Download from computer
In addition to existing songs, you can add a new track. This is done from a computer:
- on your profile page, find the “Music” section;
- click the download music button;
- click “Select file” and attach the required song;
- You need to give the melody a name and choose a cover.
Be careful: Odnoklassniki allows you to upload audio files whose size does not exceed 100 megabytes. However, most of the melodies weigh 5 - 12 megabytes, so there will be no problems. Only mp3 format is accepted.
The downloaded tunes will appear in the existing playlist, and your friends will know about it. Your actions will be reflected in the Odnoklassniki feed. You can also see what audio files your friends are uploading.
So, you have completed the task of “how to add music from a computer to Odnoklassniki.” After this, you have the opportunity to add songs to your status, to your page, or attach them to a message.
MusicSIG VK.com is a free application for downloading VK music from a browser
MusicSIG is another great application for downloading VK music via Chrome. It can be recommended as an alternative for saving songs to your phone locally if another extension or application has been “cut off” by VK owners at the service level.
The browser extension does not differ from VKD in functionality. The MusicSIG differences are only visual. In a custom VKontakte playlist, MusicSIG displays a filter of songs by bitrate, allowing you to select the quality of the composition.
Convenient browser extension MusicSIG
Unlike VKDownloader, the application downloads files simultaneously, and not one by one. In addition, MusicSIG offers options to save the playlist in M3U or text format.
In general, the MusicSIG add-on has many other options that are not related to downloading music from VK. Among them are the ability to directly follow links, remove advertising from Contact, add links to save: not only to audio, but also to video, applications. Visual modifications include changing the names of items in the VK user menu, calendar, clock and other beauties that change the functionality of VKontakte for the better.
The latest version of the MusicSIG application introduces support for the VK2.0 interface: this means that there will be no compatibility problems, and the likelihood of errors when saving audio tracks is minimal.
Program “VK Music: Download VKontakte” for Android
If you listen to music on a phone, say, running Android OS, it would be a convenient option to install an application designed to play VKontakte tracks.
Fortunately, there is such a program, and more than one. In particular, the “VK Music” program gives the user the opportunity not only to listen to their favorite songs on the social network, but also to save them for local listening on the phone. You can download the program on Google Play; the application is available only for Android. Features worth noting:
- ability to download to Android from a contact by specifying the desired audio format
- convenient and quick search through the impressive VK audio library
- online and offline listening to VK audio tracks on your phone
- The Android version of the application has a nice design.
Thus, the “VK Music” program is attractive because it allows you to download from VK for free through a convenient user interface and a number of useful options. In addition, “VK Music” for Android not only allows you to download audio from VK, but also offers itself as a convenient and functional music player (be sure to read our review).
How to use voice recorder on iPhone?
Copying voice recorder recordings from iPhone to PC is not easy - simply connecting the device to the computer with a USB cable is not enough. Fortunately, there are two ways to transfer voice recorder audio recordings. We'll talk about these methods, and also teach you how to record conversations and edit audio tracks.
A user who believes that the built-in voice recorder on an iPhone can fully replace a portable device for recording conversations is greatly mistaken. When using a voice recorder, the owner of an Apple device will encounter a number of inconveniences: firstly , the recording itself will be of rather low quality, and secondly , transferring the audio file to a PC for subsequent processing will not be easy. The low quality is explained by the fact that call recording is an additional feature for the iPhone; Difficulties with data transfer are due to the privacy policy, in which Apple firmly believes.
However, if you need to make an urgent and unplanned recording, the iPhone will help out. For this reason, it is important to know exactly where the voice recorder is located on your Apple device and how to use it.
How to add an audio recording to VKontakte
You can add an audio recording to a playlist as follows:
To do this, in the “My Audio Recordings” section, enter the name of the artist or the name of the song into the search bar. Then, after the melody is found, press plus.
As a result, you can see this track in your playlist. You can add a VKontakte video in the same way.
In order to upload an audio recording from a computer to the VKontakte website
you need to follow a few simple steps:
Just don’t forget about the rules for posting audio recordings, according to which:
- The audio recording format must be MP3;
- your audio recording should not weigh more than 200 MB;
- This audio recording must not violate copyright.
Having completed all these steps and following the rules, you will be able to manipulate the track and transfer the VKontakte audio recording to your friends.
A VKontakte user can also hide an audio recording from other visitors.
To be able to download music from VKontakte to your own computer, you should install a certain plugin in your browser that will help with downloading.
How to send a voice recorder recording to VKontakte from your phone
Quite recently, the need arose to upload a recording from a voice recorder on VKontakte; after rummaging a little on the Internet, I did not find a single piece of practical advice.
One of the proposed methods was this: send the recording from your phone to the cloud, from the cloud to your computer, reformat the audio to mp3, and only then add it to VKontakte, in my opinion, a too labor-intensive process.
The task was to download the track directly from the phone, bypassing the computer. And I independently found the best option, it is as follows.
Since you can only add audio recordings to VK in the full version from a computer, we will first move from the mobile version of VKontakte to the full version, and from there we will add a recording from a voice recorder, this is done quite simply, so don’t be alarmed.
This recording must be in mp3 format; on my xiaomi phone, the voice recorder records in mp3.
If the recording format on your device is different, download any free mp3 recorder from the Play Market. Also, you need to know the path to the file; if everything is ready, it’s time to start.
Step-by-step instruction
1. Open the mobile version of VK in any browser on your phone (do not confuse it with the application), then go to the menu.
2. At the bottom of the menu, there is a link, “Computer version”, click on it.
3. In the window that opens, select the same browser from which you entered the mobile version.
4. In the full version of VKontakte, we need to open the “Music” section, left column.
5. Move to the right side and click on the “Add music” icon, in the form of a cloud.
6. In the window that opens, we see two restrictions:
- The audio file must not exceed 200 megabytes, and as I said above, it must be in mp3 format.
- The audio file must not violate copyright and related rights.
Click the “Select file” button.
7. Now we need to find the file on the device; in the window that opens, click the “Explorer” button.
8. On Xiaomi the path is as follows, on other devices it may be different, “Internal storage”.
9. Next, go to the “MIUI” folder.
10. Open “sound_recorder”.
11. Select a checkbox for the previously made recording from the voice recorder, then press the “OK” button.
12. Our entry was displayed on VKontakte.
I hope this article helped you, that’s all for me, I wish you success.
Source
The second method is universal
Here's another way to add music to a contact in Android, including music for calls, SMS and alarm clocks. To do this, we need to create four folders in which our melodies, signals and ringtones will be placed.
Preparing a place to download ringtones
1) Find a standard file manager (or any file manager) in your smartphone;
2) Open the manager, select the SDCARD folder;
3) Clicking on the SDCARD folder opens a “tree” of folders with files.
4) Find the DCIM folder;
5) Create a MEDIA folder inside the DCIM folder;
6) Open the MEDIA folder, create the AUDIO folder in it;
7) Open the AUDIO folder, create four folders in it:
- ALARMS - for alarm ringtones;
- NOTIFICATIONS - for event tones and notifications: SMS, MMS, mail, etc.;
- RINGTONES - for ringtones;
- UI - for interface sounds.
 At the root of the memory card we get the following directory tree:
- Media/audio/alarms;
- Media/audio/notifications;
- Media/audio/ringtones;
- Media/audio/ui.
The place for downloading melodies, signals, ringtones has been prepared. You can start installation.
Adding music to VKontakte
So, let's get down to business and look at how you can add music to your VK playlist.
Using the application
Both in Google Play Market and AppStore there is a special application with which we get access to our favorite pages. Since this software is the same on Android and iPhone, we will show an example only for the first platform. Looking at it, fans of Apple devices will be able to do the same on their phones.
So, let’s deal with the “green robot”:
- First, launch the VKontakte application itself, press the button with the image of three stripes located in the lower right corner and select “Music” in the menu that appears.
- There are several ways to add the music we like. The first option is to use the search, the second method is to view the list of recommended ones. Let's try to find something. To do this, enter the name of the composition in the search form and confirm the entry.
- When the list of songs is displayed, we can listen to each of them by simply pressing with our finger. To add a track to your own list, select the icon with the image of three dots on the right side of the title. When the context menu appears, click on the “Add to my music” item.
- A notification will appear confirming that everything was successful and the song will appear in your playlist.
- We go back, go to the “My Music” section and see that the song we selected is present.
Accordingly, again, using those same three dots, we can delete the track.
We work with the mobile version
This option is suitable for push-button phones or touch devices that are not equipped with an operating system. After all, they cannot afford to install a special application and work with VKontakte through it. So we'll just use the mobile browser.
It works roughly like this:
- We launch any browser convenient for us and go to vk.com. When the page on the social network opens, log in using your username and password.
- Just as in the case of the application, click the icon with the image of three stripes in the lower right corner and select the “Music” item from the list.
- Using the search, we find the track we need. When the list of desired compositions appears, click the three dots opposite their names and, using the only item, add them to your playlist.
- We switch to our list and see that the track has been added successfully.
Step-by-step instructions for folding
- Go to the official VKontakte website and find the “Music” section.
- Sound recording. There are several recording options: through a computer and a phone voice recorder (on an iPhone, like on any other phone, the voice recorder is equally functional).
- Upload a file with audio recording. This can be done via a USB cable, Bluetooth or Wi-Fi. The transferred audio file must have the extension .mp3. Although the voice recorder is almost the same for all phones, on some devices audio can be recorded in a different format.
- In the “Music” section, find the download button in the form of a cloud in the right corner.
- Go to the dialog window and attach the required recording as music.
List of hidden Force Touch features in Apple Watch that you might not know about
The Force Touch function is in use.
How to quickly calculate the total bill for all guests and determine tips on Apple Watch
Release of a new OS on Apple Watch mod.
How to enable Power Reserve mode on Apple Watch
The Apple Watch smart watch has become excellent.
907 Theme
Lorem ipsum dolor sit amet, consectetur adipiscing elit. Donec condimentum accumsan ligula, non commodo dolor varius vitae.
Morbi dapibus neque a mauris sodales bibendum. Phasellus at ornare tellus. Suspendisse consectetur laoreet diam eleifend interdum.
Feedback form
Feedback
Latest Posts
List of hidden Force Touch features in Apple Watch that you might not know about
The Force Touch function is in use.
How to quickly calculate the total bill for all guests and determine tips on Apple Watch
Release of a new OS on Apple Watch mod.
How to enable Power Reserve mode on Apple Watch
The Apple Watch smart watch has become excellent.
Recent Portfolio
No Posts To Display
Contact Info
Lorem ipsum dolor sit amet, consectetur adipiscing elit. Donec condimentum accumsan ligula, non commodo dolor varius vitae.
How to upload music to contact
If you want to upload, for example, your own song or audio recording, then this will not be difficult either. To do this, also click on the “Audio Recordings” tab. The entire list of audio recordings will be displayed there. Now to your right there will be a tab with the word “Audio recording” and next to it a plus sign, click on this plus sign, after a few seconds a window will appear for adding an audio recording from your computer and a panel with the words “Select file”. You click on it again and select the desired audio from your computer. Only it should not exceed twenty megabytes.
That's all, you've learned how to quickly find or upload the desired audio recording to your VKontakte page! It is worth noting that you have the opportunity not only to upload your own audio recordings, but also to download already uploaded ones. This is done by downloading an additional program. This program will not take up much space on your hard drive and will provide the opportunity to unlimitedly download your favorite music.
Each user of the VKontakte social network can easily upload any audio recording to it from a computer or phone, as well as send the composition they like to a friend or add this song or melody to their group, and when this music is no longer relevant, delete it. But now we will only talk about how to add and download audio recordings.
How to transfer a recording from a voice recorder using iTunes
In order to transfer an audio recording using iTunes, you need to connect the device to your computer using a standard USB cable. After this, we will be able to transfer not only recordings from the voice recorder, but also other files to our PC.
To do this:
- Insert the USB cable with one end into the corresponding port of the PC, and the other into our iPhone;
- Wait until the operating system installs the necessary driver and detects the device;
- Launch iTunes;
- Go to the “Music” tab;
- In the next window, check the box “Enable voice recordings”;
- Go back to the previous window by clicking “Browse” and click the “Synchronize” button at the bottom;
- Next, click “Playlists”;
- In the next window, select “Voice recordings” on the left in the block;
- Select any entry here and right-click on it, then click “Open in Windows Explorer.”
Now your entries will be synced and all will appear in one place. If you are not familiar with the file system of your computer, then write down the path to the voice recordings so that you can easily and quickly find them next time.
VKD is a convenient way to download music from VK to your phone
The VKD extension for Chrome comes to hand when it comes to working VK audio downloader. By installing the program, you get a convenient browser add-on.
To save music from a contact to your phone:
VK playlist with VKD button
- Activate VKD in the list of browser extensions.
- In the application settings, you can pre-specify the folder for saving and disable information labels.
- Go to a playlist or hover over an individual song.
- When you hover over a song, the bitrate and resulting file size are displayed next to its duration.
- You can download tracks by clicking on the icon.
- Songs are distributed into a special playlist.
Attention! Sometimes VKD, like other extensions, does not work: a red dot is displayed next to the download icon. This means that VKontakte has limited access to audio tracks, and instead of songs, a stub is loaded
In this case, we advise you to wait or use other applications from our review.
Changing the voice recorder recording format
The first way to upload a dictation to VK is to change the file format. After the change, you will be able to accomplish your plans. You can use the online converter https://online-audio-converter.com/ru/.
You can change the file to be sent via a browser on your mobile phone:
- Open the converter using the link;
Click on the “Download” button, after which the file can be found in the “Downloads” or “Download” folder. Next, you need to open your music on VKontakte and click on the “Upload audio file” button.
Select a file in your phone's memory (in the Downloads folder), and the file will begin downloading immediately. Once it appears in your files, you can attach it to messages or send it from a list. This file will also be available to other VK users. After sending it, you can delete it, refresh the page and if no one has added it to your list, it will be deleted forever.
How to upload an audio recording to VK
- Again, everything is extremely easy here, you only need to perform a few simple steps:
- Go to your VKontakte page;
- Now go to the My audio recordings tab, there, on the upper right side you will see a sign where the first line has the same name My audio recordings and it has a + sign at the end.
- Click this plus, then select the song you want to download and it will immediately be sent to your contact.
How can I independently add my own entry to VKontakte from my computer and how can I post it on the wall or give it to another user?
The solution to these issues will be discussed in this article.
It is no secret to any user of the VKontakte network that we can exchange audio recordings and other files with other users. It is possible to find almost all existing tracks and easily add them to your playlist.
How to delete a recording from a voice recorder on VK, instructions
Contents of the article (navigation)
So, for some reason you needed to send someone a recording from a voice recorder in a private message, and for some reason you are not able to record a voice message? This instruction is for you:
- First of all, go to the VKontakte website https://vk.com
- Next, go to the “My Audio” or “Music” section.
- The next step is to record audio from the recorder. In order for you to have something to upload, you first need to write it down. For this you can use:
- Record directly from your computer. To do this, you will need special sound recording equipment (microphone), as well as some program that allows you to edit sound. After recording, you must save the result in .MP3 format
- Recording from a phone. To do this, you can use the voice recorder built into the operating system, and then transfer the sound file via USB/Bluetooth/WI-FI. Finally, make sure that the transferred file has a .MP3 extension, as some devices record audio in other formats.
- Then you need to upload the audio recording to the site itself, use the “music” section, where in the right corner find the corresponding button.
- Once again, make sure it is in .MP3 format
- Next, go to the required dialogue and simply attach your recording as music.
Conclusion
It is also worth noting that you can edit the title and description of the downloaded file; to do this, simply click on the pencil icon located to the right of the title of the audio recording. To make it appear, you just need to hover your mouse over the audio.
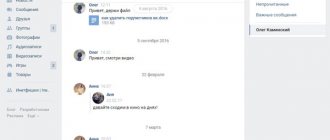
How to send an audio recording to VKontakte
Find audio recordings of famous artists and share with friends. When searching for an audio recording on VKontakte, the melody you uploaded is highlighted by your last name.
Articles and Lifehacks
Many users are interested in how to insert music into a message
. Today the easiest way to do this is to use social networks.
For example, the most popular resource among domestic users is the VKontakte resource. Every day we send many messages to other registered users, attaching photos, music or videos to them.
Inserting music into a VKontakte message
Even if we are surfing the VKontakte network from a mobile device, attaching an audio file to a message will not be difficult.
First, we need to make sure that the person to whom we want to send the music is also registered on the social network. We find the right user and see if we have the opportunity to write and send him a message. It happens that some people set sending restrictions, and only certain people can write to them. If necessary, add this person as a friend.
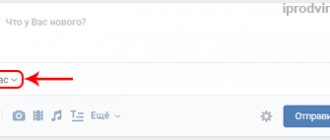
Select the option to send a message. While on a desktop computer there is a button at the bottom of the message window that says “Attach,” on a mobile device it usually appears as a paperclip. We choose to attach an audio recording, register the desired track (or add music from our own tracklist) and send it.
If the attached song was taken from our list of audio recordings, it is recommended that you do not delete it under any circumstances, as another user will not be able to listen to it.
In addition, during a general search, we can only enter the name of the artist or group. By clicking on it we can view a list of all available songs. We also have the right to add an audio recording from a computer, and this is not necessary at all.
Other ways to insert music into messages
Please note that if we want to send not just one song, but an entire album, it is best to first add it to the archive, thereby compressing the information and making subsequent sending easier. In addition, there is also a paid MMS messaging service that allows you to send an image, music or video to another subscriber
However, due to the increased popularity of social networks and the advent of unlimited Internet, this method has lost its former relevance
In addition, there is also a paid MMS messaging service that allows you to send pictures, music or videos to another subscriber. However, due to the increased popularity of social networks and the advent of unlimited Internet, this method has lost its former relevance.
“How to add an audio recording to VK” is a popular request among users of the largest social network, which includes an expanded music database. The development team is releasing modern updates for this section. The modern interface allows you to get a list of recommended or similar songs to your playlist in just a few clicks.
In this material we will look at:
- how to add a track to your playlist;
- how to download music from a computer and smartphone;
- copyright issue and its solution.
The WEB interface offers its users maximum functionality when working with a contact. If you want to add a song you like to your personal list, doing so is quite simple:
You can also create many playlists and make them available to other users of the social network. This way you can group different compositions, and even publish full-fledged albums, after selecting a graphic cover and specifying a text description.
Each user can independently upload a music file from their computer. For this:
- Go to the "Music" section.
- Click on the "Clouds with an arrow" icon located in the upper right corner.
- Select the desired file to download.
- Download it after specifying the name and other parameters.
However, there are some restrictions:
- Only mp3 format is supported for downloading;
- although the duration of the composition is not limited, its size cannot exceed 200 MB;
- No copyright infringement allowed. We will consider this issue separately.
The downloaded song becomes available for listening. Personalization settings allow you to limit access to your music to third parties.
How to send audio as a voice message
Okay, but is it possible to send a voice message on VKontakte as an attached audio recording? Yes, this is quite possible. There is no voice recorder in the VKontakte web interface, the social network no longer supports flash applications, but nothing prevents you from using any third-party web service for recording voice messages, for example, the online “Sound Recording” application, available at the link online-voice-recorder .com/ru. If you need to send audio from a smartphone, then everything is even simpler, since a built-in voice recorder is included in the firmware of most modern mobile gadgets.
You can do without third-party tools, but you will have to tinker a little. We will follow this algorithm:
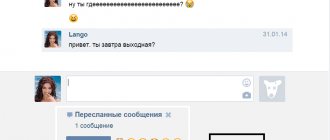
- Send a voice message to yourself.
- Download it in MP3 format to your computer.
- Upload the file to your media library.
- Send an audio file as an audio message to another user.
How to record a voice message in VK and save it to your media library? Very simple. There is such an undocumented trick on the social network - sending messages to yourself. Go to the page of any of your friends, open the list of his friends, find yourself in the list and click the “Write a message” link. Then everything is as usual: go to the dialogue, press the microphone button, read the voice message and send it to yourself. Now the message file needs to be extracted. Right-click on the message and select the “View page code” option.
Using the page search (F3), look for a tag with the data-mp3 , it will contain a direct link to the MP3 file of the message.
Follow this link in your browser, click on the ellipsis button on the player panel and click the “Download” button that appears, and then upload the file to your library, giving it a suitable name.
Now it will be easy for you to send audio as a voice message on VK to any user by attaching it using the appropriate option.
We solve possible problems
Anyone who has used this service at least once in their life may have noticed that it does not always work correctly. Let's look at the most popular problems.
Doesn't load music from computer. This is a general problem, and we need to figure out what’s going on more specifically:
● Internet connection lost. In principle, this can happen both on your side and on VK servers. After all, VKontakte is not Google; they have fewer servers and are less powerful. Therefore, glitches and freezes with VK are observed much more often.
● You have a slow computer. Many models of computers and laptops slow down when they try to upload music to VK. This is affected by a small amount of RAM or a weak processor. Of course, this manipulation is not the most difficult, but if Microsoft Word takes you a minute or more to open, and Photoshop refuses to start at all, perhaps this is a sign that you need to quickly update your hardware.
● The audio file has the wrong resolution. In principle, there are no wrong resolutions, but it is best to upload files in .mp3 format. It is officially recognized that although this is not the best format for preserving quality, most files have exactly this ending.
● Or maybe your file is large? Many recorders, such as the Zoom H1, record the audio stream in .wav format. Ten minutes of such a recording - and you simply won’t be able to upload it to VK because the file size is exceeded. And if you use a special Android application that you installed in 2021 to record audio in higher quality, then most files may exceed the allowable size.
Remember, VK is not a file hosting service; this social network has limitations. And they are not connected with the whim or demands of copyright holders (more on that later), but with the limitations of servers.
Separately, you should be aware of problems with downloading audio files when a notification appears that the composition is protected by copyright. In this case, of course, you must reconsider your desire and answer the question, why are you doing this at all? Please understand that if you upload something online, you are responsible for it.
It's one thing to write a message, but quite another to upload digital information and make it publicly available. Yes, VKontakte has long been considered a hotbed of pirated information, because here you can find music, films, and books, but the administration is still vigilant about preserving copyrights.
There are technologies for uniqueizing an audio track; you can do this from an iPhone using a special application, but I won’t teach you this, because I think it’s wrong. Well, in fact, if we download from torrents, this is one thing, but if we download ourselves and contribute to piracy, it is completely different.
Another problem arises when you upload a video in which a famous song or tune is playing in the background. In this case, a copyright infringement notice may also arise. It's a shame, but what can you do? You may not distribute files that are not your property, even if 99% of the information in them was created by you personally.
Adding music to a VK group
You can add audio recordings in several ways in two different variations of the VKontakte social network site, regardless of the type of public. The adding procedure itself is almost identical to the same process on a personal page. Moreover, the group fully implements the ability to create playlists with music sorting.
Method 1: Website
In order to start adding audio recordings to public VKontakte, you will first need to activate the corresponding section through the settings. The procedure is completely identical for both the “Group” and the “Public Page”.
- Open your community and through the menu on the right side of the window, go to the “Management” section.
Here you need to switch to the “Sections” tab and find the “Audio recordings” item.
In the indicated line, click on the adjacent link and select one of the options offered:
- “Open” - any users will be able to add music;
- “Restricted” - only managers can add compositions;
- “Disabled” - the block with music will be deleted along with the ability to add new audio recordings.
If your community is of the “Public Page” type, it will be enough to check the box.
Now return to the group's home page to begin downloading.
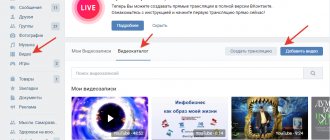
Option 1: Download
Option 2: Add
We hope our instructions helped you with adding audio files to the VKontakte public page.
Method 2: Mobile application
Unlike the full version of the VK website, the mobile application does not have the ability to add music to communities directly. Because of this aspect, in this section of the article we will carry out the download procedure not only through the official application, but also through Kate Mobile for Android. In this case, one way or another, you will first need to include the corresponding section.
- While on the main page of the public, click on the gear icon in the upper right corner.
From the list that opens, select “Sections”.
Next to the “Audio recordings” line, set the slider to enable mode.
For the group, you can choose one of three options, similar to the website.
After this, the “Music” block will appear on the main page.
Option 1: Official app
- In this case, you can add a composition only from your audio recordings to the community wall. To do this, open the “Music” section through the main menu.
Next to the desired song, click on the icon with three dots.
Here, select the arrow button on the right side of the screen.
In the lower area, click on the “On the Community Page” button.
Mark the desired public, write a comment if you wish and click “Submit”.
You will learn about successful addition when you visit the group page, where the post with the audio recording will be located in the feed. The only inconvenient aspect is the lack of an added composition in the music section.
Option 2: Kate Mobile
- After installing and launching the application, open your community through the “Groups” section. Here you need to use the “Audio” button.
On the top control panel, click on the three dots icon.
From the list, select “Add audio recording”.
Choose from one of two options:
- “Select from list” - music will be added from your page;
“Select from search” - a composition can be added from the general VK database.
Subsequently, you need to check the boxes next to the selected music and click “Attach”.
If the transfer is successful, the compositions will immediately appear in the music section in the community.
This option is the most optimal for mobile devices, since Kate Mobile supports adding songs from search, which the official application cannot do. This feature greatly simplifies access to files.
How to save a voice recording from iPhone to computer
Long audio recordings do not fit into email attachments. I will show you two ways to send a long audio recording from an iPhone to a computer.
For example, you recorded a long interview or speech of 50 minutes or more on an iPhone voice recorder and now want to transfer this recording to your computer to edit a video.
To do this, click on the “send” icon at the bottom left.
And choose one of the proposed options. For example, send by e-mail.
But the error message is that the attachment size is greater than 25 MB. Unable to attach attachment.
It will also not be possible to send via imessage, since “The attachment is too long. Would you like to select a smaller clip of this attachment to send?" imessage also has a limit on the maximum size of a sent file.
It will also not be possible to send via iCloud email due to the error “The message size is 36.2 MB, which exceeds 27.0 MB, the maximum size allowed by the server.
And then the error “Preparation failed” may appear. The recording is currently being optimized for sending. And no matter how much you wait, it will continue to be optimized.
Using audio editing.
The first method is audio trimming. So, to reduce the size of an audio recording on an iPhone made using the voice recorder application, click “edit”.
Then click on the crop icon at the bottom right.
You will now enter file trimming mode. Drag the right bounding line further to the left to trim the end of the recording (don't worry, nothing will be deleted).
I made 39 minutes out of 57 minutes, cutting off almost 20 minutes from the end. Now click "Crop".
There will be options:
- Crop original
- Save as new entry
- Cancel
Select Save as new entry.
A new audio file will be created with the same name, but with an addition (copy). This way we created a copy of the file with the ending cut off. On iOS 10, this problem should no longer occur, although anything can happen.
Now all that remains is to do the same thing, but only cut off the beginning of the file and the end of the file. And from one large file we will receive two medium ones, which can be sent to a computer or anywhere.
Using iTunes.
Connect your iPhone to your computer, open iTunes and click on the iPhone icon that appears.
Now click on the “Music” tab and check the “Sync music” checkbox, and also check the “include voice recordings in synchronization” checkboxes.
Synchronize your iPhone with your computer by clicking “Sync” at the bottom in iTunes.
Wait for the synchronization to complete. Now all your voice recordings have been transferred to your iTunes library. Click on the Music icon in iTunes to open your music library.
Find here the file name you named your audio recording.
Right-click on it and select “Copy”.
Now you can paste this entry into any folder on your computer. To do this, right-click on an empty space and select “Paste.”
The audio recording from your iTunes library will be transferred to your disk. Only it will not save the name, the audio recording will be renamed. Also, for the security of your Apple ID account, I recommend installing Two-Step Apple ID Verification.
The audio recording format will be .m4a, to convert .m4a to .mp3 or any other format, you can watch the video tutorial. It shows how to convert from .flca format to .mp3, but also instead of .flac you can do it with .m4a format.
Other articles on this iOS topic:
smotrisoft.ru
Conclusions?
Want an honest opinion? I don’t think that VK Audio Recordings are not the best way to distribute music. Yes, it’s convenient to add a file to a message and send it to another participant; you can, for example, add it like in a telegram to save it in history, but these are not the most important points.
What do you need? So that you can quickly switch between files. And if you use a powerful computer, or access it from your phone through an application, you may have noticed that playback slows down a little. For example, I have to wait a few seconds before the track starts playing.
This is annoying, because we, a generation that is spoiled by YouTube, are not used to waiting, even for such a little time.
Therefore, when it comes to listening to music, I prefer YouTube. It's much more familiar to me and easier to use. And if you are a professional musician, then it is better to upload your tracks to Soundcloud or another similar service. There you can do everything beautifully, with a cover and a detailed description.
Subscribe to my blog updates and share the link with your friends.
Bye!