You and I have already talked more than once about the topic of dialogues in VK. Here are the instructions: how to send a message to all VKontakte friends, how to make a VKontakte message unread.
Let's continue. Now I will show you how to send photos and videos in a VKontakte message . This will be useful to you if you need to send a cool photo to a friend (see how to add a photo to a contact from your phone) or an interesting video (see how to upload a video to VKontakte).
Forward message to wall
In order for the message you want to forward to get on the wall, you need to take the following steps (read about how to repost to the wall here):
- Go to the Messages section.
- Click on the correspondence where the desired entry is supposed to be.
- Click on the desired message.
- There will be a “Forward” button in the upper right corner. Click on it.
- The Dialogues section will open. Select any correspondence.
- Next to the Send button that appears, there will be an “Attach” button. Click on it once.
How to insert a picture into the description of a VKontakte group
p, blockquote 15,0,0,0,0 —>
p, blockquote 16,0,0,0,0 —>
We refresh the page and see the image in the community description:
p, blockquote 17,0,0,0,0 —>
You can unpin or edit a post at any time.
p, blockquote 18,0,0,0,0 —>
Exchange pictures on VKontakte and cheer each other up.
And so, let's imagine a situation that you are corresponding with someone on the VKontakte social network and suddenly you need to send some picture from your computer or a picture from the Internet. We will discuss how this is all quickly done in this article.
How to insert a picture in VKontakte
- Via attachment from a computer;
- By dragging an image from your computer;
- By copying the URL of an image on the Internet;
p, blockquote 6,0,0,0,0 —>
Next, “Upload a photo” from your computer and send.
p, blockquote 7,0,0,0,0 —>
p, blockquote 9,1,0,0,0 —>
We wait a couple of seconds for the image to load and send it.
p, blockquote 10,0,0,0,0 —>
- If desired, you can indicate the location of the photo in VKontakte;
p, blockquote 11,0,0,0,0 —>
p, blockquote 12,0,0,0,0 —>
p, blockquote 13,0,0,0,0 —>
Now choose any of these methods and send the picture to the wall, in a message
or
in a comment.
p, blockquote 14,0,0,1,0 —>
Why are photos not being sent?
If, when uploading a photo to the VK website or simply dragging it from a folder, page, or desktop, an error message appears, the reasons may be as follows.
- Incorrect aspect ratio. The picture is too wide or long. In this case, you can crop the photo in any available editor on your computer or smartphone.
- Unsupported format. You need JPEG, PNG, or an animated GIF image. Select these types of files to send. If the image you want to send is saved in a rare, unsupported format, you can use an image converter to quickly change the file format. For example, the free service online-convert.com will do this in a matter of seconds.
- The file size is too large. Files larger than 10 MB are not accepted. This problem can also be solved using an online converter or special image compression utilities, such as Image Resizer.
- The mobile application does not have access to the phone's camera or gallery content. These functions are enabled in application settings, as well as in the menu of the smartphone operating system itself.
- There is no Internet access or the connection speed is too slow to send images. Check your computer's network connection. When using a smartphone, make sure that you are using fast mobile Internet (4G, Wi-Fi, LTE), and not a GSM or 3G network, the speed of which will not be enough to download high-quality images.
These simple steps will help solve the problem, and you can send the photo to your wall, to a group, or in a private message.
Insertion options
First you need to understand what methods you can use to add photos. There are 3 options for inserting a picture: attaching a file from your PC, dragging a photo from Windows Explorer, and by copying the URL link of the picture on the Internet. Let's consider these options in more detail.
Method 1: Download from computer
To attach a picture from a PC, you will need to perform several simple operations.
- In the place where you want to insert a photo, you need to hover over the paperclip icon and select “Photo”.
- Next, click “Upload photo”.
- Select the required file, and after downloading is complete, send it by clicking on the appropriate button.
Using the same method, you can add music or video to VKontakte.
Method 2: Drag and Drop a File
It is possible to drag and drop a photo from your PC and then insert it into the desired location.
- To do this, you need to grab a photo from the folder with your mouse and drag it into the browser window.
- After this, we wait for the download to complete and send the image.
Method 3: Download from link
The third method will allow you to insert almost any image you find on the Internet.
- Find the picture you want to send to VKontakte and right-click on it.
- Next, select “Copy image URL”.
- Paste the copied address into the text field and send the message.
Using the methods described above, you can insert pictures almost anywhere where it is possible to write text. Choose the method you like and share your photos.
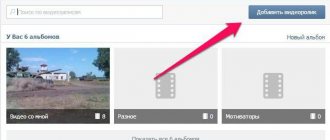
We create and design an album in VKontakte
- On the left side of your page, click on the “My Photos” button. Now pay attention to the upper right corner of the screen. Under the “Exit” button there is a “Create Album” command. Click on it, enter a name, description (optional, but recommended). Click the “Create” button.
- Proceed to upload photos. Each can be placed in an album by clicking on the camera icon in the interface that opens. Upload photos from your computer in the same way as on an avatar, select the address, and click on the “Save” button. If desired, add a description and click “Save”.
- To add photos to an already created album, go to the “My Photos” menu from the main page of your account. Select the album you are interested in there. At the bottom of the page with the preview pictures that open, you will see a camera icon. Click on it and upload the photo.
Keep in mind that when you add a photo not to an album, but when you click on the “Add new photos” button, the image will appear on your wall, but will not be saved in albums.