Restoring VKontakte materials immediately after deletion
The service developers understand that users can accidentally delete posts from the wall or other materials, so they leave the option of instant recovery. Here we'll look at how to do this on desktop and mobile devices.
Full computer version of the site
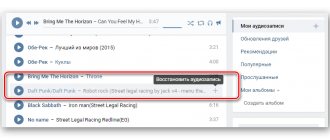
If the user clicked on “Delete” in the options menu of their wall post, they can immediately click on the “Restore” button. After this, the deleted post will return to the wall with all the materials that were published in this post.
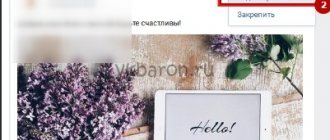
Using the example with a photo, this works as follows: after clicking on the “Delete” button, a special “Restore” button appears, after clicking on which the photo is returned back to the user’s page or community.
Mobile version of the site
In the official application for phones, materials cannot be restored in this way, but this possibility remains for the m.vk.com website, which is specially optimized for mobile browsers. So, for example, after deleting a post from the wall, the “Restore” button appears, after clicking on which the post will be returned back.
After deleting a photo, the same button immediately appears, which you just need to click to restore the image.
How to postpone recording in VK from your phone
Because the creators of VK allow administrators to run groups not only from a PC, but also to work just as successfully from a phone. There is even a special application for iOS and Android (See).
The “delayed publication in VK” function works for them as fully as the others. In order to make a delayed post from your phone, you also need to go to the “timer” section and set the required time for publication.
Many users have a lot of useful and interesting information stored on their VKontakte wall: photographs, music, memorable messages. But this is an unreliable storage, because any records can be accidentally erased. It is especially offensive if the information presented in the post was unique, that is, you will not be able to repost or post it again. There is no need to get upset ahead of time: deleted data can be returned if you know how to act in this situation.
How to return a deleted VKontakte post if the restore button is missing?
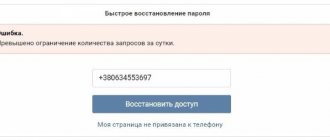
Often VK users are faced with a situation where they need to restore a post that cannot be restored instantly using the method described above. It is important to understand here that even after such deletion, the post still “lives” for five hours, during which it can be returned. You can restore a post on a user’s wall or in a community. At the same time, only the account that posted this post on its wall, or the community administrator, can use this method.
For this method, you will also need to find out the ID of the user who posted this post on the wall, or the ID of the community. You will also need to know the post number. To do this, you can click on the time at which the entry was published.
Here you need to pay attention to the numbers that come after the word wall in the address bar. In our case, the first large number before the underscore is the user ID, and the second number “72” is the post number.
Note!
Since the post number may be unknown after deletion, you can find it out in another way: simply by looking at the number of the previous post and adding 1 to it. If the last post on the wall has comments, they should be added to the number of this post to calculate the number of the deleted post.
Next, follow this link to get to a page with a special command that can return deleted records. Here at the bottom of the page in the “Example request” section you need to insert the page or community ID (before the community identification number you should put a “-“ sign) in the “owner_id” field, and also in the “post_id” field you should indicate the number of the deleted post. In the “version” item you should leave the default “5.92”. After this, you need to click on “Run” to restore the deleted post. If the command is executed successfully, the following message will appear in the corresponding field: “{“response”: 1}”.
About managing discussions
Sometimes there is a need for quick removal by discussions. And then the question arises of how to do this. If you want to “cover” all the created topics at once, then it is better to implement the idea through the same community settings. You just need to select the “Close” option in the “Discussions” section and save. Now you know how to delete a discussion in a VKontakte group in a radical way. But loyal and reliable.
However, quite often you only need to delete one topic. Or several. To do this, go to the section of all published discussions, and then look for the “delete” button there. Click on the one that is located near your post. And all problems are solved.
Only many users very often look for different programs for VKontakte. As already mentioned, it is better not to resort to their help. After all, they often hide the most common virus that hacks user accounts. And then it will be very difficult to regain your community and profile. Thus, it is better to practice standard methods of solving the problem several times and hone your skills, rather than then suffer and be tormented by the issue of regaining access to your own profile.
Hello, friends! I think you have noticed that in various groups or public pages, administrators or subscribers create discussions in which other people then take part. So, if you also have your own community, or maybe you were chosen as a group administrator, then you should learn more about them. After all, they help attract new subscribers: people share their experiences, ask questions, etc., and increase user activity.
In this article we will look at how to create new discussions in your group, pin one of them to the top of the list, edit the title or the text itself, close or delete those that are no longer relevant.
If you sell any product or provide various services, then it will help to attract new customers. You can read the detailed article by following the link.
Recovery via technical support
If the above method does not help, the user can contact the site's technical support. To do this, you need to follow this link, after which you should describe your problem in detail, describing which materials were deleted and when. Also here you need to indicate a link to the page from which the materials were removed (this can be a user profile or a community page). This request should be sent to the user who downloaded and deleted the materials.
Important!
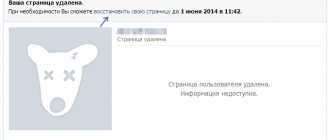
Technical support specialists cannot always help with these problems. It is also worth considering that they only have a few hours before the files are completely deleted from the site’s servers.
How to create a discussion in your VKontakte group
When you have just created a group, and there are no materials, documents or topics in it yet, creating the first discussion falls on your shoulders, since it is you who needs to develop activity among the participants.
- Go to the group's main page. Under the block of photos there will be a small window with a link “Add discussion”. Click on it.
Fill all necessary fields:
- Create a title that captures the main idea of your discussion. Enter text below it, it will become the first message in the topic. Try to describe in your message the purpose of creating this topic, give an example, and set the general tone of the discussion.
In the lower left corner of text editing there are icons for various options. You can add the following materials to your message:
- Survey for participants.
- Image, photograph.
- Video file.
- Music. Up to ten audio recordings.
- Documentation.
If you check the “On behalf of the community” checkbox, then participants will see this discussion with the group name, not yours. Once you are done with the design, click “Create Theme”.
- This is what your topic will look like after publication. Any participant will be able to tag you in it or write their own message. You can make this topic completely private, that is, closed for commenting, or allow all users to participate in it.
- A discussion block will now be displayed under the group header.
How to create a discussion in someone else's VKontakte group
When you enter an existing VK group, first of all, make sure that the privacy settings of this group or community allow users to create new topics. Most often, this option is not available, as it spoils the overall appearance of the page and leaves a lot of spam.
- Click on the “Discussions” section.
- In the upper right corner, select the “Create topic” button. Fill out the form as you did in the previous two steps, and you will be able to communicate with a large number of people, exchange information, and also follow current news within a small community of people.
Now you know how to create discussions in groups, communities and public pages of the VKontakte social network.
Discussions in VKontakte groups are one of the most successful and effective ways to communicate with your audience. With their help, you can not only share information, but also receive feedback, reviews, answer subscribers’ questions and much more. Today we will look at how to create a VKontakte discussion in a group, what it will give and how to use it.
Discussions are one of the community sections. It can be either on or off. And depending on the type of community (group or public page), it has certain features.
The main purpose of discussions is interaction with the public (whether it is simple communication or publishing news). One way or another, they are created for the participants.
Add a discussion from your computer
Let's find out how to add categories for communication from a computer or laptop.
Adding to public
Let's go to the public. Under the avatar we find an icon with three dots - this is a menu of available actions. Click.
Select the first action – “Community Management”.
In the menu that opens, find the “Sections” block.
Check to see if the “Discussions” section is checked. If necessary, install it and save the changes by clicking “Save”.
Below is the “Main Block” function – here you can choose what type of content the emphasis will be on.
If you select discussions as the main block, they will be displayed either under the public header or after the products (if there are any). It will look like the screenshot below.
By default, the section is on the right, under albums and videos.
If no discussion has been published before, then the section will be displayed exactly like this - a link, by clicking on which you can publish the first topic in the public.
Click on the “Add discussion” link. We find ourselves in a standard template, where you need to enter the title and text of the first comment (without it you won’t be able to publish it).
The functionality is standard, as for any public message on the wall in VK: you can attach a photo, video, audio, statistics or survey. If you check the “On behalf of the community” checkbox, the new publication will be on behalf of the public.
If there is already at least one category in the community, then by going to the exchange of opinions section, we will see a list of published topics. The creator's name, number of posts, and date are also displayed.