The social network VKontakte today has a multimillion-dollar audience. Naturally, among the mass of users we can find an ordinary reader, a businessman, a large company that offers its goods and services, representatives of small businesses, and so on. By promoting our company on this platform, we strive to:
- to increase brand awareness,
- to sales growth,
- to increase the number of subscribers,
- to strengthen the image.
However, one should take into account the fact that VKontakte is a visual social network. Users first of all pay attention to pictures, photos, and then to the text. Therefore, it is necessary to remember one old truth - you are greeted by your clothes, but you are seen off by your mind. So, in order for you to be greeted as expected, we suggest getting acquainted with a convenient service for working on visual content - the online graphic editor CANVA.
In this article, we will step by step analyze the entire process of functioning of the service and create a cover for the VKontakte group.
Let's go!
Creating a workspace
First of all, we create the correct workspace. The VKontakte website is aligned in the center, there are no trailing backgrounds. Width of VKontakte 790px Length is infinite. The width is not random. VKontakte is designed for viewing from the most ancient monitors with the most ancient resolution of 800 by 600px . 10 additional pixels are margin for the browser scrollbar. In some cases, VKontakte is expanded in the Applications section. It expands due to the space between the logo and the menu, but this is not important to us. the File > New dialog box, create a working area of 800 x 600 pixels.
Interactive header
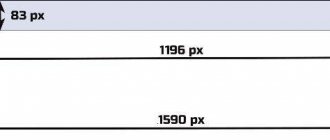
We must not forget about the header parameters - 1590×400 px. From a phone, this format will be 1196x400 px, so the main elements cannot be placed on the side.
Interactive cover – reproduction of pictures in real time.
There are many template sites on the Internet for creating interactive pictures, so creating them will not be difficult even for a beginner. You can add to the cover : changing dates, weather, some kind of countdown, etc.
But this format is not suitable for all groups. You need to study in detail the topic of the community , its content and target audience. There should be harmony and correspondence to the theme in all details.
The most popular designer for creating interactive headers is vkfiller. Let's look at the creation of this service as an example:
- Go on the website and take advantage of the free option.
- Register via VKontakte on the service.
- Explore detailed instructions to obtain an access key on the site.
- Find in sections types of dynamic covers and select a specific group. You need to click on the checkbox and create a template.
- Find the " Change Background " key. You can add a ready-made template to a blank sheet of paper, or use available website templates.
- Let's use the function "Adding a widget».
- To add text on the service, you can use integers 17 modifications. Using the settings, you can add the necessary elements.
- There is a counter at the bottom of the site refresh rate settings template. For one update they will deduct from the account about 0.002 rubles. If modifications occur every minute, in 24 hours there will be about 5 rubles. Over the course of a month, the cost will accumulate to about 140 rubles.
- Once you've finished creating the cover, you can save the .
Design creation
On the design creation page, Canva offers us ready-made templates for our cover. The required topic can be found by searching for templates. If something grabs your attention, you can stop there. If not, then use additional elements offered by the service to create your own exclusive cover. The finished template does not have to use the colors and shapes that the service offers. You can change:
- text,
- font,
- color palette,
- remove or add an element.
In our article, we will look at a couple of cover design options, and you will subsequently, using your creativity, be able to bring to life all the ideas that will help make the promoted brand unique and memorable.
For example, let’s choose a community theme – the children’s clothing store “Karapuz”.
Marking out the work area
Let's use Guides . Turn on the ruler Windows > Rulers or Ctrl+R , click on the ruler with the mouse, and without releasing the button, drag the guide to the beginning of the work area. Let's place the second guide pointwise, View > New Guides . In the window that appears, select Vertical guide and 790 px , the same width as the VKontakte site. Between these guides we will draw our VKontakte website in Photoshop.
Aligning the work area
The dimensions are fine, but the site is squeezed to one side, and on the other side it has 10px gap. Let's align the work area by adding a few pixels on both sides. Go to Image > Canvas Size . In the Anchor , point the extension to the left. Check the Relative . Then the change in the size of the area will occur relative to the sizes that already exist. In the Width area , add 10px and click OK .
Now do the same thing, but this time leave the Anchor And expand the work area by another 40px so that the site is not visually cramped.
Why do you need a script?
The script is used to receive data and display it in designated areas. That is, it downloads information from the source and transfers it to the cover, and is a connecting element.
The update frequency is adjusted based on your wishes. You can select the optimal value so that current information is displayed in the header.
Creating a dynamic cover with a script is more difficult than a regular one. Much more knowledge and specialized software will be required. Therefore, it is better to entrust this procedure to professionals. Then you can be sure of perfect functioning.
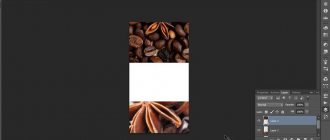
Creating a logo
More precisely, we copy the logo, because VKontakte has already kindly provided it to everyone on its special page. Download the PDF and open it in Photoshop. The first thing that will catch your eye is that the logo is disproportionately large. Of course, now we will reduce it, however, if you are already planning to reduce it using Edit > Free Transform , be prepared for the fact that its styles, designed specifically for these sizes, will remain unchanged. The end result will be unsightly.
Of course, the style settings can always be adjusted downward.
This is what I did the first time, redoing the styles by eye. But here's what I offer you. Instead of opening the styles and starting to methodically select all the parameters by eye or rasterize the graphics, losing control over the styles, just open the logo, go to Image > Image Size Scale Styles and Constrain Proportions checkboxes are selected in the menu and reduce the height logo from 600px to 40px . Not enough? Reduce it further.
Now select your logo layers and drag them into your site's workspace, and here's the fastest way to do it. Select the layers in the layers panel, click on the work area with the Move Tool and drag the layers onto the site tab.
Creating a general layout for the site
I analyzed in detail the header, menu, logo, various nuances of both. Now let's go faster, it's impossible to linger on each inscription. VKontakte is a very simple site in terms of design, simple and pleasing to the eye. Its main advantage is that Vkontakte uses template repeating blocks with various information. Block for Participants, block for the wall, block for links, block for notes. The design of all blocks is the same, but the blocks do not flicker, do not overlap each other, do not discord, are very easily distinguishable and do not get lost in the total mass. At first glance at the site it is very easy to understand where and what. Here is the general menu on top, here is the personal menu on the side. Here is the avatar and my information, here is the wall, and here are all sorts of features. In this part of the article we will mark the layout.
You probably noticed that VKontakte divides areas 1px stripes of graphics. They are barely noticeable, but still distinguishable. To draw them, we will not use the vector version of Line Tools and here's why. Vector tools work outside of the pixel grid. A vector line can sit exactly on a pixel, to the left of the pixel, to the right, Photoshop will have to display this graphically somehow. We remember that Photoshop is a raster program and Photoshop displays all graphics in Raster. This is not bad, because browsers also render sites in a raster. The problem with the Line Tool is simple, it doesn't have Snap to Pixels. Therefore, you can draw an even strip that will not interfere with a single pixel only by accident or in the Fill Pixels the Anti-Alias setting disabled , more about which you can read in my article All about the Shape Layers, Path and Fill Pixels modes.
No problem, draw stripes in a raster by creating an empty layer in advance. But that's why I still choose Vector in Photoshop. Fill-based vector objects are much easier to recolor. In raster images, you need to use selections and Edit > Fill , or constantly go into the Color Overlay . Vector objects are more flexible and visible in the Layers panel, and are easy to modify and stretch. Raster ones are constantly blurry, or they need to be redrawn. The choice is yours, but I prefer maximum control over the layout.
I'll select the Rectangle Tool and draw all the layout objects, places for avatars, dividing stripes, dividing blocks. The result will be an empty site with objects on which I will apply styles. Of course, let's not forget about the famous Snap to Pixels
In truth, this is the first stage with which this lesson should begin. And we would definitely start with it if we were creating our own website from scratch. In our case, the layout already existed, we just redrew it.
How to create a VK cover in Canva
To register for the service,
To make a cover, go to the main page of the service: canva.com and activate the 30-day free period (later you can cancel your subscription and use the service for free). You can use your Google account or Facebook profile to log in.
Step 1.
Once you're logged into Canva, start creating your cover. This can be done in two ways - manually, indicating the size of the “cap”. When you click the “Create VK Group Cover” button, Canva will open a new template with recommended dimensions—1590x400 pixels—and layout options.
Step 2.
If you don't know what to put on your cover, experiment with free layouts. Try out cover options, try changing the background color, position of inscriptions, frames and logos.
Step 3.
To change the cover background, upload your image to the editor by clicking on the “Downloads” icon and clicking on the “Upload your own images” button.
After uploading the image to the service, click on the picture. It will “fall” on top of the design. To make it the background, hold down the left mouse button and drag the image down. If you are not happy with the visible area on the cover, double-click on the background and move the image the way you want. Click the checkmark at the top to save your changes.
Step 4.
To add text to the cover, click on the “Text” icon and familiarize yourself with the types of inscriptions and fonts.
For any inscription you can define the font, size, color, letter and line spacing. Don't be afraid to experiment - all changes can be easily removed with the Ctrl+Z keyboard shortcut.
Step 5.
When the cover is ready, save the image by clicking on the “Download” button at the top of the menu.
The service will offer to choose a format - PNG, JPG and PDF (standard and for printing). For VKontakte it is better to use the first two formats.
All you have to do is click on the “Download” button, and in a few seconds the finished cover will be on your computer.
How to add and set a cover to a VKontakte group
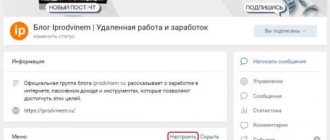
To upload a cover to the community, click on “Manage” and go to settings.
Scroll to the "Community Cover" section and click on "Download."
VKontakte will prompt you to select a file on your computer and upload it. After selecting and loading a cover, you do not need to save changes - this happens automatically.
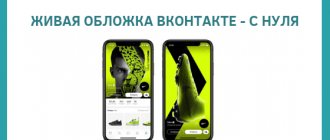
Not long ago, representatives of VKontakte announced another bright way to design communities - live covers. They will likely replace conventional static design over time. Live covers are a collage of changing images (up to 5 pieces) or short videos. They are displayed in mobile applications for iOS and Android.
Now only verified communities that were able to receive Prometheus’ fire can use live covers. However, the VKontakte administration recently pleased the owners of public sites with good news - by the end of January, everyone without exception will be able to try the new design.