Mass popularization and use of bots on the VKontakte social network can inspire administrators of various VK communities to want to install a similar bot program in their group. At the same time, they have no idea how to do this, reading a lot of materials in search of explanations for realizing what they want. In this material, I will try to help such administrators and talk about ways to create a bot for messages in the VKontakte community, and what tools will help us with this.
What can a VK chatbot do?
Involve your subscriber in an event or newsletter. Using the “Community Subscription Reaction” function, invite a newcomer to subscribe to your newsletter, tell him about a new promotion or giveaway.
Keep the subscriber from leaving the community. When the user clicks on the “Unsubscribe” button, the chatbot will send a letter with words of regret or offer a discount.
Help the client resolve the issue. The chatbot will select the right product, tell you about discounts, or simplify navigation through the community. Using certain commands, a subscriber can request information of interest, and the chatbot will provide it.
Conduct games, surveys, competitions. The chatbot will entertain the user with a game or collect the necessary information about the target audience using a survey.
Provide answers to frequently asked questions. The user may write because he is simply bored, or wants to know more about the product. The chatbot will answer the buyer and ask clarifying questions.
Next, we will show how to create and configure a chatbot using the Robochat.io constructor and the Senler mailing service.
You need to send a newsletter on VK, create a chat bot or set up a target - contact us! We have extensive experience promoting business on VKontakteRead more
Bots for increasing subscribers and sending invitations
Sometimes owners of VKontakte public pages send out mass messages calling for people to join the community. Or they recruit subscribers to the group by sending out mass invitations. These are effective, but not entirely legal methods of promotion. For such activity you can get a ban from the administration of the social network. To avoid losing your account, register a fake page for sending messages.
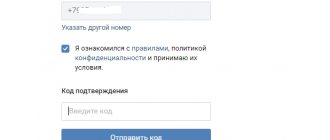
Unfortunately, it is now impossible to create a fake account without providing a phone number. To confirm your registration, you will have to send a free message with a secret code. In this way, the VKontakte administration is trying to fight spammers.
There are sites where you can buy a fake account with friends. The cost depends on the age of the profile and the number of friends - from 150 to 300 rubles. You can also use such a tool to get subscribers into a community, but it’s not a fact that after transferring money you will receive a login and password for your account.
To avoid wasting money, it’s better to buy a new SIM card, register an account for it, fill out your profile as little as possible and start sending messages. It is advisable to publish 5-10 posts on the wall at a certain interval - for example, after 1-2 days - so that social network users get the impression that this is a real person and not a bot.
Try not to send an invitation to the group in the first message - for this you will quickly get a ban from the administration due to user complaints. Say hello, say something original, and then send a message with a standard invitation to the group.
Promotion using fake accounts takes time. It is better to use white methods of attracting subscribers to the group - seeding and targeted advertising - than sending out invitations and waiting for the page to be banned.
VK bots are a great tool that will help you take part of your routine off your plate. Use them correctly to increase the activity and size of the audience in the community without getting banned from the VKontakte administration.
Group registration in Robochat.io
After registering with the service, link the community to your personal account.
- Select from the list the group where the chatbot will work.
- Give the service access to the community.
- Connect the starter template to get started with your chatbot.
The service will link a group to the template and open a work account. You need to immediately set the settings so that the bot turns off if the administrator enters into a dialogue with a subscriber.
- In the left column, click the “Manage Bot” button.
- Specify the time during which the bot will not be able to intervene in the dialogue → save.
On the right side there are reaction sections that you can use to configure the chatbot.
In the screenshot you will see the points by which you can configure the bot. In the article, the chain of reactions will be set up according to the sales funnel.
How to make a VK bot
If you are promoting VK groups, then you probably know that a VK bot is a program that helps you automate any manipulations. In our case, we will consider a bot connected to the VKontakte community, which will send identical mailings and respond to messages from visitors. In addition, you can play various interactive games with him, he will give recommendations regarding music or video, cheer you up with an anecdote, and so on. In further sections, we will look at how you can create a bot for public pages on various topics in one of the currently popular social networks, Vkontakte.
Reaction to subscription
A person decides to subscribe to your community - this is a chance to involve him in your newsletter.
- Go to “Reaction to subscription”.
- Greet the subscriber in the letter, offer assistance in navigating the content through the newsletter.
As a result, when a person subscribes to the group, he will receive a message from the chatbot.
Tips: How to increase efficiency?
To improve your productivity at Sandler, I recommend the following:
- Use UTM tags in your text . They will help you track the actions the user performs. By analyzing them, you can understand your mistakes and what is interesting to users, thereby increasing your sales.
- Think globally . To increase efficiency, invite the client to subscribe to you not only on VKontakte, but also on other social networks. Thus, if it happens that he leaves your community on this social network, you can make your offer on another one and there is a high probability that he will buy, since he was already interested in your product.
- Try to approach the issue comprehensively
. You don’t need to rely on just one newsletter. Look more globally, think about where else your customers are and how you can hook them. - Use gamification . Not everyone knows, but gamification is one of the most effective ways of promotion. For example, in one of the messages you can invite the user to participate in a game with a valuable prize. You can gamify VKontakte through the Activebot service.
- Gain new knowledge . If you want to develop your community more competently, try studying Senler from A to Z, special courses for VKontakte, or learn SMM from the masters.
Welcome message using Senler
In RoboChat, the welcome message is sent only once. This is not very convenient, because a subscriber can unsubscribe and subscribe to the newsletter several times. Therefore, it is better to connect a greeting message through a mailing service. I use Senler.
Log into your personal account for your mailing service.
- Newsletters → new mailing list.
- Write a welcome message and add keywords that the chatbot will respond to.
- Auto-message → count clicks on links → save.
The subscriber will receive such a letter.
The letter contains 4 commands - we will register them in Robochat.io.
Setting up commands
Return to the Robochat.io service.
- Scripts → create a command.
- Enter your keyword in the first field.
- In the “Bot response” field, write a response option. Be sure to indicate that you can return to the beginning of the menu using a command (otherwise the chatbot will respond to other commands as an error).
This is what the message will look like.
We do the same with the other teams: “1-3”, “3-6”. For the game team “Let’s go” the chain will be a little more complicated.
How to use Senler?
In order to start using the service, you need to go through four steps: registration, connecting to the service, setting up and gaining Sendler access to the VK group. We'll talk about them now.
Step #1. Registration
In order to register for the service and receive a free 500 bonus rubles to your account, you need to click on the button below.
Go to Senler
Next you find yourself on the main page of the site, in the upper right corner, where you need to find the “Login” button and click on it
After that, an authorization window through the social network VKontakte will appear, in it click “Allow”.
All after these steps you are successfully registered on the service
Step #2. Connecting the community in Senler
In order to connect a community, on the main page of your Senler personal account, click “Connect community”.
Next, all the communities you have created will open before you.
It’s also worth saying right away that you can only send VK newsletters in your community. Therefore, if you don’t have one yet, you need to first create your own VKontakte community. After creation, you will have this community in the current tab.
To connect it to the service, simply click on the button under the “Connect” community.
After this, you will need to allow the service access to your community again by clicking on the “Allow” button.
After all these steps, your community will be successfully connected to the service.
Step #3. Settings in Senler
I divided the process of setting up Senler into two steps. First, you need to create a group of subscribers and then select the action you need (either creating a newsletter, or creating a chatbot). I will tell you about all this below.
Creating a group of subscribers
To create a VKontakte message distribution or a chat bot on Senler, the first thing you will need to do is create a group of subscribers. You can do this by going to the subscriber group section and clicking on the “New group” button there.
Next, enter a name and set all the parameters of the group you created.
After which the service gives you a link to the group you created, copy the link to a separate text file on your computer.
That's it, after these steps the subscriber group will be successfully created.
Actions
Once you have created a subscriber group, you have two options. You can either create your own newsletter or write your own chat bot. We will talk about each of them in more detail below.
2.1 Create your own newsletter on VK
To create your own VKontakte message mailing list, in your Senler personal account, click “New mailing list”.
Next, a window appears in front of you in which you need to select the type of mailing:
- Auto messages . If you choose this option, you can use it to set up automatic series of letters based on certain parameters. For example, automatic greeting of a new member and much more
- Target
. If you choose this option, you can send a mailing to the loaded list at a certain time. - One-time . If you choose this option, you can send a newsletter using a certain number of filters. For example, you can send a promotional code only to residents of a specific city.
In general, choose the type that you need, put a tick in front of it and click on the “Continue” button at the end of the page. I love automation, so I'll choose the first option.
Next, fill out all the fields, enter a message and select the subscription group you created. If you wish, if necessary, you can set a time interval or send yourself a message as a test. After making all the necessary changes, click on the “Save” button.
The next moment a window will open in front of you in which you will need to activate the newsletter. If you do not activate, the VKontakte newsletter will not work.
If you only wanted to make one welcome letter, then this step is complete for you.
If you, like me, want to make a series of letters, then you need to create another newsletter. In the settings window, enter the following message (letter), select the same group and set a different time interval. Then click on the “Save” button.
You can view the entire chain of this series of letters in the “Letter Chains” section. Having opened the created chain, a window similar to this will open in front of you (see the picture below).
At this point, the entire setup of VKontakte message distribution will be successfully completed.
2.2 Create your own chat bot in VK
In order to create your own VKontakte bot, go to the “Chat bots” section and click on the “New bot” button there.
After that, enter the name of your chat bot and click “Save”
Next, the chat bot settings window opens in front of you. It is made intuitively and simply in the form of a window with actions, as on most sites with auto funnels. If you click on the “+” icon, which is located in the lower right corner of the browser, then you will see all the possible functions that you can add to your chat bot.
When you finish working on the bot, you should end up with something like this chat bot (see picture below). Its essence is simple: the user is asked a question and answers it with one of the answer options. The bot, in turn, guides the person along the path you set up. At the end of the customer journey, they are led to a purchase or other desired action.
Once your bot is ready, you need to launch it to the masses, to do this, just click on the “Launch” button
After all these steps, your chat bot on Senler can be considered successfully configured.
Step #4. Gaining access to Vk
In the last step, you need to connect your configured mailing list or chat bot in Senler to your VKontakte group. We have made all the previously necessary settings, but without gaining access we will not be able to collect an audience, so this step is mandatory.
In order to do this, go to your group and go to the “Management” section
Next, in the admin panel, go to the “Applications” section
Then, in the list of applications, find the application “Senler - sending messages” and on the right side click on the “Add” button.
P/S: Sometimes the application is not displayed immediately, but is minimized; in order to see it, simply display the list of all applications.
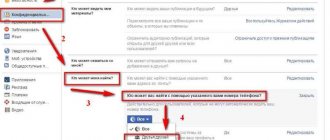
After installation, you need to configure the visibility of the application. Select “All users” and click on the “Save” button.
Next, if you log into the group from a third-party account, after the user information you will see a Senler button in your group.
And if the user clicks on it, he will see all the mailings available to you.
In principle, this is where all the settings on Senler end. The only thing is if you want to make some kind of newsletter immediately displayed in the VKontakte menu, then you need to configure it additionally. Personally, I would recommend that you do this because... this will reduce the number of clicks the user has to complete before reaching the goal.
Game with chatbot
Now we need to think over a chain of questions and answers for the “Let’s Go” team.
- Create a new team, enter a question.
- Select the “Switch to another command if” form and enter the correct answer.
- In the script, select the pre-generated key (correct answer).
- In the key, write the next question and the new key with the correct answer.
This is what happened.
Dynamic buttons
Buttons can be implemented at any stage. In this article we will show you how to do this with the “Let’s Go” command.
- Script → menu → command keyboard.
- In the panel with buttons, write a keyword → add a transition → script for the key “let’s go” → save.
This is what the button looks like in a message.
You can experiment with buttons: make many buttons with answer options, change their colors, connect them at all stages.
How to create a bot on VK via Android
Android is an operating system created for electronic devices. It runs on the Linux kernel and makes it possible to create applications controlled by the device through Google system libraries. How to create a VK bot via a smartphone? Android fully supports many programs for creating bots using a smartphone. In order to do it yourself, an excellent knowledge of a programming language will help you, including an understanding of what the concept of “bot code” means. If you have difficulties with this, you can also use an automatic device or services. Let's say Abot is able to create its own virtual assistant. He will answer messages and all kinds of questions from clients. This is quite a convenient thing to control and conduct business via a smartphone.
Response to frequently asked questions
Often, before asking a question, users say hello and wait for an answer. So that the subscriber does not have to wait for the message to be read by the administrator, create a reaction to the greeting.
- In the “Scripts” section, create the keywords “hello”, “hello” so that the chatbot will immediately respond to the message.
- Enter other common requests as well. For example: “how are you”, “help”, “I want to buy”, “delivery”, “promotion”, etc.
Types of bots
Chatbots can be classified by type and purpose. According to the first criterion, two types of programs are distinguished - primitive and advanced.
Primitive chatbots respond to messages that contain a code word. If the user enters an original message - not according to the proposed template - the program will not answer him or will report that he did not understand the command.
Advanced chatbots understand any user requests and try to give relevant answers to them. You don’t have to look for words in hopes of formulating a request—the artificial intelligence program will understand the user in any case.
Advanced chatbots understand not only text, but also voice commands. They are constantly learning, adding to their knowledge base from conversations with users.
A primitive chatbot can be created for free, without any special knowledge or experience. Creating an advanced chatbot is a complex process that requires the participation of programmers.
There is another classification of chatbots - by type of goal. There are four types of programs here:
- Assistants. Chatbots of this type will find the information you need—for example, the weather forecast in a neighboring city—and help you order food for the office or find the cheapest air ticket. They understand only template messages.
- Artificial intelligence. Those same advanced chat bots. They can be trained to do anything - close clients for a deal, find the user the information they need, etc.
- Business bots. A useful tool for business communities. In such a chatbot you can embed a mailing list with a chain of letters to invite people to a webinar or marathon, an autoresponder with notifications about when users perform any actions in the community.
- Gaming. With such a chatbot you can play gallows, roulette or any other simple game. Such programs easily imitate human actions, as they are based on artificial intelligence.
A chatbot should be created only when you have decided on your goals. If you need a bot assistant who will warm up leads or bring them to a deal for you, contact the specialists. You can create a simple chatbot for sending messages, increasing activity in a group, or increasing subscribers.
What's the result?
The chatbot constructor Robochat.io and the Senler mailing service significantly save time on communicating with clients and help automate promotion on VKontakte. You yourself saw how they:
- Involved the subscriber in the newsletter.
- We persuaded him not to unsubscribe from the community.
- Helped me find the information I needed.
- We played a game.
- We talked with the client.
And all this without your participation.
You can experiment and create more complex chains of reactions.
To help you, we have collected 25 ideas for implementing a chatbot based on the experience of famous brands. Use it. kak-sdelat-chat-bota-dlya-gruppy-vkontakte-poshagovaya-instruktsiya
How to determine who is communicating with you - a real person or a bot
Modern technologies are so developed, and time flies forward so quickly that the average person has less and less time to communicate.
Many companies optimize business processes by outsourcing the functions of consultants to bots. If you are communicating with a bot consultant, then determining who is in front of you will be much more difficult than with a bot interlocutor.
Observe the reaction of the user who responds to you.
- If you receive a long message in response in just a couple of seconds, this is a sure sign of conversation automation.
- If your interlocutor sends you a message again, the text of which is exactly similar to the one sent earlier, a chatbot is probably communicating with you.
Setting up a backend bot on VKontakte
The next step is to create a special script that will receive requests from the VKontakte callback API and react to events in a certain way.
Let's create, for example, a php script handler.php, the address to this script, after setting up the backend, we must indicate in the community settings. Pay attention to the values of the following variables:
$confirmationToken $token $secretKey The confirmationToken stores the code that the server must return, in our case: 004eec27 token stores the access key that we generated in the chapter “Generating an access key”
We set secretKey in the callback API community management section.
The final code looks like this (handler.php): Final code handler.php
After you upload the code, you should return to the “Community Management” → “Working with API” → “Callback API” section, enter the address before the script and click "Confirm"
After this, the community configuration for working with the bot is completed, now if we send a message to the community, we will receive a response.
Preparing the server part for connection
Callback API
is a tool for tracking user activity in your VKontakte community. With its help you can implement new useful functions, for example:
- A bot for sending instant replies to incoming messages.
- Automatic content moderation system.
- A service for collecting and processing audience engagement indicators.
To start using the Callback API
, connect your server in your community settings and select the types of events you want to receive data about (for example, new comments and new photos). When an event of the selected type occurs in the community, VKontakte will send a request to your server in JSON format with basic information about the object that caused the event (for example, an added comment). You no longer need to make regular API requests to track updates - now you will receive them instantly.
Connection instructions are described in detail in excellent documentation for VKontakte developers.
Let's look at it in more detail; to host the chatbot script, we must have a functioning web server. To work with the callback API, VKontakte recommends using the https protocol; instructions for obtaining a free cloudflare certificate and server settings can be found in the article, which can be found in the Google search engine for the request Free SSL certificate CloudFlare
.
After setting up the server, you should have a working web server onto which we will upload our bot script.
Server Tuning
Now you will need a server to host your bot. You can use free hosting services such as 000webhost.
If you use cheap/free hosting, then most likely cURL will be disabled on them (you will not be able to send media files with a bot, only text), and it cannot be enabled. 000webhost is fine with this, you can use . If you have your own server or a good one purchased, then you need to connect cURL for the bot in our example to fully work.
How Callback API and keyboard work
I'll give you a short tour of how everything works. The Callback API sends to your server any event that occurs in the group in the form of JSON. The full list of events can be viewed in the “Callback API” → “Event Types” tab. This is what the JSON request looks like when the user sends a message, in this case he clicked on the button:
{"type":"message_new","object":{"date":1529668584,"from_id":89846036,"id":1522,"out":1,"peer_id":89846036,"text":"Gold fish","conversation_message_id":305,"fwd_messages":[],"important":false,"random_id":0,"attachments":[],"payload":"{\"animals\":\"Goldfish \"}","is_hidden":false},"group_id":101461081}
There are several interesting fields that can be processed: user id, message text (text), button payload (payload).
Messages are sent to the user using the messages.send method. If you send a keyboard, then after all the standard parameters you add the keyboard parameter, which contains the json of the buttons, this is what it looks like:
keyboard: { "one_time": false, "buttons": [ [{ "action": { "type": "text", "payload": "{\"button\": \"1\"}", " label": "Red" }, "color": "negative" }, { "action": { "type": "text", "payload": "{\"button\": \"2\"}" , "label": "Green" }, "color": "positive" }]
Adding a bot through the channel or group menu
Telegram assistants can be invited to join your project not only through their menu, but also through the channel or chat menu.
How to do this on a smartphone:
- Login to your project.
- Click on the line with its name and avatar (at the top of the dialog window).
- Select the line subscribers.
- Invite a bot in the same way as a regular messenger user.
Procedure on a smartphone.
Adding a helper bot to a channel via computer:
- Go to the desired channel and a window with a description will open (Fig. 3).
- Opposite the line with the number of participants, click on the sign with the image of a person’s bust.
- Find the desired bot through the search bar and add it.
Procedure on PC.
Administrator bots or interlocutor bots can themselves request invitation links to a channel or group, and join them independently. Each special bot, after its launch, will definitely inform you about its functions and tell you how it can be added to a particular project. In such cases, it is necessary to act according to his advice.