In the fall of 2021, VKontakte launched in test mode the ability to go live on broadcasts to game streamers in Russia and the CIS. Later, to create live broadcasts, the VK Live mobile application is released on the iOS and Android platforms. Today, all owners of computers, smartphones and other gadgets can go live. This is the second important update after VK stories.
This innovation will allow for round-the-clock broadcasts, using special equipment to produce reports and much more. In a live broadcast, you can share video from your computer screen or video window.
How to remove VKontakte notifications
Let's look at the instructions on how to remove VKontakte notifications
, through the official website vk.com, directly through your personal profile:
- Having gone to your VK page, you need to go to the “My Settings” section and select the “Alerts” section. This section contains a lot of settings for your profile. You will see a complete list of notifications, which includes setting up notifications for your smartphone and email. It is not possible to turn off messages forever; you can only set up sound notifications.
- Settings that are available on the site: show instant notifications, enable sound alerts, show message text, they can be disabled using the slider.
- Below there will be settings for feedback, events, etc. They are also adjusted using the knob on the right.
- It is possible to configure notifications via SMS. If you require notifications, then click the checkbox and the “save” button, you will see other settings, namely whether to receive SMS or not, and at what time to send notifications.
- You can also link the email to which notifications will be sent.
- The notifications you set will be sent to your email. Messages, events, friend requests, tags in photos, invitations to communities, birthdays, gifts, events and much more from the list.
Source: https://pr-vip.ru/blog/kak-otklyuchit-uvedomleniya-vkontakte
Broadcast to VK from a computer
To create a broadcast you will need. VK account and OBS Studio . The program can be downloaded on the website, select the system and press the button.
Further, everything is standard, installation, launch, nothing new. But let’s go through the broadcast launch settings.
A little earlier I talked about the program when we were setting up a broadcast on YouTube. But here we will repeat ourselves a little and go deeper, since perhaps this will be useful to you.
First of all, let’s configure the program from the inside, go to the “Settings” section on the program’s control panel.
OBS Studio Settings
General OBS Settings
Here you can change the OBS interface language if it does not match yours. We leave the rest as is.
Broadcasting
This section will help you synchronize the program with the VK social network. You need to enter a link and key. Where can I get them? They are located in the live broadcast settings interface in your VKontakte account. In VK, go to the “Video” section, click the “Create” broadcast button and find the “Video encoder settings” item.
Here the link and key will be waiting for you. It says below that do not show them to others and so on.
You can easily generate others if you think you've exposed them.
Next, copy and paste this link and key in the program into the required fields of the “Broadcasting” section. The same thing was done earlier on YouTube. This means that your stream is protected.
Conclusion
In this section, you should pay attention to the Broadcast Encoder. Depending on your PC, you can choose:
- Hardware (QSV) – chip works
- Hardware (NVENC) – the video card is working
- Software (x264) – the processor is running
But they should only be changed if the program generates an error when starting the broadcast. The default is the second parameter, and if it works, don’t touch it.
Use different encoders for the broadcast and recording streams (recommended)
Video
Here, change the resolution according to your monitor or down.
We don’t pay attention to the other settings and won’t touch them, since we won’t need them. And if you want to tinker with the settings further, try it.
Now let's go to the main window of the program and configure it to finally start the broadcast.
First of all, decide what you want to broadcast:
- yourself via webcam
- capture the entire monitor screen
- stream a separate program window
- run media source (local video file)
- slide show
- image
- real-time typing
- stream games
For example, select “Screen Capture” and add it to “Sources”.
If everything is fine, you will see your desktop or what you have open on the screen.
Let's return to the settings on VKontakte and finish setting up the broadcast. Or rather, let's finish with the design.
- choose a cover
- let's give the title a name
- we'll write a description of the broadcast
- select a category
- put the necessary checkboxes (ticks)
- We save everything.
All that remains is to start the broadcast in the program itself and everything will work. I checked the “Post on my page” checkbox. This means I will see the broadcast in my feed.
After you are sure that everything is working, click the “Publish” button and check the “Notify friends” checkbox. Friends will receive a notification and may come to look at your art.
Now the broadcast has truly started working on the entire VK.
How to turn off notifications on VKontakte
There is an alert for almost every event within a social network.
This allows you to stay up to date and track the reactions of other users to published material, a comment left, or a broadcast.
If there is a large audience, such notifications can become quite annoying, cluttering up really important messages. In this article we will figure out how to disable notifications in VK.
Disabling notifications via email and within VK
The corresponding section of the profile settings is responsible for receiving notifications by e-mail and through the VKontakte page. To change these parameters you need to:
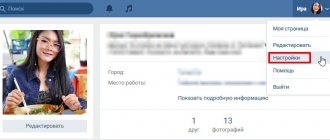
- Click on the round avatar and select “Settings”.
- Go to the “Alerts” section (located under the security and privacy settings).
- Adjust settings: The first block called “Alerts on the site” configures the type of notifications that arrive directly to the VK profile. Here you can turn on or off instant notifications, sound and text display.
- Next comes a whole series of different events taking place on the social network. Opposite each, you can choose one of three options for receiving alerts: “all”, “only important”, “disabled”.
- The last block displays the e-mail that receives a summary of events that have occurred and sets the frequency of their receipt. To disable notifications received by email, select the “Never” option. Instant or once per day alerts are also available.
By switching all switches to “Off” or “Never” mode, you will be able to completely get rid of VKontakte notifications.
Turn off notifications on your phone
Previously, the social network had the ability to receive notifications in the form of SMS to a mobile number. This option has now been removed. The thing is that now you can install the official VKontakte application on smartphones and receive alerts through it. This is more convenient and allows you to immediately familiarize yourself with the event for which you received a notification.
To turn off notifications coming through the application you need to:
- Tap on the three horizontal stripes.
- A menu will open where you need to click on the gear icon.
- Select "Notifications".
- Click on the big “Configure notifications” button.
- Disable the feature by moving the slider to the left.
Ready. Now your phone will not receive notifications about events within the social network.
Reference. You can also disable the option through your smartphone settings. You should visit the “Notifications” section, find the application and make the appropriate settings. In this case, you can either completely turn off all signals or deactivate individual elements - sound, vibration, LED indicator, mark on the icon.
Disabling notifications in VK is quite simple. To do this, you must follow the instructions presented in the article. Email notifications are disabled through the interface of the full version of the site, and mobile notifications are disabled through the general settings of the phone or the application itself.
Source: https://zatupila.ru/kak-otklucit-uvedomlenia-v-vk.html
How to turn off notifications in VK
This article will discuss in detail the question of how to disable notifications in VK on your phone, email and browser.
The VKontakte developers have created a very multifunctional and flexible system for notifying users about all kinds of events. The range of notification options is huge.
You can customize everything: from messages and likes to changing the balance in your advertising account. After reading the article, you will learn how to turn on and off any notifications in VK in a couple of clicks.
Turn off notifications on your phone
The social network VKontakte appeared long before smartphones and stable mobile Internet became something commonplace.
Therefore, some time ago, VK had a service of notifying about events in the profile via SMS to a mobile phone number.
Now, the vast majority of users use smartphone applications. Accordingly, messages arrive only when you have Internet access.
To turn off notifications on your smartphone, follow these steps:
- Go to the official VKontakte application.
- Tap on the button in the form of three horizontal stripes at the bottom of the screen.
- Go to settings via the gear icon.
- Go to the notification settings menu.
- Here are all the options with which you can disable and enable alerts. Choose which notifications you don't want and opt out of them.
Reference! You can temporarily turn off all notifications by tapping Do Not Disturb and choosing a mute period of 1, 8, or 24 hours.
If you wish, you can remove only notifications about new messages that arrive too often. A separate option is available to disable notifications from group chats, in which several hundred messages can arrive in an hour.
Settings for feedback (likes, comments, mentions), events (applications, invitations to communities) and the “Other” section can be adjusted in accordance with your activity on the social network.
If you often publish new photos and posts, it’s better to remove likes so as not to be distracted by the sound of your phone every time someone likes your post.
But if you don’t receive comments and requests often, then you can leave these notifications to immediately find out about such an event.
We recommend: How to change the language on VKontakte
Turn off notifications on your computer
Many people use social networks to collaborate or study. For example, they exchange their work, notes and ideas. For this reason, the VK tab is often open during the work process. To remove annoying messages or their sound, follow these steps:
- Go to your profile settings through the column of the same name in the menu.
- Go to notification options. This page contains a huge list of all kinds of settings. Using the “Site Alerts” block, you can disable the sound of notifications and display them as pop-up messages.
- Use the toggle switch to turn off notifications.
- Using other blocks on the same page, you can prohibit sending notifications about any event. For example, turn off notifications about likes or invitations to communities.
How to unsubscribe from emails
The VK security service automatically connects the mailing of letters about any events in the profile to the user’s email mailbox, if you specify it during registration. There are 2 ways to refuse this service.
- Open the letter that came from VK to your email. Scroll to the very bottom. Look for the small print that says “unsubscribe” and follow the instructions. They will open on a new website after clicking on the inscription.
- In the VKontakte notification settings, scroll to the very end of the page.
- In the “Email Alerts” block, in the “Notification frequency” column, select “Never notify.”
The developers of the social network make great efforts to ensure that users’ stay on the site is as comfortable as possible. You can make your profile even more comfortable for yourself by fine-tuning your alerts using the instructions provided.
Source: https://vkbaron.ru/akkaunt/kak-otklucit-uvedomlenia-v-vk.html
How to turn off notifications in VK on an Android phone
Hello! Today I will show you how to turn off notifications in VK on an Android phone. You can very simply and quickly turn off all VKontakte notifications on your smartphone. See the instructions below and write comments if you have questions. Go!)
On your phone's home screen, find the Settings icon and tap it.
Next, in settings, click on the Notifications tab.
Here you will be shown a list of all the applications from which you can receive notifications.
Here you can enable or disable:
- All notifications from VK;
- Notification indicators on icons;
- Message synchronization;
- Downloading attachments;
- You can open additional notification settings in VK.
All is ready. This is how you can easily remove pop-up messages from VKontakte.
&n
Source: https://wdfiles.ru/blog/kak-otklyuchit-uvedomleniya-v-vk-na-telefone-android.html
How to turn off notifications about VKontakte broadcasts
Following Instagram and Facebook, our beloved VK also introduced the ability to create broadcasts by users. Everything would be fine, we ourselves published how to make a live broadcast on VKontakte, but day after day, various kinds of notifications about the start of broadcasts are annoying, and there is a desire to turn off the notifications.
How to turn off notifications about VKontakte broadcasts
You can turn off all notifications about broadcasts, friends and communities to which you are subscribed. This is very easy to do, go to your page and go to settings -> notifications , or you can directly follow this link: vk.com/settings?act=notify.
This is the settings page for alerts, here you can turn them off, not only turn off alerts, but also for other events. Personally, nothing else bothers me, it will be enough to just disable one item.
Uncheck the box and save the changes. Events such as the start of broadcasts from friends and communities will no longer bother you.
It’s another matter if these notifications about broadcasts do not make you very angry, on the contrary, you would like to see them in your home. But some of them are especially intrusive; there is an option to disable such alerts for a specific person or community.
How to turn off notifications from a specific person or group
There is also a way out: go to the page of a user or community from whom you would not like to see notifications. Click on the three dots under your avatar and select “Do not report broadcasts”
Similar to the example with the group, we do it on the personal page of the person from whom we do not need notifications about the broadcasts he has launched. Click the ellipsis under the person’s avatar and select “Do not report broadcasts”
Why are these alerts so annoying?
The broadcast service is relatively new; attracting people to broadcasts launched by people in any other way, such as notification, is problematic.
We are already accustomed to the fact that there is a re-scope; social networks offer us too many monotonous ideas.
VKontakte is, first of all, a tool for communication, listening to videos, and last but not least, it is interesting to watch broadcasts or stories that are sometimes of very dubious meaning.
By the way, if we figured out how to turn off notifications so that they don’t bother us, then it wouldn’t hurt to find out how to remove stories out of sight - how to remove VKontakte stories.
Source: https://kak-vk.ru/otklyuchit-opoveshheniya-translyacij-vkontakte/
How to earn money
Broadcast authors can receive donations from viewers: to support their favorite streamer, the user can click on the “ Support ” button under the broadcast player, specify the amount of money and the text of the message, after which it will appear live. In addition to paid messages, you can display notifications about new subscribers, as well as users who shared the broadcast.
You can read more about connecting donations here.
In addition, broadcast authors who have crossed the 250 thousand subscriber mark can participate in the video content distribution program and earn money by showing advertisements in front of their videos: to participate, you need to send a request to Support.
In the future, we plan to launch other methods of monetizing broadcasts, which we will definitely tell you about. Follow the news!
Hello, friends! Over the past year, the developers of the social network VKontakte have done a lot of new and interesting things. We have already talked about the History of VKontakte, and about the ability to send voice messages to VK. Now let's look at another very interesting feature: live broadcast.
Initially, only iPhone and iPad owners had the opportunity to broadcast live on VKontakte through the VK Live application. Now this opportunity is available to those who have a smartphone or tablet based on the Android operating system. Please note that the Android version must be 4.3 or later. Otherwise, when downloading VK Live from the Play Store, you will see the message: “Not supported on your device.”
If you want to go live from a computer or laptop, then you can do this. All you need is to create a broadcast, set up a video encoder (it must be installed on your computer) and that’s it - you can talk about something live to your subscribers and friends. But I’ll tell you how to do all this later in this article.
How to turn off notifications in VK
On a social network, each owner of a personal profile can configure the receipt of notifications at their own discretion. To make the appropriate settings, it is recommended to first study the current information so that no difficulties arise in the process. Before turning off notifications in VK, you need to weigh all the pros and cons of this feature.
How to turn off VKontakte notifications from a computer or phone
Not every social network user needs to receive notifications about the latest changes in their profile. To disable this function, you can use both the mobile version and a desktop computer. After deactivation, emails containing the latest events occurring in your profile will no longer be sent to your email.
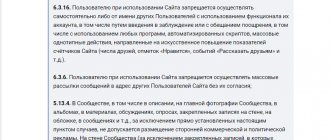
VKontakte notifications can be disabled by following these steps:
- Go to “Settings” in the “Alerts” section.
- In the “Alerts on the site” item, you should remove the sound.
- In the “E-Mail Alerts” section, uncheck the checkboxes opposite all lines.
You can simply indicate in the “Notification frequency” section that you should never notify. Any of the presented methods is relevant for solving such an issue.
About logging in from another device
The developer does not recommend disabling the notification that the page is being accessed from a different IP address. This approach will allow you to react in time to the actions of scammers and change your password.
To enable this notification you must:
- Go to “Settings” to the “Notifications” section.
- Move the slider to ON opposite the corresponding line.
This notification is an excellent protection against hackers.
About messages
To receive a notification about receiving an incoming message, you should go to settings and check the box next to this item in the appropriate section. Please note that not only a notification that an SMS has been received will be sent to your email, but the text will also be duplicated.
From applications
The most annoying notification is the invitation to various games and applications. Most users specifically disable this feature. If necessary, you can configure to receive messages only from your favorite developers, which is quite convenient for those who take part in the game.
About all events
Before turning off notifications in VK, you should carefully study all possible deactivation options. If you need to turn off all notifications, you can specify “Never receive notifications” in the settings, which is much more convenient than manually checking all the options.
How to disable notifications about broadcasts in VK
An annoying notification is the notification about live broadcasts, especially if we are talking about account holders with a lot of friends. In the “Alerts” section, remove the check mark next to the corresponding line. Unfortunately, the developer did not provide the ability to select users to receive notifications about the start of broadcasts.
How to disable VK notifications in Yandex browser
In some cases, it becomes necessary to deactivate notifications that come from the browser. Most often, Yandex users encounter a similar problem. In this case it is necessary:
- Go to “Menu” in the “Settings” section.
- In the “Advanced” item, select “Personal information”.
- In the content settings, go to notifications and check the checkbox next to the line “Do not show notifications from sites.”
After the changes are made, the user will not see notifications from sites, including the VKontakte social network. You can simply turn off the sound on the device or in the settings, which is enough for most users.
Broadcast to VK via computer or laptop
Live broadcast is the same as video recording. It is created in the video section and displayed there. After the live broadcast ends, the video will be saved on the page or in the group and can be viewed.
You can inform your friends and subscribers about the start of the broadcast through notifications . Also, while viewing the news, they will see a window with a video in which your broadcast will be played with the sound turned off, and, if desired, they will be able to watch it.
Streamers can make money from live broadcasts . If the person watching you wants, he can click on the “Support” button under the player and transfer you a certain amount. Gifts sent by users are also taken into account: half the cost of the gift sent goes to the social network, half to you. VKontakte also has a program called “Video Content Distribution”. It will be available if you have more than 250 thousand subscribers. You send a request to Support, and before your videos, users will watch advertising videos.
In live broadcasts you can share interesting news and your emotions about what is happening in your life. You can send a mass message to all subscribers, for example, to congratulate you on the holidays. You can do a live broadcast similar to a program - joke, tell something funny. You can play the game live and show the stages of completing levels. Tell us how to do makeup beautifully, draw a quick picture, pack a suitcase for a trip, and so on. In general, what you will broadcast depends only on your imagination.
How to create a broadcast on VK from a PC
You can create a broadcast either from your page or in a group, but you must be its owner or one of the administrators.
If you want to go live from the page, then log into your account and go to the “Video” section in the menu on the left. Then click on the “Create broadcast” button.
To make a live broadcast in a group, for example, you want to hold a prize draw live or talk about the news, also go to your group’s main page and open the videos. Then click on the “Create broadcast” button.
A window will appear indicating that this function is in testing mode. Click “Try” in it.
Next, upload the cover for the broadcast: click on “+” in the window and select the appropriate image from your computer. For correct display, the image aspect ratio should be 16:9 and the size 1920:1080.
Come up with a name for the broadcast and a description for it. Then select the appropriate category. When you select “Computer Games,” another field will appear in which you need to specify the name of the game.
The next step is setting up the video encoder. Expand the appropriate item.
Here you will see two fields “URL” and “KEY” - this is the link and the stream key. These values must be inserted into the video encoder to be able to conduct live broadcasts.
If someone else finds out your “URL” and “KEY” values, then he will be able to broadcast from your page or group. Therefore, the warning: “Do not share the link and key with anyone!” very handy. If someone knows them, then click “generate new settings”.
Now let's understand the video encoder. If you have one installed on your computer or laptop, then use it: insert the link and key into the settings. If you don’t have anything like that, then in the broadcast creation window, in the “Video encoder setup” section, click on the “more details” link.
There is no need to close this window; we will return to it a little later.
Setting up the OBS video encoder for broadcasting to VK
Clicking on “more details” will open a new tab in the browser with the information “Setting up a video encoder”.
Scroll down the page. There you can see “Recommended video encoders”. Select one of them and click on it.
A page with information about setting up the selected video encoder will now open in a new tab. I'll tell you about installing and configuring the Open Broadcaster Software , since I chose it in the previous step.
On the page that opens, find a line like “Download...” and follow the link provided.
How to download and install OBS for Windows
By clicking on the link, the official page of the OBS video encoder will open, from where you can download it. Select the operating system that is installed on your computer: Windows, iOS or Linux, to do this you need to click on the logo.
You can install OBS on Windows 7, 8, 8.1 and 10. To download the installation file, click “Download Installer”.
In the next window, click the “Save File” button.
Go to the "Downloads" folder on your computer and run the file you just downloaded.
The OBS Studio Installation Wizard will launch. Click on the "Next" button.
For example, I lack a component for the video encoder to work correctly. Therefore, I click on the “Yes” button to download and install it on my computer. Next I will tell you how to install the missing component.
If such a window does not appear, skip a few steps and continue installing OBS.
So, we clicked “Yes” and the official Microsoft website page opened on the Internet, from where we will download the required component.
I'm missing "Visual C+ Redistributable Packages for Visual Studio 2013". Click on the "Download" button.
In the next window, check the boxes next to the files you want to download. Be sure to select the "vcredist_x86.exe" or "vcredist_x64.exe" file. Here everything depends on the bit depth of your OS: if it’s 32-bit, then x86, if 64-bit, then x64. Just in case, I also downloaded “vcredist_arm.exe”, but it was not useful to me.
When selected, click “Next”.
Confirm saving the files.
Open the downloads folder on your computer again, but now run the downloaded “vcredist” file that matches the bitness of your OS.
In the Microsoft Visual C++ component installation window, click “Install”, and when the process is completed, click “Close”.
After this, you can try installing OBS Studio again. Launch the installation file from the downloads folder and click “Next” in the first window of the Installation Wizard.
There is nothing further complicated. Accept the terms of the license agreement and confirm the selection of the folder in which the video encoder will be installed.
In the step shown in the screenshot below, check the “Browser plugin” box and click “Install”.
When OBS Studio is installed on your computer, a window like this will appear. In it, leave a checkmark in the “Launch OBS Studio” field so that the video encoder starts, and click “Finish”.
This completes the OBS installation.
How to set up OBS for streaming
Now let's move on to setting up the Open Broadcaster Software video encoder so that you can conduct live broadcasts from Vkontakte.
In the main program window, click “File” in the top menu and select “Settings” from the list.
On the left, go to the “Broadcasting” tab. In the “Broadcast Type” field, select “Custom Broadcast Server”. Then there are the “URL” and “Stream Key” fields. Here you need to insert the link and stream key that were in the VKontakte broadcast creation window - “URL” and “KEY”.
Go to the Output tab. Here, set the Video Bitrate value. It depends on the selected broadcast quality:
| Quality |
The “Encoder” field should be “Software (x264)”. “Audio bitrate” – “128”. Then check the “Enable advanced encoder settings” box and see that “veryfast” is selected.
On the “Audio” tab, in the “Sampling frequency” field, select “44.1khz”. In the “Desktop Audio Device” field, select the device that will play sound. If you have only one on your computer, then set it to “Default”. In the “Mic/Auxiliary Audio Device” field, select a microphone. If there is only one, set it to “Default”.
Video tab. “Basic extension” is an extension of your monitor. “Output extension” corresponds to the stream extension that will be uploaded to the VKontakte server. Choose it the same as the basic one. If you set it lower, then you can reduce the consumption of traffic used.
In the "Scaling Filter" field, set "Bicubic (Fine Scaling, 16 samples)" and "General FPS Values" to the frame rate, or 30, or 60.
When you are done with the OBS video encoder settings, click “Apply” and “OK” at the bottom.
Why is there a black screen in OBS Studio?
Now we need to figure out the image that should be live. If you do not make the following settings, then during a live broadcast on VKontakte, your subscribers, and you yourself, will see black screens.
There are special areas for this in the Scenes and Sources program. What are they needed for? So that the image is shown during the live broadcast.
You can make several scenes and select a separate source for each. For example, for the first “Scene” we select “Source” – “Screen Capture” - the entire computer desktop will be shown live. “Scene 2”, “Source” – “Video capture device”, the live broadcast will be an image from a camera connected to a computer or laptop.
During the broadcast, you can switch between created scenes. First you showed yourself through a video camera - selecting “Scene 2”, then switched to “Scene 1” and show your computer desktop.
Add “Scenes” by clicking on “+” in this area. You can give them any name. Then select the desired scene and add a “Source” by clicking on the “+” in the appropriate area and selecting the appropriate option from the list.
“Screen capture” – the entire desktop; “Window capture” – you can select a specific window; “Game Capture” – select the game window; “Video capture device” – an image from a camera connected to the computer.
When you select “Source”, windows will open in which you can make the necessary settings.
This is what I said in the example. Two scenes: the first corresponds to capturing the entire desktop, the second – an image from the camera. Live I can switch between them in the video encoder window.