#Social networks February 12, 2013
Welcome, friends, to the blog - . In one of the articles, I told you how to make a simple text menu on VKontakte. And today, I decided to continue this topic and talk about how to create a graphic menu on VKontakte . After all, not every webmaster who wants to beautifully design his group will be satisfied with a text menu. Now, perhaps, a graphical menu is more relevant, since various images are perceived much better by visitors than text links. And with the help of graphics you can create something really beautiful and colorful.
Where to begin?
Well, of course, you should start by selecting suitable graphics or drawing a menu from scratch. Of course, not everyone can draw a menu from scratch. But the problem can be solved, since the World Wide Web is full of various graphics, both free and paid, with which you can implement your plans. At this stage, I will not go into details, since it is not difficult to find pictures on the Internet, and I do not know how to draw. Let me start right away with the fact that we already have suitable graphics, but what to do next is not clear?
After you have downloaded or drawn the menu, you need to cut it. What is it for? This is necessary to create separate links for a particular image. Since, if our menu is placed entirely in a group, then it will not be possible to create more than one link, or I don’t know something. In addition, our menu needs to be adjusted in size, that is, it’s immediately worth considering that the maximum visible width is 388 pixels (one image), and the rest will either be cropped or adjusted to the dimensions that you specify when creating the menu in the group, while the image may stretch or, on the contrary, shrink, which can spoil the original idea. It is also worth considering that, for example, for a horizontal menu we will have to focus on a width equal to 370 pixels, otherwise the menu will not line up horizontally.
So, I will show, for example, the most common buttons. I will do all manipulations with graphics using Photoshop, so I recommend that you use it too. After we have sorted out the sizes, all that remains is to cut the menu. To do this, you can use the convenient “cutting” tool.
Simply select the required areas with these tools, for example:
And save it for web devices.
In the window that appears, we can select the image format, its quality and much more. In this case, I will choose the format: JPEG and the best quality, and leave the rest as it is and save the VKontakte graphic menu.
After this, our image will be saved in sliced form in a folder to which we could assign a name. Now, you can proceed directly to creating a graphic menu for VKontakte.
How can I see my friends' birthdays?
To see all the birthdays of your VKontakte friends this month or any other:
- Click "Friends"
- In the right column at the top next to the words “My friends”, click on the calendar icon
- a calendar will open that you can scroll through by month (triangle buttons left and right). When you hover your mouse over the picture, your friend's name will be shown and how old he will be (or is) turning that day.
Even easier, you can open the calendar using this link (opens in a new window). Keep in mind that some of your friends may not have indicated their birthday at all, or indicated it but hidden it - then you won’t be able to find out it using this method. Therefore, the most reliable option is to ask a friend (or acquaintances) when he was born, write it down and, to be on the safe side, set a reminder in your phone.
Where to watch birthdays from your phone
If you want to see other VKontakte friends from your phone, then download the VKontakte application from the Play Market or App Store.
Then, next to the page title, click on the arrow.
From the drop-down menu, select "Birthdays".
The list at the top will show users who are celebrating their name day today. Just below you can see which of your friends is having a birthday in the next month.
The good thing is that it displays how old the user will be if there is a year of his birth. But you won’t be able to see who was born in 3 or 4 months.
Let's show you how to view birthdays on VK using the Kate Mobile application for Android mobile phones.
Download the application and go to your profile. Next, click on the three vertical dots in the upper right corner.
Select "Birthdays" from the list.
The page with the dates of your friends will open on the nearest person who will celebrate the name day. You can scroll the list up or down. In the example, I can scroll down and see who was born not only in April, but also in May, June, and so on.
But this application does not show how old a person is or has turned, unlike the official VKontakte application.
Why doesn't VKontakte show friends' birthdays?
Usually VKontakte reminds you of friends’ birthdays under the sign of a bell:
But sometimes the reminder doesn’t work. Maybe it’s the VKontakte website that’s buggy, or maybe your friends are deliberately hiding their birthday so that they don’t have to be congratulated by the whole crowd and don’t have to answer everyone. We advise you to find out the birthdays of your friends who are really dear to you and set reminders in your mobile phone so that they repeat every year. You will learn how to do this from the instructions for your phone. And we told you how to find out the birthdays of your friends on VK a little higher: look up or rewind these instructions a little back to see.
Birthday is a he, not an it! It’s correct to say “it was a birthday”
and not “was”, because the word “day” is masculine. In addition, the word “birthday” does not exist at all, just imagine! Learn to speak and write correctly, it is useful in life.
How to make your VK more convenient?
Try the “Login” start page. Through it you will enter the VKontakte website or any other with one click. And there are still many interesting possibilities.
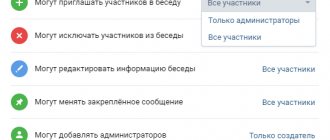
The most important condition that must be observed is that you must have administrator rights for the group in which you want to install “Calendar”.
1. Sign up for Gmail. 2. Go to the “Services” tab.
3. Select Calendar.
4. In the “My calendars” tab, select “Create a calendar”.
5. Edit the name, description of the calendar, and location at your discretion. BE SURE to check the box next to “Share this calendar.”
6. Click the “Create Calendar” button. The calendar you created will appear in the “My Calendars” menu. 7. Select the calendar you created (the square next to its name will turn green). Go to “Calendar Settings” by clicking on the arrow to the right of the name.
8. In the “Calendar Address” item, click the “HTML” button. A link for your calendar will appear in a pop-up window. Copy it.
10. Enter the required application name; select types - “IFrame/Flash application”, “Application”. Be sure to read the Application Posting Rules. Click the "Proceed to Download Application" button.
11. In the window that opens, enter your phone number. Click the "Get Code" button. After this, the “Confirmation code” line will become active. You must enter the code received via SMS. After that, click the “Submit Code” button.
12. If the code is entered correctly, the application editing window will open. Be sure to select the group in which the calendar you created will be displayed. To continue, click the “Save Changes” button.
13. Your application ID will be displayed in the window that opens. In the "Container Settings" item, select "Application Type" - IFrame. In the lines “IFrame Address” and “HTTPS Address of IFrame”, paste the copied link (see point 8). In the “IFrame Size” section, enter the required dimensions for the calendar window. Click "Save Changes".
14. The calendar you created will be displayed in the selected community. Changes to the calendar are made through Google Calendar.
The user-friendly interface attracts a huge number of users to this service. Having a VK page, you can find almost your entire social circle among your registered friends. When entering information when filling out a profile, many indicate the day, month, year of birth, or one of these numbers, which makes it easier to find people you know. And of course, everyone is pleased to receive a postcard and a few warm words on their name day.
It is no less pleasant to demonstrate to people your sincere attitude by congratulating them on the holiday. However, the current pace of life often leaves no chance to remember even important anniversaries.
VKontakte makes it possible to use the appropriate system of notifications and reminders. Finding out when a person was born is not difficult. The service is available to all account holders.
Everyone can send a congratulations message, prepare for a significant event, choose a gift in advance, top up your account with votes “ VKontakte”
».
Writing down memorable dates in notebooks is extremely inconvenient. However, this is not necessary, since the online service provides a “Calendar” function, which we will talk about in more detail.
The new VK interface is different from the previous one. Including regarding search, viewing dates of birth. Many are confused by the absence of a window on the right where the birthday people of the current day were previously indicated.
However, now, to find out how to see a friend’s birthday in VKontakte, you don’t need to open many applications and go to each page. All you need to do is use the calendar posted on the website. Here you can easily find users who have indicated their data in their profile.
Friends will not be left unattended
You can quickly get acquainted with the necessary information by following simple instructions:
- log in to your VK personal account by entering your Login and Password;
- go to the “Friends” item located on the left panel (the “All Friends” tab);
- in the upper right corner, click on the “Calendar” graphic;
- on the “Upcoming Events” tab that opens, those who will celebrate their name day over the next 24 hours are located at the top (there is a function to congratulate these people with a message or a virtual gift);
- then the list is replaced by a calendar image of the current month, on the dates of which there are user photos;
- move your mouse over the avatar to see the person’s name and find out how old he is;
- to view birthdays of other months, just click the left-right arrows at the top of the table image (dates that have already passed look more faded compared to those that have not yet arrived).
Please note that not everyone provides their details. Some hide access to them in the settings. If you already know this information, you can add it to your calendar as a reminder.
You can congratulate your friend in the following ways:
- send a message through the corresponding menu item;
- leave a congratulation, a beautiful postcard on the wall.
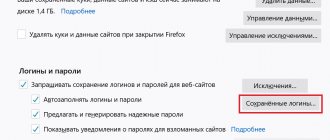
- open general settings and make sure that you have entered the required data correctly;
- Check your privacy settings by selecting all users or just friends among those who have access to information on the page.
By checking your calendar periodically, you can always be sure that you will congratulate your friends and acquaintances on time, leaving them with a pleasant impression of yourself. And this is an excellent foundation for good relationships that will bring more positive moments into life. Now you know how to view your friends’ birthdays in VKontakte.
, and as you understand, doing this is not as difficult as it seems. Just follow the site notifications in contact and you will never miss the best day in the life of your friend or acquaintance.
Good afternoon friends. In this short article we will learn how not to miss your birthday and congratulate him on time, and we will also find out what a calendar is and where it is located.
In the “Edit” section, “Basic” tab, if desired, any user can fill out the “Birthday” column by entering the date there. This can be done not only during registration, but also at any time after creating the page.
How to create a vertical, graphic menu on VKontakte?
Let's go to our group page. And we do some preparatory actions: In community management, we connect “materials” and save. If something is not clear at this stage, then read the article about the VKontakte text menu, everything is explained there in detail, it is said about it.
After this, we need to upload our pictures that we received when cutting the menu. That is, click “add photos”.
Next, you can either drag all the pictures from the saved folder, or select, using the “select file” button, the path to our folder, select all the pictures and click “open”.
Once the images are uploaded, we can start creating the menu. To do this, click on “edit” next to the latest news.
And now, we can add the code for our menu. In my case, it will look like this:
[[photo-48249652_297601976|130x46px;nopadding;|https://link]] [[photo-48249652_297601975|129x46px;nopadding;|https://link]] [[photo-48249652_297601974|129x46px;nopadding ;|https:/ /link]]
So, let's take a closer look at what's going on here:
... - these tags align our menu in the middle. If you remove them, the menu will be pressed to the left edge.
[[...]] - actually, links to menu items.
photo-48249652_297601976 - the path to our image. The path is formed as follows: album number_number of the photo itself. How to find out the path to our image? Everything is very simple. We go to the photo album in which our pictures are located and click on the desired image. Then, in the address bar we will see the full path to our image.
130x46px;nopadding; — image options: 130x46px; - the width and height of our image (may differ from the size of the image itself) - for a vertical menu on VKoktakte it is not necessary to indicate; nopadding; - no spaces - when using this option, all spaces (indents) are removed and the images are merged into one.
https://link - the address of the page to which this or that picture links.
Here's what I got:
Birthdays of VKontakte users
After the user has indicated the date of his “sad holiday,” it is automatically saved to the social network database for subsequent work with it. Why is this being done? When that very day comes, VKontakte notifies all the friends of the birthday person so that they can congratulate him on the holiday.
Where is the birthday of a VK user displayed?
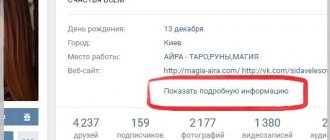
DR is indicated on the user page in the basic information (if it is specified in the settings). To find out when a person was born, you just need to go to his page and look at the date in the corresponding line. Even if you are not close friends, but just acquaintances, the person will be pleased if you remember the date of his “sad holiday” and congratulate him on this day.
Friend's birthday notification
VKontakte notifies you when your friend’s birthday is approaching or is approaching. The notification comes the day before the holiday and on the birthday itself.
If you go to the birthday person’s page, a notification about the holiday will appear there too. In both notifications, you will immediately be prompted to send a gift to the user (read about this in the article “VKontakte Gifts”).
You can click on the “Show all gifts” link and go to the store. In order to buy a gift, you must have money in your account. Read about this in the article “How to deposit money into a VKontakte account.” If you have money in your account, then you can simply choose a gift, buy it and send it to the birthday person.
How to change date of birth on VKontakte
You can change or fill out your birthday information at any time. To do this, go to the “Editing” section, “Main” tab.
VKontakte calendar
Why do you need a VKontakte calendar? This is a kind of service where all your friends’ birthdays are displayed. Yes, we remember that notifications about them come a day in advance and on the birthday itself. But sometimes at the beginning of the month you just want to see who is celebrating their birthday this month.
Calendar information
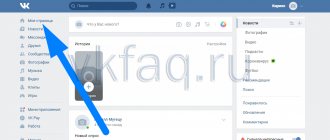
Let's see where it is located. You need to go to the “Friends” page, and in the upper right corner of the menu you will see an icon with a calendar image.
- view upcoming friends' birthdays and events;
- write a congratulation or send a gift to the birthday boy directly from here;
- see friends’ holidays and events for the entire current month, as well as birthdays and events in the next months (and past ones);
Now you know how to find out about a friend’s birthday on VKontakte and won’t forget to congratulate him. And that's all we have...
Writing a VK chatbot script
You can use many programming languages to write a script, but I will show everything using node.js as an example.
Create an index.js file on your computer and open it with a code editor or IDE (I use VS Code).
Now we need to import the library that we will install on the server later and insert the token (access key) that we received in the previous steps:
const { VK, Keyboard } = require('vk-io'); const vk = new VK({ token: “insert the token here” }); const { api } = vk;
In order for the chatbot to send the schedule, it needs to know it. Let's create an object with days and activities:
days = { “Monday”: “1)Informatics/English\n2)Native literature\n3)History\n4)Literature\n5)Russian\n6)Informatics and ICT\n7)English/ No lesson", "Tuesday": "1) Computer Science and ICT\n2) Literature\n3) Practical. in mathematics\n4)Algebra and basic science\n5)Geometry\n6)Labor/Russian\n7)Physical education”, “Wednesday”: “1)Physical education\n2)Chemistry\n3)Geography\n4) Social studies\n5) Social studies\n6) English\n7) Physics”, “Thursday”: “1) English/Computer science\n2) Algebra and basic science\n3) History\n4) Literature\n5 )Physical education\n6)Biology\n7)No lesson/English", "Friday": "1)Society and people\n2)Physics\n3)Economics\n4)Astronomy\n5)Lifestyle\n6)Geometry" }
Fill this object with your data according to the above example.
Now we need the script to receive all messages that are sent to the bot:
vk.updates.start(); vk.updates.on('message', (context, next) => { //Further we will write all the code here (inside brackets) }
We check whether the message contains text and is sent on behalf of the user:
if (context.text == NULL || context.isGroup == true || context.text == 'undefined') return
Now let's write a condition that the message contains the name of the day of the week. Also, don’t forget to send a message using “context.send” along with the schedule. In addition, we add an inline button to view the schedule for the whole week, the condition for which we will write in the next step:
if (Object.keys(days).indexOf(context.text.toLowerCase()) >= 0) { context.send({ message: days[context.text], keyboard: Keyboard.builder() .textButton({ label : 'Whole week', payload: { command: 'Whole week' } }) .inline() }) }
Now you can write a condition to view the schedule for the whole week:
if (context.text.toLowerCase().includes('whole week')){ context.send(`Schedule for the whole week:\n \nMonday:\n${days["Monday"]}\n \nTuesday: \n${days["Tuesday"]}\n \nWednesday:\n${days["Wednesday"]}\n \nThursday:\n${days["Thursday"]}\n \nFriday:\n ${days[“Friday”]}`) }
Save the file and proceed to install it on the server.