We do not receive or store any passwords for the social network in Contact. This is technically impossible.)
Video editing often saves the day on the eve of significant dates, when it is so important to congratulate loved ones in an original way. Creating videos yourself from memorable photographs will demonstrate the special attitude of the donor and his creative potential. Moreover, for such manipulations today you do not need a special program for creating videos, because a modern online video editor - vimperor.ru - has loomed in the arena of the World Wide Web.
How to make a VKontakte slideshow with effects and music
A VKontakte profile allows you to exchange photos with loved ones and share important moments, despite distances. However, if you have uploaded a hundred vacation pictures to an album, there is no guarantee that even your closest friend will not get bored and watch the collection to the end. Combine photos into a music video - and you will definitely not be left without enthusiastic comments! In this article you will find instructions on how to make a slide show with VKontakte music and amaze your loved ones with a fascinating story about your journey and more.
Create a slideshow in a minute on VK
VKontakte provides the ability to view photos in automatic mode. To do this, just follow a few simple steps:
- create an album, come up with a name for it and upload a photo;
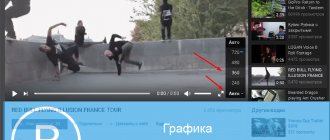
- open the image in full screen size by clicking on the special icon (see screenshot), or by pressing Alt + Enter
; - check the box next to the “Slide show” option and set the slide duration from 5 to 10 seconds.
Go to full screen viewing mode
Set the duration of display of one photo
Ready! Pictures from the album will slowly replace each other on the computer screen. Such a slide show is good for a background at a family feast, but not for showing memories of a bright vacation, holiday or other important event. In addition, a VKontakte slideshow created in this way cannot be saved in your profile and shown to friends.
If you decide to share your vivid memories, do it effectively - create a fascinating photo story using the PhotoSHOW PRO program! This software makes it possible to easily compose videos from photos, music and animation, as well as post a ready-made slide show from VKontakte photos! The editor is easy to use, you will master the algorithm in just a couple of minutes.
Why is the slideshow from PhotoSHOW PRO better?
- №1.
The editor allows you to use titles and interruptions. They give the video completeness; such a video looks more serious and professional. - №2.
You can add short videos to your project and, if necessary, trim them right in the program. This variety will make the slideshow even more interesting to watch. - №3.
Thanks to the collection of animated collages in PhotoSHOW PRO, you can easily place several photos on a slide at the same time. - №4.
The software offers an extensive catalog of effects and transitions; moreover, you can customize the animation yourself. - №5.
In the program, you can easily customize the musical accompaniment to the video - select a song or instrumental melody, add sound effects or record voice comments.
Fascinating holiday slideshow: step-by-step instructions
By following the tips below, you will create a memorable photo movie in PhotoSHOW PRO in just 5 steps. All you need to do is download the slideshow editor. Collect your photos in a separate folder and get to work.
Step #1. Upload photos and add them to the project
Create a “New Project” and in the file browser window, find the folder with your pictures. Drag frames one at a time onto the slideline, or use the Add All Photos option to import all images at once. You can freely change the sequence of slides and also adjust the duration of their display.
Place your shots on the slideline
If you want to have multiple photos on a slide, go to the “Collages” tab. Choose the photo animation you like best and add it to your slideshow. The software will automatically offer to fill in the gaps with your photos. If desired, open the collage slide in the editor, select a new background and add clipart or captions.
Choose a suitable collage from the catalog and replace the pictures with your own
Step #2. Complete your project with titles and screensavers
In the “Titles” and “Intros” tabs you will find a collection of slides with ready-made designs that will perfectly complement your travel video. In addition to a number of universal options, the software also offers thematic ones, including those dedicated to tourism. Add your favorite slide with the click of a button. You can transform any template in the editor or even create a splash screen from scratch by uploading your image and customizing the header design.
Edit a ready-made splash screen or create your own design from scratch
If you plan to post a slideshow on VKontakte, you need to create a screensaver that is as catchy and attractive as possible. To do this, you will need a short and succinct title, which in 3-4 words reflects the essence of the video and at the same time interests, for example: “How we conquered Sochi.” Add one of your best photos to your screensaver or use it as a background.
Step #3. Edit your photos
If the photo needs improvement, open it in the editor and go to the “Layer” section. There you will find tools for high-quality photo transformation. Crop the photo, expand it, and add filters if desired.
You can complement your slide composition with captions, clipart, glow effects, and geometric shapes. Just click on the "Add Layer" button and select the option you want. Captions with dates and names of places visited will fit perfectly into a slideshow about a trip. In addition, PhotoSHOW PRO offers a thematic selection of clipart for vacation videos, so you don’t have to waste time searching for suitable pictures.
Experiment with different slide design elements
Step #4. Customize the animation
If in the VK slideshow one transition was used for all photos - slow fading, then in PhotoSHOW PRO you will have access to dozens of animation options from simple gradients to modern motion-graphics styles.
Connect your slides with colorful transitions
In addition, the program allows you to apply professional effects to your slides. Dynamic and minimalistic, bright and monochrome, classic and three-dimensional - don’t limit yourself to just one, choose different options for your photos. You can create a 3D slideshow with just a couple of mouse clicks.
Effects from the “Natural” group will fit perfectly into a holiday slideshow. Add sun glare to the frame or, conversely, simulate rain or snowstorm. Your photos will come to life in a second!
Select the appropriate effect from the collection and drag it onto the slide
Step #5. Choose musical accompaniment
Finally, complement the project with suitable music. The section of the same name will offer you to use songs from the program’s selection or download any other song from your PC. You can cut and splice audio tracks.
Select a song from the program catalog or upload your own audio file
The software also provides a sound recording function, which means that you can share your vacation impressions by adding voice comments. By the way, you can voice not only the entire slide show, but also each slide individually. To do this, in the slide editor you need to go to the “Sounds” tab.
Of course, preparing such a video from a photo will take a little more time than viewing a VKontakte slide show, but the result will be much better quality! To post a clip on social networks, go to the “Create” tab and use the “Create a video for publication on the Internet” option. In the list of different hosting providers, find VK and select HD quality.
Prepare a video for publication on VKontakte
Wait for the conversion to complete and you can safely post the video on your page. Slideshows are a convenient way to share emotions from memorable events and travel impressions with loved ones. Download PhotoSHOW PRO and save memories by creating amazing music videos!
fotoshow-pro.ru
Features of the publication
At the end of 2021, VK management presented a new social network service that makes it possible to post photos and short 12-second videos in the feed, which are available for viewing throughout the day. The new publication format was created so that users could share with their friends and subscribers what is happening in their lives right now, without worrying about the quality of the content.
Stories are placed in a special block located above the main news feed. There is also a button to add them. It is noteworthy that the user can upload photos and videos no older than 24 hours. The VK administration introduced another restriction on the creation of Stories - by default, they can only be posted from a smartphone or mobile gadget. The official web version of VK is not equipped with tools for publishing disappearing photo and video materials. However, there is still a way to download stories from a computer, and it is described below.
How to post VK Stories from a computer
By uploading stories via a PC or laptop, you will not be able to change your privacy settings later. This is worth considering if you do not want any of your friends or subscribers to see the published materials.
Step-by-step instructions on how to post a story from a PC or laptop:
- Insert the following address into the top line of your browser - https://vk.com/dev/execute.
- At the bottom of the page you will see a blank “code” window.
- If you want to upload a disappearing photo, insert the text into it: “return API.stories.getPhotoUploadServer({“add_to_news”:1});”.
- If the video is “return API.stories.getVideoUploadServer({“add_to_news”:1});” (without quotes).
- Click on the “Run” line.
- The “Select file” window will appear on the right side of the screen, click on it and select the object to publish.
Please note that you will not be able to post a photo or video whose size exceeds 5 megabytes.
Using this method, you will not be able to add sound to your story during the publishing process. The only option is to upload video files that already have sound added using a variety of editors.
How to make a slide show on VKontakte?
Today we will look at how to create a slide show from photos in an album and learn how you can surprise and delight your friends by making a beautiful video from various photos with the addition of audio recordings.
How to make a photo slideshow on VKontakte
We open any photo, even our avatar, even from any of our albums or from one of our friends. The main thing is to open the photo. Now there are two options for switching to full screen mode - this is where you can enable the slide show effect.
- The first option is the ALT + ENTER key combination (first press alt and without releasing enter), or CTRL + ENTER, if suddenly the first combination does not work.
- The second option is to move the cursor to the upper right corner of the image until a special cursor appears. See all the details below:
After the described manipulations, the size of the photo increased and it became more convenient to view it. Next, to switch between images, just use the arrow keys on the keyboard. But we need a slide show. It’s okay, to do this, check the Slide show box, the inscription in the lower left corner:
To finish viewing photos in this mode and return to the normal screen, press the ESC key.
How to make a VKontakte slide show with music
Simple VKontakte capabilities are not enough here, so let’s go to the Applications section and see what third-party developers offer today. After searching for the word “slideshow” (combined), we were offered 5 applications. PS If you write separately, then there is only one thing.
The last ones didn’t open for me at all, although Picorolla is a fairly popular application, installed by 4 million users. The slider was disappointing because downloading music from a computer doesn’t work and you can’t download tracks from the page. The third allows you to work only with page photos and high-quality video is not free. The fourth application allows you to create a free 15-second video, but you have to pay for the rest. In general, not much. It’s a shame that Picorolla doesn’t work, it would be interesting to evaluate the functionality, apparently it’s not fate.
searchlikes.ru
A little about the online video editor
The Russian-language platform vimperor.ru provides free access to interactive tools for creating and publishing full-fledged videos with the author's concept. The process of work from the first minutes will turn into a fun and exciting pastime, the result of which will be a unique slide show.
Advantages of the service:
- on the site you can learn how to create a video from photos ;
- no need to install additional software;
- there are no special requirements for the hardware component of a computer device;
- you can work without registration, uploading your favorite music and necessary photos;
- resource information allows you to understand not only how to make a video from photos and music on VKontakte, but also how to make money by publishing clips;
- You can use photos and music in any format to create a slide show;
- personal profile information remains confidential;
How to take a photo from a video, save a frame from a video
Often, while watching a video, there is a need to save a frame from the video, or, as they say, take a photo from the video. In this material we will talk about how this is done using the example of four popular programs for watching videos.
How to take photos and videos using VLC Player
VLC Player is one of the most popular video players at the moment. VLC Player gained its popularity thanks to its simple interface and support for all necessary functions. Among these functions is the creation of photos from videos. In order to take a photo from a video using VLC player, you need to open the “Video” drop-down menu and select “Snapshot”.
After this, the program will save the current frame as a separate photo. For convenience, you can pause the video and then use this function. All saved frames will be located in the folder C:\Users\Username\Pictures. You can also find them in the Images library.
How to take a photo from a video using Media Player Classic
Media Player Classic is another very popular video player. If you use it, then in order to take a photo from a video you need to open the “File” drop-down menu and select “Save Image”.
After this, a window will appear in which you need to specify the folder to save this frame. It should also be noted that in Media Player Classic you can save frames using the ALT+I key combination, without opening the “File” menu.
In addition to saving a single frame, Media Player Classic can cut frames from a video. To do this, open the “File” menu and select “Save Thumbnails”.
The result is a picture like the one in the screenshot (below).
This picture displays the name of the video file, its size, duration and resolution. Under this information there is a cut of frames from the video with a time display.
How to save a video frame in GOMPlayer
If you use the GOMPlayer media player, then in order to save a photo from a video you need to right-click on the video itself and select “Video – Save the Current Frame” in the menu that appears. You can also use the key combination CTRL+E for this.
Just like in Media Player Classic, in the GOMPlayer program you can cut video frames. To do this, you need to use the “Video – Create Snapshot Preview” function.
How to save a frame from a video in KMPlayer
If you use KMPlayer to watch a video, then in order to save a frame from the video you need to right-click on the video and open the “Capture – Capture source frame” menu. After this, a window will appear on the screen in which you just need to save the resulting frame to any folder.
KMPlayer also has a feature called Frame Extracts, which can be launched using the Capture menu or using the CTRL+G keyboard shortcut. After launching this function, a small window will appear on the screen in which you can configure automatic saving of frames. For example, here you can configure saving every hundredth frame or one frame per second.
After you select the desired settings in the “Frame Extraction” window, start playing the video and click on the “Start” button. After this, the program will begin saving frames to the specified folder.
comp-security.net
How to add music to VK history on iPhone
Making a Story on an iPhone is extremely simple. You only need to launch the program to play songs before pressing the button to record videos. The following will do the job perfectly:
- VK Music.
- iTunes.
- BOOM.
- Yandex.Music.
- SWPlaylist.
Any software is suitable for both online and offline listening to songs.
Step-by-step instruction:
- Open the application in which you listen to tracks.
- Play the desired song.
- Minimize the program to play the song in the background.
- Open VK.
- Click on the story post button.
- Shoot a video in the usual way.
- Select “Publish immediately.”
Your song will be heard in the recorded video.
Please note that the tracks you play on headphones will not be heard in the story. Always disconnect this accessory from your mobile device before shooting to get great videos.
Photo with music
The method presented above is only relevant for those who are going to post a video in their stories. But what if you want to publish a photo in your Stories feed with your favorite song playing in the background?
After the release of the latest iOS 11 update, owners of Apple products received an additional option - they can now record everything that happens on the screen of their device. This innovation can be used to create a cool musical Story.
First, let's figure out how to launch the new utility on the iPhone:
- Open settings.
- Go to the "Control Center" section.
- Click on the line “Customize elements”.
- Add a utility to record what is happening.
- Swipe the screen up.
- In the panel that appears, find the circle icon.
- Click on it.
After completing the above steps, a countdown will begin, and after three seconds, screen recording will begin.
How to add music to a VK story with a photo:
- Go to the app that contains your favorite tracks.
- Play the desired song.
- Minimize the program so that the track plays in the background.
- Open your Camera Roll.
- Find the photo you plan to publish.
- Swipe up on the screen and click on the record button.
- Upload your recorded video using the standard method.
You can edit the video and get rid of the red stripe in any mobile video editor, for example, VivaVideo.
How to take a still frame from a video file in popular video players
Hi all! Today I want to tell you how you can take a photo from any video file.
. That is, in a different way, it will sound like how to take a screenshot from a video. Don’t worry, we don’t need a camera for this, all manipulations can be done programmatically. All video players at the moment can take screenshots without any problems, let's look at how to do this.
The first time I needed to make an image from a video file was back in 2007, when I saw one very beautiful frame from my graduation. It was necessary to tear out the photo from the video for further printing. I followed the simplest path: I opened the video in full screen, found the desired frame and, by pressing the Print Screen key, pasted the screenshot from the clipboard into the usual standard graphics editor Paint. Afterwards, I simply printed out the saved file and inserted the resulting result into a frame.
In principle, everything is very simple and this option is suitable in any situation in any player. But there are much simpler options: any modern player has a function like saving a specific selected frame. The difference is that there is no need to open any graphic editor to save the frame, everything happens in a matter of seconds. Below we will look at popular players in which you can take a freeze frame
. By the way, do you want to choose a player for your computer? Then don’t miss the article on the top best video players for PC.
How to take a screenshot from a video using KMPlayer
It was not in vain that I started with this video player because so many users use it. So, first, select the desired frame, right-click on the video and select “Capture” - “Capture source frame” in the context menu.
Or you can use the key combination Ctrl+E.
How to take a photo from a video with GOMPlayer video player
In this player, we also select a frame, right-click and select “Video” - “Save the Current Frame” to save the image. You can do all this with the key combination Ctrl+E.
You can cut a video in GOMPlayer using the “Create Snapshot Preview” item in the “Video” section. In general, the player itself contains many useful functions and tricks, thanks to which you can carry out interesting manipulations.
Taking a still picture using Media Player Classic
This is a very popular player, which, oddly enough, can also take screenshots from any video files. To do this, again select the required frame, click “File” - “Save image”. A window will pop up where we will need to specify the folder where the still frame will be saved.
The same result will be obtained if you press the key combination “Alt” + “I”. If you want to cut frames, click “File” - “Save thumbnails”. Here we simply assign a name to the files and click “Save”.
Taking a photo from a video file using VLC Player
VLC Player is no less popular video player than those described above. Surprisingly, this player can also save photos from videos. To do this, click “Video” - “Take photo”. The frame from the video will then be saved to your computer's hard drive, usually in the Pictures folder in the Windows library.
Here is a short review of players that can take a photo from any video
. As you already understand, all these actions are carried out in a couple of mouse clicks and are much different from taking screenshots using the Print Screen button. Try it, and if you have questions, ask in the comments. That's all for now, see you again!
itportal.pro
How to take a photo from a video
While watching the video, you will notice that some episodes perfectly replace even the highest quality photographs, even of the same moments. If you like this, save your favorite moment from the video. With minor editing of the frame, it can be regarded as an excellent shot, supposedly taken with a camera.
To do this you will need the following programs:
— Adobe Photoshop (order a 100% licensed version for correct operation in our online store),
- Windows Movie Maker,
- Virtual Dub.
Instructions
- In order to save your favorite moment from the film as a stand-alone element and further work on it, run the video sequence in one of the file editing or playback programs. The type of utility will directly depend on the format in which the video was saved. In cases where the clip is saved in a format supported by Windows Movie Maker, the document shortcut will need to be dragged into the file editing program.
- Submit your document for editing on the timeline. This function will be performed by pressing Ctrl+D on the keyboard. Stop the mouse cursor at the moment you want to save in the photo. In the control panel of the program you can regulate the process of playing a video file.
- Take a photo by clicking on the button of the same name in the program control panel. Select the file storage location and specify its name.
- If for some reason the video sequence does not launch correctly in Windows Movie Maker, use the service of another utility called Virtual Dub. Stop the necessary moment that you want to depict with a photograph. The Play button will help you play the clip. Move the pointer to the desired moment in the video; it is located just below the Virtual Dub panel.
VirtualDub program
In the Video folder, find the list of filters and select Deinterlace. You will be given seven types of filter settings, all depending on your personal preferences.
Video: How to make a PHOTO from a VIDEO
besthard.ru
How to make a photo from a video? Step-by-step instructions and tips
Modern technologies make it possible to record all important and not so vital moments. But when sorting through personal photo and video archives, sometimes you have to regret the chosen method of saving - after all, you can’t put a video in a frame, how can you make a photo from a video?
Do we preserve memories correctly when we need to take a photo from a video - where to start?
Today, even the simplest mobile phone has a video and photo camera. Just a couple of decades ago, filming was a phenomenon, if not fantastic, then intended for important family holidays and significant national events. Nowadays, adults take pictures of children and pets, photograph beautiful things and views simply, “for the soul,” even first-graders play around during recess, filming their tricks and games on their phones.
There are a lot of advantages in such technological progress - the entire history of an individual family or person is stored not only in memory, but also on various media, now it is more pleasant and interesting to remember, and it is easy to share the events of bygone days with others. It’s not always just the format that is chosen correctly. We select photos to create beautiful or important still images, and include video when some interesting action is expected.
It often happens that from some interesting dynamic event there is only a single video and more than one photo left, but you really want to print something for the family archive and upload it to social networks - how to make a photo from a video? Everything is simpler than you think, you only need a video, a program to play it and any graphic editor.
How to make a photo from a video - instructions
It is necessary to immediately note the fact that the quality of photographs directly depends on the quality of the video itself. It is almost impossible to obtain high-definition images from recordings made using a mobile phone with a 5 MP camera. You can make a photo from a video in almost any video player. There are also special editors for video processing.
How to make a photo from a video in a regular player?
- Open the desired video file in the program.
- We stop the video at the required frame.
- Depending on the settings of the selected player, press print screen or another combination key (for example, in Power DVD the default is the letter C).
- Open any graphic editor, insert an image, edit it to your liking and save it to the desired folder.
Everything is more than simple, isn't it? Some players allow you to take still pictures without stopping the video, with one click on the copy button. You can also set up automatic saving of all saved photos to a selected folder - this function is not available in all players.
How to make a photo from a video. Virtual Dub program
The virtual dub program is convenient for creating photos. In this editor, you can break down all the videos into frames and select the most successful ones. Indispensable for short videos (let’s say you wanted to take a photo, accidentally selected a video, and quickly canceled it, but the video remained for a few seconds), for long clips it is preferable to select short segments for saving images.
How to make a photo from a video. NERO 7 program
The well-known multifunctional program NERO 7 is also ideal for cropping video clips. Technically, everything is performed as described in the detailed instructions - we play the video, press C, the frame goes to the clipboard, after which it can be opened in any graphics program and changed if necessary.
You can set additional settings, after which, when you press a key, images will be automatically saved to the selected folder. One of the main inconveniences of NERO 7 is that the program does not recognize all types of files; preliminary recoding may be required.
How to make a photo from a video. Adviсe
Some video players do not support the function of saving frames from playing images. In this case, to achieve your goal you will have to cheat a little.
- You need to start the video and open the player in full screen. Then use the Print Screen key to create screenshots. Namely, press the key during playback (you can stop it), then paste it into any image editing program and save it.
- If you're trying to figure out how to take a photo from a video, but you're getting a black screen instead of pictures, it might be because of the original video format. There are special editors for changing the file type. Many of them also have a photo-slicing function.
- We figured out how to make photographs from videos, but is it possible, on the contrary, to create a video from photographs? Of course, yes, slideshows of individual frames edited to music are used as a supplement to regular videos and as independent clips.
You can create and design such a dynamic photo series to your taste in almost any video editing program.
Previous articles from the “Career” category
Also read: Loading...
fithealth.ru
How to insert music into a story on Android
Owners of Android smartphones will have to install special programs that will allow them to add tracks to photos and videos for Stories feeds. According to statistics, the following applications are the most popular:
- VideoShow is a powerful video editor with a wide range of functions. In addition to overlaying music tracks. It allows you to create colorful slide shows and presentations. It features a simple and intuitive interface and pleasant design. Is freely available.
- Movie maker &Editor is a free video editing software that includes in-app purchases. With its help, you can apply a variety of effects and animations, and create sound. An indispensable tool for any blogger.
- Flipgram is an application that is available for both Android and iPhone. Allows you to create full-fledged films on a mobile device, make slide shows and presentations. It is free and includes advertisements, which you can opt out of by purchasing the PRO version. Equipped with a button for publishing video materials on various social networks, including VK and Instagram.
Step-by-step instructions on how to add music to a story in VK using an application (using Flipgram as an example):
- Go to Google Play to download the video editor.
- After installation, launch the program.
- Click Video Editing.
- Find the desired video in the Gallery and click “Start”.
- You will see tools for editing and changing, the program will offer standard melodies.
- Specify the track you want to overdub.
- Click "Add Music".
Here you can reduce the length of the video (if necessary) to twelve seconds.
Save the edited video to the device’s Gallery, and then publish it in the standard way - launch the VK application and click on the “Add Story” button located in the upper left corner of the screen.
How to take a photo from a video
Today I’ll tell you how to make a photo from a video using a very simple, fast and absolutely free Free Video to JPG Converter program.
It was evening, there was nothing. I found a video from ten years ago with my youngest son Sashka and decided to watch it.
It is impossible to describe the impressions in words. My child’s facial expressions immediately caught my eye - he managed to display 20 emotions on his face in 10 seconds. It’s impossible to catch this with a camera; you just won’t even have time to turn it on. And your baby will immediately start posing.
I remember that I put the video camera on the table, directed it, turned it on and went into another room. So she filmed for half an hour...
But only today, 10 years later, the idea came to find a simple program that could take a photo from a video. Not a couple of screenshots, but break the entire video down by seconds or frames. I didn’t have to search for long - this is the Free Video to JPG Converter program.