Signing the photo
Please note that it is worth signing a photo on this resource so that every outside user and you can easily identify the image over time. Moreover, the described process is often combined with placing marks on photographs, thanks to which you can identify people and go to their personal pages.
Today the social site The VK network allows you to sign any image using just one technique, which equally applies to both new pictures and previously uploaded photos.
- Through the main menu on the VK website, switch to the “Photos” section and upload any perfect image, following the appropriate instructions.
Write the text that should be the main caption of the desired image.
Click on the “Publish on my page” or “Add to album” button, depending on your personal preferences in terms of the final location of the image.
Go to the location of the downloaded image, open it in full screen mode and make sure that the description was successfully added.
To achieve greater accuracy in the case of photos with real people, it is recommended to set marks through the additional menu item “Tag a person” .
At this point, you can complete the process of signing images directly when uploading them. However, you should not ignore a similar procedure, which may be required if you have previously uploaded photos without proper description.
The following recommendations apply equally to creating a new description or editing an existing signature.
- Open the picture you want to sign in full-screen view.
The only existing limitation is that it is impossible to sign pictures from the album “Photos from my page” .
Enter the required text signature in the field that opens.
Left-click anywhere outside the field to enter a description.
Saving occurs automatically.
Please note that it is impossible to automate the described procedure, but despite this, you can place pictures in a photo album and create a description directly for the desired folder. Thanks to this, the process of analyzing content is also greatly simplified, but do not forget that even with this approach, no one forbids you from creating descriptions for some photos in the album with a common caption.
Thank the author and share the article on social networks.
Hello, dear readers of iklife.ru.
Social networks are intended primarily for communication and information exchange. This can be text, images, video. And today we will figure out how to add a photo to VKontakte.
Let's start with posting on a personal page, then we'll talk about communities, pay attention to publishing from a phone, and at the end we'll learn how to quickly post materials from Instagram on VKontakte.
How to make a free beautiful signature online by last name
Probably everyone remembers how they made their first signature, how they signed their passports, how they put their signature in the registry office, how they covered notebooks and wrote letter by letter in calligraphy. A thrilling and unforgettable experience. We went through this once, but then there was no Internet, signatures were spied on from teachers, found in books and newspapers. And someone is just trying to find their own style, create a beautiful creative signature for life and also write autographs on a piece of paper?! I present to your attention an overview of services that will facilitate your search for creating an original personal signature.
The content of the article
Service for creating your own personal signature
5 simple steps and you can make a creative signature without much difficulty. We go to the service, turn on the translator in the browser or click on the icon in the drop-down menu and mark the Russian language. Select the window labeled Create using our step-by-step wizard . Click Start .
- Enter your first and last name in Latin letters. Click Next Step. Your signature is all ready. The next steps are to configure the signature.
- Select the font style and watch the painting change.
- Select and mark the font size.
- Set the font slant, determine which slant your signature will look impressive with.
- Select the text color and background color, pay attention that there is a checkmark to select a transparent background.
Generator of handwritten signatures and inscriptions
A service for creating inscriptions, a huge selection of tools and a lot of room for imagination. But we are interested in creating a personal handwritten, calligraphic, beautiful signature.
Generator of handwritten signatures and inscriptions online
In the left menu on the “ Inscriptions ” tab, select:
Smooth calligraphic
- The first stage is to enter your initials and click Next .
- The second stage is to look at examples of painting and note the font style.
- The third stage is to choose the font color and size, you can turn on the stroke.
Click Save As and save the file in PNG format. The signature is generated on a transparent background.
Calligraphic personal signature example
Handwritten fonts
Mark the font, select the font size and color, enter your full name or capital letter of your first and last name and click Generate .
Handwritten signature example
Online signature generator: create a free signature online
Another service where you can practice and save your signature to your computer. Let's use an online signature generator. There is no need to register there. Go to the service using the link >>>
Online signature generator
- We insert the initials into the required fields, the middle name is not necessary, for example, I generated my first and middle names, but entered the middle name in the “ Last name ” column. Click the “ Choose signature ” button.
Enter initials (full name)
- We wait while the service generates signatures, select the option you like, and use the arrow to scroll through the slider with images.
Online signature generator by first and last name
If you need a signature option as a sample , right-click on the picture, select Save picture as and save the picture to your computer in png .
Save the signature in png format
We need a picture as an animation, follow the instructions below.
Setting up animation on the service "Online signature generator"
- Click on the wrench and get to the settings menu, customize the animation to your taste. Here you can start the animation by clicking on the black triangle and stop its scrolling to configure other settings - to the question “ Repeat drawing?” » o left-click and select a transparent background or picture
If you like everything, click “ Save animation ”, wait until the file is created, an icon will appear in the browser window (Pop-up window in Chrome is blocked), in the Yandex browser we find such an icon in the right corner. Many people are afraid to download when the browser windows are locked, but Chrome provides an explanation, here is a quote:
The Chrome browser automatically blocks pop-ups (the Pop-up Blocker icon appears in the address bar). This feature can be disabled. If pop-ups are blocked in your settings but still open, you may have malware installed on your computer. How to change settings for a specific site Not all pop-ups are advertising or spam. Some reliable websites simply show content in them. How to allow a site to show pop-ups Launch your Chrome browser. Open a page that blocks pop-ups. Click the Blocked pop-ups icon in the address bar. Select the link to the desired pop-up window.
Click on the icon in the browser window , a window will open in front of you, click on the link, the picture will open in a new browser window and save the file as a GIF image.
The icon with a heart allows you to upload the signature to the “ Gallery ” section and social network buttons , which makes it possible to share the signature on social networks.
Electronic handwritten and animated personal signature generator
Using the online tools on the service, you can create a custom electronic signature in a couple of simple and clear steps, easily generate a handwritten signature for use in emails, websites, blogs, forums, PDF, Word, Docs, etc.
The downside of the service is that signatures are created in Latin.
We post a photo on our profile
There are several options for this placement: on the wall, in the photography section, in an album, and by setting an avatar. You may find some or all of them useful. Let's look at each method separately.
On the wall
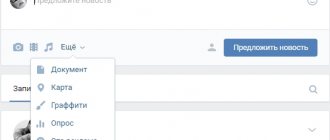
To attach an image to a post, click the camera icon below the text. You can post graphics without an accompanying message, but this is rarely done.
Then follow the “Upload photo” link.
In Explorer on your computer, select the required file. Or take a photo in real time, it will appear under the new entry. Click "Submit". Done, new material has been published on the wall.
On the page
Go to the corresponding menu item.
Click on the “Add Photos” button. Select one or more files in Explorer and open them. Now you can make some adjustments:
- make a description,
- to turn,
- open photo editor,
- remove if necessary.
All this is done using icons on each thumbnail.
After processing is complete, we confirm our desire to publish the images on the site.
Now you can see them in your account in the appropriate section.
In album
If you don’t already know that graphics can be stored in separate folders, read the article on how to create an album in VK. If you already have ready-made catalogs, after uploading photos from your hard drive, you can choose not “Publish on my page”, but “Add to album”.
In the window that opens, select the location where you want to move the files.
Main profile photo
Hover your cursor over the current image and a menu will pop up. Select Update Photo.
Here you can take a snapshot or download a ready-made one from your computer. When the download is complete, confirm your choice with the “Save and Continue” button, or go back and select another option.
Finally, define an area for a small avatar that will appear next to your messages and in other users' friends lists. Save your changes.
..
, so it will look larger than all the other text since it's a heading.
When you click on the question mark located at the bottom right, a hint appears to help you understand when editing the article.
Let's start filling out our post. Adding text. To format the text, just select the required fragment and use the pop-up menu, which has the ability to make the text bold, italic, or strikethrough.
You can also insert a hyperlink that points to a post, group, website, or other web resource. The design of headings and direct quoting are also provided at the time of the appearance of new functionality.
To go to a new line, press “Enter”, and a new paragraph – “Shift + Enter”.
How to add media files?
Go to the next paragraph (keyboard shortcuts were described above) and press “+”.
We see the following “pop-up”.
The first button allows you to add photos by directly uploading from a computer or group/profile photo content, or take a photo via a web camera.
The second one allows you to add a video recording to the post.
For now, to add video content, you should initially place it in your videos. You can also find videos through the search that appears when you add them! And one more fact. The video will not play in edit mode! You can see it “in action” only after the article is published.
You can immediately set a description.
The third button allows you to add a GIF from your documents or by directly uploading from your computer.
Photo content can be added without going through the above operations by using the clipboard and the well-known keyboard shortcut “Ctrl+C” (copy) and “Ctrl+V” (paste).
Hotkeys used in the new editor.
Let's consider combinations of combinations that can significantly increase the speed of posting. Some of them may already be known to many:
- “ctrl+B” - highlight text in bold;
- "ctrl+I" - italics;
- “ctrl+Z” - cancel the previous action;
- “Enter” - go to a new line;
- “Shift+Enter” - the cursor moves to a new paragraph;
- “*” + “Space” - creating a bulleted list item;
- “Number (0,1,2...)” + “.” + “Space” - adding items to a numbered list.
Publishing and drafting posts
Having examined the main points regarding editing, let's move on to saving and publishing.
Changes made to a future published article are saved automatically as a “Draft”. In the “Articles” section you can also see the “Published” subsection, where posts that have been edited and displayed on the wall after publication are displayed.
You can add a new “Draft” using “+” in the same section.
Publishing an article is also easy. Click on the appropriate section. If we are not satisfied with the cover of the post, you can upload your image from a PC or other device.
Copy the link to the material, paste it into the post adding field and click “Submit”.
When you click the read button, the user follows a link to the material that we published.
Pressing the crescent key allows you to switch to Night Mode.
So we looked at the new article editor on VKontakte.
What advantages and benefits does the new functionality provide to users?
Let's figure this out and weigh the pros:
- the ability to save several drafts at once, which saves time and optimizes labor costs;
- highlighting those points in the article that need to be emphasized, which allows you to draw attention to the entry of potential clients and subscribers;
- editing saved and published entries at any time;
- Easy and simple adding of media files.
Conclusion
Having considered the new functionality regarding adding an article to VKontakte, we can say with confidence that many have been looking forward to this editor. Once again, it should be emphasized that it is easy to edit and understandable, allowing any user to understand it.
It is likely that in the near future the developers will add new and interesting options (for example, emoticons, photo captions, view statistics, etc.), which will undoubtedly delight us all. Therefore, do not waste time, stay in the trend and keep abreast of new events! Start trying out a new and not yet familiar editor “to taste”, having fun.
akiwa.ru
Add a photo to the community
If you are the creator or administrator of a community, then posting graphic content is an obligatory part of filling it out. Here, as in a personal profile, there are several options for publishing materials: on a page, in an album, changing the main thumbnail.
And we will use the same techniques. First, go to the main menu section “Groups”, “Management” and go to the community that we plan to edit.
To publish news with a picture on the wall, write text in the “Add entry” field and attach a graphic file. To do this, click on the icon depicting a camera. You can select from the materials available on your personal page or download from your PC. When the download is complete, we post the content to the wall.
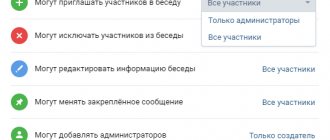
To create and fill a group album, you need to go to the “Management” menu, “Sections” and add the ability to publish photos. The program offers you to choose from 2 types of access – open and closed. In the first case, all group members can post photos, in the second - only administrators. Save the settings and move on.
On the main page on the right we find the “Add photos” link and follow it.
Here you can upload images to the main directory created automatically or go to the “All photos” tab - “Create an album”.
You can then download pictures saved on your hard drive. To do this, go to the album and click on “Add photos” or drag documents from a folder on your computer with the mouse.
To change the “face” of the group, upload a photo to the main page.
Creating a signature in Gmail Yandex Mail.ru
How can I have your signature automatically added to the email I send? Let's consider in order: mail.Yandex.ru, Mail.ru and Gmail.com, and we will devote separate instructions to using a signature when sending via Outlook.
Signature in Yandex mail. 2013-2014
1. Log in to your mail and find your mail settings. Select "Personal information, signature and portrait":
2. Enter in the box the name that will be shown in the “From” field to the recipients of your letters and, if desired, upload your photo or logo. If you want to insert the logo directly into the signature, and the insert image button is only available for a link to the image, do this as follows - open word or another text editor and drag your logo there, then copy from there (CTRL + C) and paste like shown in the photo:
Done, now you don’t have to sign “With respect...” every time. , but if the signature is suddenly not needed, you can always erase it directly in the text of the letter. It is especially important to sign the email for a Yandex domain.
Automatic signature in Mail ru mail. 2013 - 2014
1. Log in to your Mail.ru mailbox and click in the upper right corner (Settings):
2. Select Sender Name and Signature:
3. Here you carefully fill out everything, as in the screenshot (only with your data); if you want to use several different signatures, then the “Add name and signature” button will be useful to you. The automatic signature in your Mail.Ru emails should be no more than 255 characters:
Your signature in Mail.ru is ready!
Uploading photos to VK via phone
Often photographs are taken with a mobile device camera. Few people carry a digital camera with them. Therefore, there is no point in transferring data to a computer; it is easier to post it on a social network directly from the gadget.
To post photos from an iPhone or Android mobile device, go to the official social network application. Open the menu by clicking on the three dots in the corner of the screen and follow the “Photos” link. We are interested in the “Albums” tab. Let's go there.
If necessary, create a new folder; if not, add files to the existing one. To do this, click on the plus sign and then on the appropriate option: “Upload from gallery” or “Take a photo”.
In the same way, you can upload photos in the mobile version of the browser.
The official program for mobile phones provides another interesting opportunity - publishing pictures to VKontakte history. To do this, you need to open the news and click on your avatar with a plus sign or on the camera at the top of the screen.
If the program makes a request, allow it access to the camera. Then tap the big circle at the bottom of the screen and take a photo. The story will be shown to friends and subscribers throughout the day.
Posting images to the community
To add a photo to a group, go to it. Under the main information there should be a “Photos” block. We go there, select the “Albums” tab. We open the one that we want to replenish, and using the plus sign in the corner, we load graphic materials from the gallery or take a photo in real time.
We publish photos through the gallery
The same result can be achieved if you go to the folder where the images are stored on your phone. About the files that need to be sent to VK, click on the icon at the top of the screen. For me it looks like in the screenshot.
Now you need to select the social network icon, allow it access to files and attach pictures.
Instagram Photo Captions: A Detailed Writing Guide
Instagram is a visual social network, but post captions are getting more and more attention here. With the tightening of algorithms, everything becomes important: both the general appearance of the account and the captions for photographs.
Let's figure out what to write in a caption for a photo on Instagram, how to format it correctly and use the caption to engage the audience.
Instagram Captions
A signature is a short text under a photo on your account. Instagram allows you to write texts of up to 2200 characters. If this volume is not enough, bloggers move part of the entry to the first comment.
Hashtags are added to Instagram photo captions or users are tagged. You can also add an emoji to your signature. The main thing is not to overdo it with their quantity.
What does the signature contain?
First of all, the caption to the photo is a functional part of the post. Bloggers here talk about the product they are promoting, and brands convey a key message that cannot be expressed visually. For example, they talk about a new collection or detailed instructions for competitions.
More and more bloggers are appearing on Instagram and using the platform to publish short texts. Popular topics: proper nutrition, training, self-care, recipes, raising children, notes from travel.
Sometimes serious or controversial topics are raised, resulting in long discussions in the comments. Instagram recently announced tree comments, an update that shows that the platform is truly moving beyond just visual content.
How to tag someone in a photo caption on Instagram?
A user can be tagged in a post in two ways: in the image or in the caption.
1. To tag a person in a photo, click on the three dots in the right corner above the photo, then “Edit.” Click on “People Tags” in the lower left corner, a window will open where you can tag the user - start entering their nickname anywhere in the photo.
With this option, the user will receive a notification about it, and the photo will appear in his account, in the “Photos with you” section.
2. To tag a person in your signature, add the @ sign and start typing the nickname - you will see a list of users in the tooltip, select the one you need.
The user will receive a notification that he was mentioned in the post, but this post cannot be found in his profile.
How to use Emoji in your signature
To add an emoticon, simply add it to the text of the post. Audiences have different attitudes towards emoji in texts.
The optimal use of emoticons is to highlight important points in a post. For example, use colored squares or dots to make a bulleted list.
How to use hashtags in your caption
To add a hashtag, place a hash sign in front of the word. When published, the tag will automatically become clickable.
On Instagram, tags work like links, and clicking on a tag takes the user to the overall ranking of posts.
9 photos are included in the “Best” section. Getting to this top depends on several parameters, which the social network does not talk about in detail. It is known that reaching the top is influenced by the number of reactions under a publication and the speed of gaining likes. Therefore, the number of involved users will largely depend on how to caption a photo on Instagram.
The "Newest" section contains photos with the hashtag, sorted by publication date. However, Instagram technical support admits that the photo may not be included here either. Because of this feature of the platform, myths about the Instagram shadowban appeared: hashtags stop working on the account. This is not true, it’s just that in any account any picture may not be included in the search results for the tag.
Create a branded hashtag for your company: this way you will introduce users to it, and they will use it in UGC.
You cannot place more than 30 hashtags under one publication: the rest will not be clickable.
Tags can be placed both in the caption to the photo and in the comments to the post.
Beautiful caption for Instagram photo
How to create interesting captions for Instagram photos? Take your cue from the accounts you like. Keep track of what topics they raise in their posts and the size of the signatures on their account.
In your personal account, tell the story of the photo, your latest news, or discuss an issue that concerns you. Tell us about the cafe you go to, a movie you recently saw, ask the audience an interesting question. Beautiful captions for photos that are also engaging will arouse interest and be of great benefit. Quotes are a bad idea, leave them to the public pages on VKontakte.
In a company account, captions are part of the content strategy. Formulate what topics your brand speaks about and with what intonation. Each post must align with the company's content strategy. Good morning wishes remained in 2012. Beautiful captions on Instagram can be seen in the examples of the accounts panaceas_pantry (photo above), outdoorvoices (photo below).
How to analyze Instagram captions?
Instagram Insights provides detailed data on photos and stories. But it is impossible to calculate the effectiveness of signatures using it.
Use Popsters.ru to analyze topics, text size and hashtags.
Text Summarizing Tool
Click on the button with the letter “A” on the right above the post feed. Two graphs will appear in the left block: “Words” and “Words/ER”.
- Words
Shows how many posts a particular word appears in.
- Words/ER
Shows the average ER for posts that use a word.
Using this data, you can analyze different topics of posts.
You can also analyze the signature using graphs:
- Quantity by text length;
Displays the number of posts with different text lengths: short, medium, long.
- ER by text length;
Shows the average ER of posts with different caption lengths on Instagram.
- Relative activity by text length.
Shows the average activity in posts with signatures of different lengths relative to the average performance of posts of other formats.
Instagram hashtag analysis
Let's continue to look at new analytics features on Instagram. There are three indicators to evaluate the effectiveness of using hashtags:
- Hashtags
Shows the number of posts containing certain hashtags
- Hashtags/ER
Shows the average ER of posts with specific hashtags.
- Relative activity by hashtags
Shows the average performance of posts with certain hashtags relative to the average performance of posts in the account.
Main conclusions
1. The signature is an important part of the publication. In it you can tag a person, add a hashtag and provide detailed information.
2. The topic of the signature can be anything: the rules of the competition, the history of the creation of the photo, a question for subscribers. But this content must be relevant and consistent with the company’s content strategy.
3. It is convenient to analyze captions and hashtags on Instagram using Popsters.
Useful articles on a similar topic:
popsters.ru
Autoposting from Instagram to VK
And finally, as I promised, a little trick for fans of Instagram and VK. Open your VKontakte profile and click “Edit” under the main photo. In the menu on the right, go to “Contacts”.
At the bottom of the window we see the inscription “Integration with other services”. When you click on it, social networks will appear with which you can link your VK profile.
Follow the link “set up import”. An Instagram window will appear in which you need to click on the authorization button.
I have already entered my data, so they offer me settings for transferring materials. I recommend checking the box next to “Do not import (with hashtag only).” Then not all posts will be automatically transferred from Instagram to VK, but only those with the hashtag #vk - for import into a pre-selected album, #vkpost - for publication on the wall.
Save your results and try new possibilities. If something goes wrong, you can disable this feature at any time.
How to add a description to a VKontakte photo
- To do this, simply select the photo you are interested in in the “My Photos” section.
Immediately below the photo you will see an “edit description” field. Click on this field and you will be taken to the description edit line.
- As you can see, changing or creating a new description is very easy. If you want to change the description in the future, follow the same steps.
- Agree, the description looks very attractive. Some users, not knowing anything about the ability to add descriptions to photos, leave comments under the image. Such comments look funny and show that a person is a “dummy.” Therefore, do not neglect the opportunity to leave your short essay under the photo.
Even an inexperienced user can cope with this task without much difficulty. By following the above algorithm, you will be able to add and change a description to any photo you publish. As you can see, there is nothing complicated!
How to sign a photo on VKontakte
On the VKontakte social network, when uploading any images, users often forget or do not know about the possibility of adding a special signature. Despite the apparent simplicity of creating descriptions, it is extremely important to do it correctly and in accordance with personal desires.
Signing the photo
Please note that it is worth signing a photo on this resource so that every outside user and you can easily identify the image over time. Moreover, the described process is often combined with placing marks on photographs, thanks to which you can identify people and go to their personal pages.