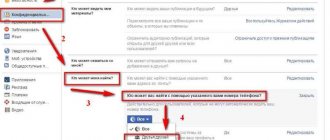
Today I decided to publish a rather interesting help that should solve the problem with music in the latest version of the VKontakte application for iOS. This will be useful to most users, especially music lovers. Surely many have noticed that in the VK App 2.2 application the “my audio recordings” item has disappeared, which at first glance makes it impossible to enter this section, and therefore users can no longer listen to their audio recordings. However, smart people have found a solution to this problem.
First, let's figure out why the audio recordings disappeared. The fact is that a significant part of the music on the VKontakte social network is illegal, that is, posted by users in violation of copyright. The policy of the AppStore, which hosts the VK App, prohibits the publication of applications that provide access to illegal content. The VKontakte administration has assured that this problem is being solved, but let's face it: until music on VKontakte is completely legalized, the problem is unlikely to ever be solved. Therefore, in order not to lose the application from the AppStore and not to deprive millions of users of the opportunity to install the application for iOS or update it to fix bugs and get new features, it was decided to temporarily disable the music section.
However, the section was not completely disabled. Only the “My audio recordings” link from the main menu has disappeared, but the section itself is still available in the application. To access it, you just need to make a special bookmark through the desktop version of VKontakte, through which we will go to the audio recordings section. Let's take a closer look. So.
Instructions: how to return the audio recordings section in the VK App 2.2 application for iOS:
After completing this simple sequence of actions, you will have a fully functional link to the section with your audio recordings.
To access music through the mobile application for iOS, you also need to go to the bookmarks section on the “Links” tab and follow our link, which we added a little earlier.
Ready! We got into the audio recordings section through the VK App for iOS! Happy listening, music lovers! The social network VK at some point completely replaced conventional audio players on the computer. The convenient section with songs has captivated a huge number of users who use it every day. People add recordings to themselves, but do not always know how to delete music on VK. Below are several ways to do this.
Problems with the data transfer protocol
Currently, most sites on the Internet use the secure https protocol to transmit data to resource visitors. The social network VKontakte also works on this protocol. If a user accesses the network using http, it should automatically redirect to https, but with certain browser and network settings this may not happen.
To solve the problem and listen to music, just log into VKontakte using the https protocol. That is, you need to follow this direct link to appear in your audio recordings: https://vk.com/audio.
Please note: If you have already found the music you are interested in through a search and do not want to leave the page, simply change the http protocol to https in the address bar of your browser forcibly, and you will find yourself on the desired page, where there should be no problems with playing music.
Flash Player is not working properly
To play various content on the Internet, you may need Flash Player, which is a utility distributed free of charge through the Adobe website. This utility is also required to play VKontakte music. If music does not work in VK, first of all make sure that Flash Player is installed on your computer and updated to the latest version.
If the Adobe product is not downloaded on your computer, you can download it from this link from the official website of the developers for free.
Please note: After installing
Adobe Flash Player on your computer, be sure to restart your browser, otherwise the changes will not take effect.
Music does not work in VK due to cache
The browser cache often negatively affects the operation of certain services on websites, including the ability to prevent music from playing on VK. To eliminate this problem from the list of reasons why music does not play on VK, you need to clear the browser cache. Depending on the browser you are using, this can be done in different ways; we will describe the method for
Google Chrome:
After this, go back to the page with VKontakte music, reload it and try to start playing songs.
Music does not play in VK on the phone
If you have problems playing music on the VKontakte social network on your phone, there may be several reasons:
- Poor internet connection. Check your internet speed. If it is low, connect to another Wi-Fi network. When using mobile Internet, wait for a more stable signal;
- Outdated application. Many smartphone users often do not update programs, which can lead to their incorrect operation. Check in the application store if the VKontakte program update is available for you. If available, download it.
Please note: Many users are afraid to update the VKontakte application because they heard that the new version does not have a music section. Indeed, a similar problem existed for some time, but in the latest versions of the program the section has returned, so you can safely download updates.
Music is a faithful companion of the human soul. A source of delight, joy, consolation, oblivion and other equally vivid sensations. He walks through life next to him - accompanies him at every turn of fate, and on his personal VKontakte page, of course... Why should we be surprised? When your favorite audio recordings are at hand, virtual communication becomes more interesting and comfortable. In the chat there is a warm conversation with a friend, girlfriend, and from the speakers a melody flows, which is especially dear to the heart, which “catches” in a special way. It’s still nice, you’ll agree.
But it also happens that musical preferences change: some songs need to be deleted from Vkontakte, some need to be left and, accordingly, new singles need to be uploaded, that is, the collection of tracks on the page needs to be replenished.
You can get rid of unnecessary audio tracks in your profile in various ways: you can use both standard social network options and special browser extensions. Let's get to know them better.
How to delete and restore an audio recording using standard VKontakte tools?
1. To delete a song, first open the “My audio recordings” section (link in the vertical menu on the left side of the avatar).
2. Hover over the track you no longer need. Two icons (options) will appear to the right of its name:
- “pencil” — editing the title of the audio track.
- “cross” is the delete function.
3. Move the cursor to the “cross” (the message “Delete audio recording” will appear). And then left-click on it.
The song will be deleted immediately, but will not visually disappear from the list, but will only acquire a dull tint. As long as you are in the audio recordings section, it can be restored.
Attention!
If you go to the main page of your account and then return to the music section, the deleted tracks will disappear. You will have to search/download them again and add them to the catalog.
So, if the “cross” was clicked by mistake, to return the audio track, do the following:
In the field of the song you just deleted, click the plus sign (a hint “Recover audio recording” will appear above it).
In addition, VKontakte developers have provided a function that allows you to delete audio recordings added within the last seven days. To activate it:
- click on the “cross” in the field of the remote audio track (located next to the “plus”);
- in the modal window that appears, confirm your intentions: click the “Delete” button.
Attention!
When this function is activated, all tracks that appeared in the audio collection over the past week are removed, regardless of their status, both active and deleted (colored dimly with a “plus” icon for recovery).
How to recover deleted music
To carry out high-quality recovery of music files, use the R-Studio utility. Install the program components on a local disk from which the necessary tracks have not been deleted. Restart your computer and launch R-Studio.
Open the Device/Disk column and select the hard drive partition on which to search for data. Right-click on its icon. Go to Scan. Enter the number 0 in the Start column, and fill in the next field with the size of this local volume. First check its value in the Disk Size line.
Select the file system format of the partition being scanned. If files were lost as a result of formatting, select the disk structure that was used previously. Activate the Detailed function in the Scan View column. Set the search filter by *.mp3 key.
Check the disk analysis parameters and click the Scan button. The launched procedure can last several hours. Click the Ok button after completing the analysis of the hard drive partition.
Left-click on the scanned disk icon and press F5. Wait while the list of found tracks is created. Select the desired compositions by checking the boxes next to the files or directories. Click the Recover Marked button located on the program's control panel.
Specify the folder where the program will save the recovered mp3 files. Disable the Skip files with bad sectors function by unchecking the box of the same name. Start the recovery process by clicking Ok.
Check the integrity of the recovered information. If some files are damaged, install the Easy Recovery utility. With its help, try to recreate the structure of damaged music tracks. To do this, run the File Restore function.
An accidental press of the “Delete” key, and then an equally accidental hit on the “enter” key - and the folder with important documents ends up in the trash. And it happens that it was deleted intentionally, but after a while you realized your mistake. It is still possible to restore documents.
If the folder has just been deleted, then press the “Ctrl Z” combination. The effect will be obvious if you are at the original destination address of the folder. In such a situation, you can restore materials with the mouse - right-click on an empty part of the directory (without selecting any files), select the “Undo deletion” command. The folder will instantly return to its place. If the folder was deleted some time ago, go to the Trash. To do this, open the desktop in Explorer or minimize all windows. Find the trash can icon with the appropriate name. Double-click on it with the left mouse button to open it. Find and select the object with the left mouse button. Right-click to open the menu and select the “Restore Object” command. It will return to the folder from which you deleted it.
If you deleted a folder using the “Shift Delete” combination, and not just “Delete”, then the object will be deleted, bypassing the trash, and cannot be restored.
In order for information to be written to and read from a hard drive, it must have a certain structure. In particular, any hard drive contains a master root record and a partition table. If this data is damaged, the operating system may stop loading, or some partitions will be lost.
- – Acronis Disk Director program;
Most often, a violation of the disk structure occurs as a result of some user manipulation. This could be the use of various disk utilities, installation of a second OS, etc. and so on. Sometimes the disk structure is disrupted without the direct participation of the user, due to certain software failures.
The disk structure is damaged - how to restore it? Use Acronis Disk Director for this; it is one of the best utilities in this class. It is available in two versions: the first you can run from Windows, the second starts directly from the boot disk. It is better to use the version that is loaded from disk at system startup. It is based on Linux and is very reliable. The Windows version sometimes crashes - in particular, it is better not to use it for partitioning a disk or resizing partitions.
You can find a bootable version of Acronis Disk Director on the Internet. When you start your computer, select boot from CD, usually just press F12 and select boot from CD in the boot menu. As a last resort, enter the BIOS and there set boot from CD as primary.
After starting the program and the prompt to select its option appears, click the “Manual” item with the mouse, this will give you more options. The main program window will open, click on the unallocated area of the disk - this is where the deleted partition (or partitions) is located. In the context menu, select “Advanced” - “Recovery”.
In the window that opens, select the “Manual” recovery mode and click “Next”. A new window will open - “Search Method”, in it select the “Full” option and click “Next” again. The search for sections will begin, and as they are found, they will appear in the list. It's very good if you know the size of the deleted partition. The program can even find very “ancient” partitions; you will need to select exactly the one you need to restore.
After completing the search, select the section you are interested in and click “Next” again. Now all that remains is to perform the last operation - to apply all the completed operations in practice, since before this they were only stored in the program memory. In the main window menu, select “Operations” – “Run” or simply click the start flag icon on the panel. Operations will begin. After they are finished, close the program and restart your computer. The found disk will be available again along with all the files on it.
- disk structure restoration
Deleting all audio recordings using the VkOpt addon
VkOpt is a plugin that expands the user functionality of a profile on the VKontakte social network (downloading/editing content, Last.fm scrobbler, quick access to settings, etc.). Supported by all popular browsers: Firefox, Google Chrome, Opera.
Warning!
Download VkOpt only on the developer’s website (vkopt.net) or on the official website of the browser extensions you use. A plugin installed from other sources may be infected with a virus.
So, let's look in detail at how to delete music on VKontakte using the VkOpt addon (instructions for Google Chrome).
Installation and configuration
1. Click the “three stripes” shortcut (settings and management) in the upper right corner of the browser interface.
2. Go to the "Extensions" section.
4. In the “Search by store” field, enter the query VkOpt and press “Enter”.
5. The first plugin in the search results will be the plugin you are looking for. Click the “+ Free” button in its field.
Note.
Beware of fakes! On the download page for the original VkOpt, the source is vkopt.net (offsite!).
6. Wait for the installation to complete. Open the list of installed addons again: Settings → Extensions.
7. In the VkOpt block, enable the “Allow opening files...” setting (check the box).
8. Restart your browser.
Launch
1. Go to your VKontakte page.
2. The VkOpt settings window “Thank you for installing...” will appear.
3. Select the interface language: click on the flag and click “OK”.
4. Refresh the page: press the "F5" key.
Editing audio recordings
1. To delete a song/songs, hover over the My Audio section.
2. In the additional menu, select “-My Audio”.
3. In addition to selectively deleting (see the method described above) stored music, VkOpt also provides the ability to completely clear a partition of tracks. To completely delete a music collection, click the [Delete all] function in the block located to the right of the list of tracks.
4. In the additional window, confirm activation of the function: click “Yes”. After these steps, all audio recordings will be deleted. You can start creating a new selection of your favorite hits. Again, using the VkOpt options - adding a track from the main page, viewing audio collections from friends (Updates).
Enjoy your time on VK, dear reader!
The social network VK at some point completely replaced conventional audio players on the computer. The convenient section with songs has captivated a huge number of users who use it every day. People add recordings to themselves, but do not always know how to delete music on VK. Below are several ways to do this.
Adding from a computer
But there are times when the search for the desired entry is not available. This could be for various reasons:
- There has been a breakdown;
- This record doesn't really exist;
- You want to upload original audio, for example your own song or any sound personally recorded by you or someone you know.
In this case, you will need to upload the audio directly from your computer.
- Go back to the “Audio Recordings” menu and find the “My Audio Recordings” item in the upper right sidebar. Next to it you will see a plus sign. This is what we need to click on.
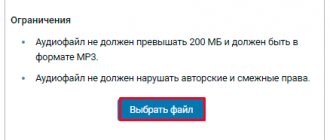
- You will see a warning window about file size (no more than 200 megabytes) and copyright. Click “Select file” and search for the music you need.
- After that, wait until the files are downloaded and that’s it. You can enjoy the downloaded music).
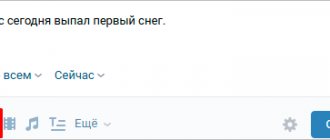
Add to the wall
Well, if you suddenly want to share good music with someone and add it to a friend’s (or even yourself) wall, then this is also easy to do. To do this, simply click on the melody icon in the place where the message is written. And after that you will get a list of your audio recordings from which you can select one or more to send to the wall. You can also use the search.
That’s basically all I wanted to tell you about today. I hope that now you will not have any problems with this. Well, I recommend that you subscribe to my blog updates to always be aware of everything that is happening. Well, we'll see you in other articles. Bye bye!
VKontakte has a separate section “Audio recordings”
, which contains millions of different songs added by users of the social network. Not long ago I wrote about, and today I will talk about uploading music to a VKontakte page, sharing audio with friends and adding various audio recordings from any pages. I’ll also touch a little on the topic of how to add prohibited songs that violate copyright.
How to delete an audio recording in the new VKontakte
Almost every person who uses the Internet has an account on a social network. Some have only one, while others register in several at once. VK is the leading platform in terms of the number of profiles; many use the service because of its convenient audio section. The user has the opportunity to add an unlimited number of songs to a playlist in his account. Sometimes preferences change, there is a desire to delete an audio recording in the new VKontakte, but the “fresh” interface is unfamiliar.
Every user has the opportunity to clear their account of unnecessary music. With the design update, the removal procedure has not changed. Instructions on how to remove music from VK:
- Go to your page.
- Click on the tab with your music in the left menu of the site.
- Find the track you want to remove from the list.
- Hover your mouse over it: a cross icon will appear.
- Click on it and the track will be deleted.
- If you wish, you can click on the plus sign that appears if the song needs to be restored. This feature will only be available until the music page is updated.
Additional Information
If the user cannot figure out how to restore music in VK after deletion, he should talk to the support agents of the social network and ask them why the audio recordings are not being returned.
You should not download and install special applications that allow you to return the track list. With their help, the account owner will not be able to listen to music back. He will get nothing but trouble:
- loss of finances if the program is paid;
- loss of personal data and account control;
- introducing viruses to your computer or smartphone.
Of course, some proposals do not promise such difficulties. But they are not capable of giving a positive result.
Modern smartphones and tablets are used to store information and process information no less often than computers. Accordingly, the problem of accidental data loss is no less relevant here: valuable photographs, videos, important documents - sometimes the loss is irreplaceable.
Just like when recovering lost data on a computer, the key to successfully recovering deleted files on Android is to exclude further writing to the media. Simply put, as soon as you discover that the files you need have been erased, you need to immediately remove the memory card or completely turn off your smartphone. These precautions help prevent memory cells from being overwritten.
How to delete a VKontakte audio recording from your phone
Modern smartphones perform many functions: sending SMS, calls, navigator, player, device for accessing the Internet. Modern models are capable of producing good sounding music through headphones, which is why many people use them to listen to recordings. If you have the Internet, it is convenient to listen to music from your playlist on your VK page. There is a way to delete saved VKontakte audio recordings on a phone on an Android system:
- Turn on Internet access and log in.
- Open the main application menu, select the music section.
- Find the track you want to remove from the list.
- Tap on a song and hold for a few seconds.
- A menu will appear from which you need to select the delete option.
There is also a second way to do this. You need to turn on the track, click on the name that appears at the very bottom of the page. Next, you will see complete data for this track, and a “three dots” icon will appear at the bottom right, which you need to click on. An additional menu will appear again, where the word “Delete” is also present. Both of these options help clean up your playlist.
How the player works
Telegram developers have launched the @cctracks channel to demonstrate the work of the new music platform. It contains several tracks that are distributed under a Creative Commons license, that is, they can be listened to and copied for free.
The web player is quite primitive: it shows the name of the artist and song, allows you to start playback, pause it, rewind tracks, adjust the volume, download mp3 files and share music with your interlocutors. There is no automatic transition to the next song, managing playlists or viewing information about a release or file. There is more variety in mobile applications. In addition to all of the above, it is possible to send files to other applications (for example, to VKontakte), as well as control buttons and display of the cover image in the notification area. When you click on the track name, a full-fledged player opens with buttons for play and pause, switch, repeat, shuffle and search through the playlist. Clicking on the name of the current song at the top of the playlist will open the release cover in full screen.
While playing a track, the next one is automatically cached, and the cache is stored for the time specified in the settings (Settings > Data and storage > Storage usage): three days, a week, a month or always. Tracks are not selectively deleted, but you can specify the type of files you want to delete (photos, documents, music, other files). The player in the applications can also save files to a standard music folder, after which they become available in the players installed on the smartphone.
How to delete all VKontakte audio recordings at once
Sometimes a person decides to rebuild his favorite audio tracks, so there is a need to delete all VKontakte audio recordings at once. At the moment, after updating the design, this is not possible. Previously, the problem was solved using a third-party plugin called VkOpt, which made it possible to further customize the profile. Now its functionality after the update does not work fully.
It is better to download this plugin from the developers website. They report that work to restore the program’s functions continues, and soon an option will appear on how to delete VKontakte audio recordings in a list. Previously, this procedure was performed as follows:
- Download the application from the developers' website.
- Install the plugin in your browser. Now this procedure occurs automatically.
- Configure the necessary program functions.
- Go to the audio section.
- A new link called “Delete All” will appear in the right menu.
- Click it and the entries from the page will be deleted.
- You must refresh the page for the changes to appear.
How to delete VKontakte audio recordings if there is no cross
Some users, after updating the design, encountered a difficulty - a cross does not appear next to the songs to remove them. Only the “show similar” button is available, which selects similar songs by style. This is due to the fact that people open the audio player playlist, which the developers placed in the header of the new interface. This is not a section with your recordings, but a player with a playlist.
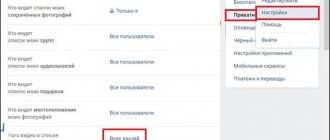
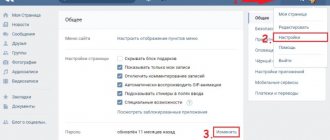
You can delete VKontakte audio recordings, if there is no cross, through the section in the left menu of the site. Some users simply do not enable this item to display. You can fix this as follows:
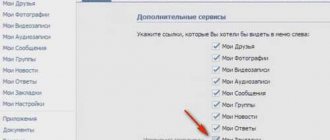
- Point to any site menu item.
- An image of a gear will appear to the left of the inscription. Click on it.
- The menu editing tab will open in front of you.
- Check the box next to “Audio recordings” and click “Save”.
- Go to the section with songs through the left menu.
- When you hover over an entry, a cross will appear. You can clear your list.
How to edit a VK playlist
In the header of each playlist there is a “pencil” icon - this is a button for editing it.
In the window that opens, you can
- change title, cover, description
- add music (via the “Add audio recordings”)
- delete music (uncheck the boxes)
- Delete the entire playlist - There is a “Trash” icon in the header of the VK playlist - At the very bottom of editing there is a “delete playlist” button
A VK playlist can be added to a wall or to a group; for this purpose, there is a “loudspeaker” sign in its header