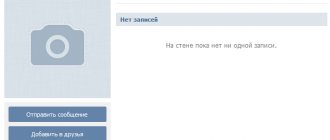
How to make a large avatar in a group on VKontakte?
Hi all! Today I will show you how to put a large avatar in your VKontakte group!
You all probably noticed that some groups, instead of the usual rectangular avatar on the right, have a wide picture. It looks like this (my group example):
Before you can put up such an avatar, you need to find or draw a picture of suitable sizes. Contact itself recommends the following dimensions: 1590x400 pixels, the image must be in JPG, GIF or PNG format. If you draw such a picture, for example, in Photoshop, then set the recommended dimensions, but if you want to find a ready-made suitable picture, then when searching, I advise you to set the dimensions: 16000×400, otherwise you will not find anything.
Installation
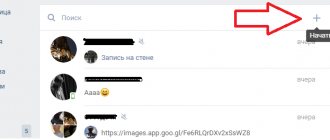
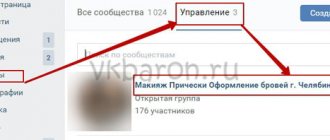
So, when you already have a picture, all that’s left is to install it - it’s very easy to do! Go to the group in which you want to put a large avatar (you must be an admin or creator) and in the right menu, click on the 3 dots and select - Community Management: Next, you need to select the community cover (this is the large avatar) by clicking - Upload: Next, click - Select file: Select the desired image on your computer, crop it as needed (if the image has the recommended dimensions, then there is no need to crop) and click - Save and continue:
After this, a notification should appear indicating that the cover has been successfully uploaded: That's it, now by going to the main page of the community, you will see a large, beautiful cover.
That's all, I wish you good luck, bye! sergey-oganesyan.ru
Monitor (resolution)
The first thing to consider when creating an avatar for a community is your monitor resolution. V Kontaktik has a fixed width, and the height is “infinite” (constantly loading)
What resolution should you choose?
In February 2012, an epic event happened: the 1024*768 ceased to be the most popular. It was displaced from first place by the 1366*768 resolution, which is found on most laptops (everyone has switched from desktop PCs to laptops).
This means that we are limited in height to 768 pixels (there is an error in the picture: I mixed up the height and width)
The most popular operating network is Win 7, whatever one may say. At the bottom we have a taskbar tile, which also eats up space in height.
The photo quality is not so good. I wanted to draw.
And so, at least the taskbar in Windows 7 eats up 40 pixels. In total, our height is already 768-40 = 728 . Go ahead. (there is an error in the picture: I mixed up the height and width)
The most popular browser in the world is Google Chrome. It also takes up precious height space
Dear Chrome, with its tabs, eats up 30 pixels, and the address bar eats up 31 (or maybe 30, measured by eye). In total, 60-61 pixels will definitely gobble up the browser and there’s no escape from it. More about other browsers a little later.
In addition to tabs and the address bar, which cannot be avoided, many users may have bookmarks open. For example, I always keep them deployed, as it saves time (quick access to frequently used sites). Bookmarks take up another 30 pixels. In total, Google Chrome can take up from 61 to 91 pixels in height.
This means we get 728 - 61(91) = 667(637), and this is already less than the maximum allowable avatar height of 700 pixels.
Then come the limitations of Contact itself.
The top navigation bar of VK eats 40 Another 29 pixels rectangle (“type”) on which the community type is written and 10 pixels indentation from the “type” to the coveted avatar.
Total 40+29+10=79 pixels for VK navigation.
667(637) — 79 = 588 (558 — with bookmarks bar)
558 pixels is the maximum height of an avatar in VK, which will be fully visible on the first screen of a laptop with a resolution of 1366*768 pixels. But that is not all!
If you want people to be able to subscribe to your community easily and without unnecessary steps, then you need to consider the following points:
The “subscribe” button should be on the first screen
Any usability expert will tell you that important elements should be on the first screen. The “subscribe” button is such an element. This means that it will reduce the height of our “ideal” avatar.
Let's look at the sizes:
- The “subscribe to join group” block eats up 77 pixels
- if this is a public page and users mentioned it in their posts, then a “mention” block of the public page appears. Together with all the indents, it will eat up 43 pixels
In total we get:
- 588 (558) - 77 = 511(481 - with bookmarks bar ) - for group
- 588 (558) — (77+43) = 468(438 — with bookmarks bar)
Let's assume that everyone has their bookmarks bar open. This means the maximum height of the avatar that will be on the first screen with the subscribe button for a group is 481 px, and for a public page - 438 px
How to make a wide horizontal avatar in a VKontakte group!
How to make a wide horizontal avatar in a VKontakte group!
In this article we will tell you how to make a wide horizontal avatar in a VKontakte group . Using a clear example, we will show how to make a wide VK avatar , and also give useful practical recommendations.
First of all, I would immediately like to say about the importance of such a graphic element of the VK group as a wide horizontal avatar. Compared to a regular vertical VKontakte avatar, the horizontal one has a larger area and is displayed on mobile devices, which allows it to be used more efficiently. Before directly installing a wide avatar, I would like to draw your attention to the icon of your group, which is displayed on the left opposite each post. It is taken directly from the miniature of the standard vertical avatar. If possible, it should be in the same style as the future hat. If the header is planned in a different style, then first upload a regular avatar, and then move on to a wide horizontal one.
So, let's move on directly to the process of installing a wide VKontakte avatar.
Instructions on how to create a horizontal avatar in a VK group.
1) Prepare a wide avatar measuring 1590×400 pixels in a graphics editor. A wide horizontal avatar is the face of your group, which forms the first impression and attitude of visitors. It is necessary to approach the creation of an avatar with special care; this will determine the further success of your community. For example, consider the avatar that we prepared for demonstration:
The main elements that are usually used in a header are:
- Logo – Sets the main graphic association with the group.
- Title - Briefly and clearly tells what the group is about and for whom.
- Graphic elements with descriptions provide more complete information about what the group offers, what advantages and features the group has.
The main elements should be placed closer to the center and to the bottom, retreating from the top border at least 100 pixels and from the side borders at least 220. This way, you will ensure normal display of a wide avatar on mobile devices.
2) Let's move on to community management.
3) Click Upload next to the community cover field.
4) Load a pre-created horizontal avatar.
5) We check whether the avatar is displayed correctly in the group from the computer and mobile device.
As you can see, making a wide horizontal avatar is not at all difficult . It is important to know only a few features. Also, I would like to draw your attention to the fact that the avatar is not the only graphic element that determines the style of the group. The overall picture is also formed by the design of posts, albums, products and other sections of your group. This should also be taken into account.
If you need help with writing posts for a group, creating product cards and writing similar content, you can contact us as part of the service filling VK groups.
We can also help with group design . For help in creating a wide horizontal avatar-header, a standard vertical group logo, wiki menu, branded graphics and other design elements, you can contact us.
To order services and for any questions, write to:
smo-i-seo.ru
Avatar size for VK group 2020
The creators of VKontakte groups face various problems. The main thing, of course, is the formation of a large community.
But who will join a group where there is no clear description of the theme, beautiful and stylish images and other elements and decorations. To create the right style, you need to know what size a particular block is on a page in a group.
Today you will find out what size an avatar for a group on the VK social network should be in 2021. And also about other features of community design.
Avatar for a group on VKontakte in 2021
The first thing that visitors to the ontakte group see when visiting is an avatar. And he should be as attractive as possible. The image must be of good quality. The group picture in VK is displayed not only on the main page.
You can see it if you hover over a link on another page. But in this case the picture is displayed in a small circle. In the miniature, only the top part of the avatar is visible. Corners are cut, you need to remember this.
Therefore, in 2021, it is best to choose a picture with the main object or words at the top.
Thumbnail area in the VKontakte group avatar
Today, the size of the alert for groups is 200 x 500 pixels. But sometimes the images are stretched a little. And they turn out a little blurry. To avoid this, you need to choose larger pictures.
But approximately proportional to the above size. For example, 400×1000 px. In this case, the image will be of good quality.
The thumbnail will be "cropped" from the top of your image at 200 x 200 pixels.
Example of a group avatar in
This may be useful: How to make a poll in VK.
Cover for the VK community
In some VK groups in 2021, you may notice that the avatar is missing. Instead, the cover is located across the entire width. It usually shows the band's logo with a brief description. Or even advertising some events. Its dimensions should be as follows: 1590 x 400 pixels.
But if you make a picture that covers the entire cover area, it may not be fully displayed on mobile devices. Therefore, it is recommended to create pictures with indents on all sides towards the center. And even easier - make the main image like this: 1196 x 315 px.
Then make a simple white background by placing the image on a white canvas in the editor with a size of 1590 x 400.
VKontakte group coverYou can do this in any program, including standard Paint in Windows. You can also make a few of your logos in pale colors in the background so that it doesn't look boring.
Or add other graphic elements to it. Recently, VKontakte developers provided the opportunity for communities to post “live” covers.
These are short videos that can replace each other at a certain time. There are up to 5 videos available for download.
You can use both videos and images in live wallpapers. There are 3 different cover designs available: video, pictures and resizable pictures. In this case, the avatar miniature for the group in VK must be uploaded separately.
To add a cover:
- Click the "Manage Group" button on the right;
- Select the "Settings" button;
- Find among the items here the line “Community Cover”;
Loading the cover of the VKontakte community - Set your group cover.
: how to listen to music on VK without restrictions.
In what format can I upload videos to group covers?
It’s worth telling separately about “live” covers for the VKontakte community. You can add videos with a maximum duration of 30 seconds.
Requirements:
- the file size should not exceed 30 MB;
- video and audio codecs: H.264 and AAC, respectively;
- video resolution: 1080 x 1920 px.
You should not upload videos of higher resolution. It may not display correctly.
Size of pictures on the wall of communities with avatars in ontakte
The main source of information on VKontakte, not only in communities, but also in the user’s profile, is the wall. Here, from time to time, images appear that can be posted by both group moderators and its participants.
The maximum size for wall pictures is 1000 px by 700 px. But it is recommended to make them with a smaller size: 700 x 500 px.
This is again due to display on mobile devices in 2020, through which users visit VK more often than from a web browser.
Don’t know how to make a black background in VK? Read about it.
How to make an avatar for a VKontakte group
Beautiful group avatar
will significantly increase the interest of visitors and subscribers.
But truly gorgeous avatars are made only by Photoshop professionals. And often popular public pages order public page design from them.
But in order to give a beautiful look to the group, it is enough to know a few simple methods and one service.
Our technique allows you to create a beautiful avatar for a group
free and without the use of third-party programs.
How to make an avatar for a VKontakte group
1. Find and save to the computer an image that suits us for our avatar. 2. Open it using the standard Paint
(this editor is installed on all computers, path: start/all programs/standard/paint). 3. In the “Shapes” menu, select an oval and mark part of the picture with a circle. This part will be your avatar:
- Make sure that the circle is even
(280x280 in the picture). Below you can see the parameters of the circle;
4. Now we clean everything around the circle (you can use an eraser):
The round avatar is ready. You can upload it to the group right now.
But if you want to add
there is an inscription
under (above) the avatar , then we continue to work.
5. We cut off all the corners and margins so that there is only room for the avatar and the inscription:
6. To add a beautiful inscription under your avatar, follow the link https://www13.flamingtext.ru/All-Logos and select the logo you like:
7. Design a logo, click “Create a logo” - “Personal use” - “Upload”:
8. Now all that remains is to reduce the size of the logo and place it under the avatar in Paint:
9. Avatar is ready
. All you have to do is go to the group and download it.
Don’t forget to highlight the circular area of your avatar in miniature:
Save the changes and enjoy the work done:
The whole procedure takes no more than 10 minutes
.
As you can see, you can make a beautiful avatar without Photoshop
.
I also advise you to download the cover for the VKontakte group to add individuality.
online-vkontakte.ru
How to make an avatar on VKontakte
How to make an avatar for a Contact?
In this video tutorial we will tell you how to make
a beautiful and interesting
avatar for your VKontakte .
In order to make an avatar, we will use one of the Internet services that provide services for creating an avatar for your page. In our case, this is the website “Avatan.ru”.
Using this site you can make a beautiful avatar in just a few minutes. To do this, click on the “Make an avatar” button.
Next, you need to upload your photo, to do this, click on the “Upload”
and in the dialog box that appears, select the directory where your photo is located.
After selecting a photo, click the "Open"
.
The photo will open in a special editor that allows you to create a beautiful avatar. As you can see, there is a special frame on the photo. By moving the markers on the borders of the frame, you can select the area of the photo you need for your avatar.
After adjusting the photo dimensions, you can go to the “Color Adjustment”
, where you can choose the color shade for the photo.
Also on the “Bottom Settings”
you can choose options to style your photo.
After setting up your avatar, click the “Save photo and proceed to avatar assembly”
.
After updating the page, you will be able to select special pictures, frames, and effects that will be placed on your avatar. After you customize the appearance of your avatar, click on the “Get ready-made avatar”
.
The finished avatar will appear on the updated page. In order to save it, right-click on it and select “Save image as”
.
In the dialog box that opens, select the directory to save the avatar and click
“Save”
.
Now the avatar is saved on your computer, and you can upload it to your page on the VKontakte social network.
We must not forget that you can make a free avatar in Adobe Photoshop, thereby obtaining the most individual photo for your page.
Thus, creating an avatar takes only a few minutes and does not require much effort.
www.teachvideo.ru
Avatar and banner template
We have created a template that you can download from the link below. With it, it is possible to make a professional avatar yourself, but it will not be unique. While this doesn't mean it won't work, it may be worth considering individuality and reading our bonus offer.
Bonus
We offer a discount of 200 rubles to everyone who has read the article up to this paragraph and decides with us. When ordering, please include this code in the body of your email: HWC-DEZiGN-200
. The code is only valid for one of your orders.
The bulk of Internet resources for communication and interaction between users support avatars - images that make your profile recognizable. Usually it is customary to use your own photo as an avatar, but this statement is more applicable to social networks. On many sites, for example, forums and simply in the comments under copyrighted materials, users set themselves absolutely neutral pictures or pictures generated in a certain way.
In this article we will talk about how to create an avatar online from scratch, without importing an image from your computer.
You can also draw an avatar using a computer program - a photo editor or an appropriate tool created specifically for these purposes. However, you will find a wider variety of solutions for generating custom images online - in the form of online services. It is precisely such tools that we will consider further.
Method 1: Gallerix
This service allows you to create an avatar by choosing the facial features of an improvised identikit from dozens of available options. The tool provides the user with the opportunity to both independently adjust all the details of the image and generate an image automatically by randomly combining components.
Here's a simple way to create a hand-drawn avatar using the Gallerix service. As a result, you get a funny personalized picture for use on forums and other Internet resources.
Method 2: FaceYourManga
An incredibly flexible tool for generating cartoon avatars. The functionality of this service, in comparison with Gallerix, allows you to customize in even more detail all the elements of the created custom image.
As a result, a PNG image with a resolution of 180x180 will be saved in the memory of your PC.
Method 3: Portrait Illustration Maker
This service allows you to create simpler avatars than the solutions described above. However, many users will probably really like the style of the final pictures.
To start working with this tool, you do not need to register. Just follow the link above and start creating your avatar.
As a result, the finished image will be immediately saved in the memory of your computer.
Method 4: Pickaface
If you want to create the most personalized userpic, it is best to use the Pickaface service. The main advantage of this solution is that it is not necessary to “sculpt” everything yourself from scratch. You are offered more than 550 original projects and templates that can be easily changed as desired.
However, to use the functions of this tool, you will first have to register.
- To do this, select “Register”
. - Enter all the required data, check the signature checkbox "I have read and I accept the terms"
and press again
"Register"
.
Or simply use one of your social media accounts to log in. - After logging into your account, you will see a new menu item − "Create Avatar"
.Click on it to finally start creating your avatar in Pickaface.
- It will take some time for the editor's Flash interface to initialize.
Once the download is complete, select a language to use the service. Of the two proposed options, it is definitely better to choose the first one - English. - Select the desired gender of the character, after which you can proceed directly to the process of creating an avatar.
As in other similar services, you can customize the appearance of the drawn man down to the smallest detail. - When finished editing, click on the “Save”
. - You will be prompted to name your avatar.
Do this and click "Submit".
- Wait until the image is generated, and then click “View Avatar”
to go to the download page for the newly created userpic. - Now all you need to do to download the finished image is to click on the appropriate button under the image we created.
The result will definitely not disappoint you. Hand-drawn avatars created in Pickaface are always colorful and have a pleasant design style.
Method 5: SP-Studio
You can create an equally original cartoon userpic using the SP-Studio service. This tool allows you to create avatars in the style of the animated series "South Park"
.
There is no need to create an account on the site, and you can start working with the image directly from the main page.
Instructions
Put a picture on the web page that matches your essence. And you don't need to use any text. Your image should be clear without words. You can put your own photo on your Avatar. Choose a filming location with a beautiful landscape and take photos with a professional camera. It is advisable to have someone else photograph you, rather than yourself.
Sources:
- how to take a beautiful photo on ava
Feel free to follow the professionals and learn skills. The time will come - you will “grow” with useful skills and your own tricks. And if you liked some other person's photo, don't hesitate to repeat it. Perhaps you can do better. And if the photo doesn’t work out, you can always analyze what you did wrong.
Materialize your photos. Which means you should print them on larger formats too. You can immediately see minor flaws in a large photograph and work on the mistakes. And your friends, looking at the live photo with fresh eyes, will also be able to point out mistakes and evaluate the photo.
Participate in exhibitions and competitions more often. There is no point in burying your talent. And besides this, it’s useful for you to see other photographers. Strive to take photographs, because competition increases the desire for excellence. And don't be afraid of criticism. But look for it wisely. Show your still unprofessional photos around your level or a little higher. They will really help you with advice, while a professional photographer would limit himself to a couple of phrases like “not bad” or “will do for a start.”
And the last piece of advice: don’t get carried away with something that is too early for you to get carried away with. Many capable people immediately try to buy cameras, fashionable and other gadgets, but end up disappointed, having spent a lot of money and not getting the desired result. You need to be able to handle professional equipment. So take your time with it, improve yourself.
Video on the topic
Related article
Sources:
- How to learn to take beautiful photographs and take good pictures
We often want to capture certain moments on video so that the best or most significant moments of our lives remain in our memory. And we want them to last as long as possible, so that in the future we can revisit them and fully immerse ourselves in the mood. The quality of video is influenced by many factors: from the choice of camera to the final edit of the film that we want to keep in our home archive.
You will need
- - camcorder
- - computer
- - video editor
Instructions
Choose the camera that your budget allows at the moment. Of course, you can record from digital, but the quality of video shot using is much higher. Pay attention to three main parameters: the grain of the image, its lightness and color, especially color. The brighter the colors, the better.
When shooting video, try to hold the camera with both hands to avoid shaky video. Keep your arms close to your body with your elbows to minimize camera instability.
Video on the topic
Sources:
- Lesson on how to make a face like in the movie "Avatar" video in good form
Avatar is a small image that is used as a graphic component of a profile on a thematic forum, social networking site, etc. You can copy an avatar from a special website or make it yourself using any graphic editor.
You will need
- — Adobe Photoshop software;
- — image for the avatar.
Instructions
You can use any picture, photograph, etc. as an image. Initially, you can use any graphic file copied from the Internet, then you can try to repeat it on your portrait. Before you start working on the blinking avatar, you need to install Adobe Photoshop on your computer.
Open the program and double-click on an empty program field or press Ctrl + O to open the image.
Make a duplicate of the main layer that was created when loading the image into the program. Right-click on the layer in the Layers panel and select Duplicate Layer or press Ctrl + J.
The color levels change needs to be applied to the bottom layer. Click the top menu “Image” and select “Levels” (keyboard shortcut Ctrl + L). In the window that opens, move the middle slider to 2.35.
The top layer (newly created) also needs to have its levels changed. Press the keyboard shortcut Ctrl + L. In the window that opens, move the slider to a value of 0.40.
Now click the top Window menu, then open the Animation palette. In the layers panel, leave only the bottom layer visible; to do this, click on the eye image opposite the top layer - it will become invisible.
In the Animation window, duplicate the image by clicking the Duplicate button. Turn on the visibility of the top layer and make the bottom layer invisible by clicking on the eye image next to the corresponding layers.
In the Animation window, activate the Always loop option and click the Play button. If you want to decrease or increase the frame rate, adjust this value in the same window.
To save the resulting avatar, click the “File” menu and select “Save for web and devices...”. In the window that opens, select the Gif image format and 256 colors. Click the "Save" button.
To create a simple animation, you don’t have to study to become an animator. Sufficient tools are available in Adobe Photoshop CS5. You will also need to learn a few simple skills.
You will need
- — Russified version of Adobe Photoshop CS5.
Instructions
a photograph as the source image
with a skyscraper against the sky. Launch the program and open the required file: press “Ctrl” + “O”, select a picture and click “Open”. Select the Straight Line Lasso tool (hotkey “L”, switch between adjacent elements “Ctrl” + “L”) and select the skyscraper. Press the combination “Ctrl” + “J” to create a new layer and transfer the selected area to it.
Open a photo
with clouds, it should be larger than the skyscraper image. Press “Alt” + “Ctrl” + “I” and note the values that are in the “Width” and “Height” fields. Create a new file: “Ctrl” + “N”, in the “Width” field enter the same value as the photo with clouds, in the “Height” field - the same, but multiplied by three. As a result, you should have three documents: with a cut-out skyscraper, with clouds, and an empty document. In the following, they will be called documents 1, 2 and 3, respectively.
Switch to the document with the clouds, activate the Move Tool (V) and drag the image onto Document 3. Align it so that it completely covers the bottom. Switch back to Document 2 and drag the image onto Document 3. Align it so it fills the top. With Document 2 active again, click Edit > Transform > Rotate 180 Degrees. Then Edit > Transform > Flip Horizontal. Drag the result onto document 3 and align it to the center.
In the “Layers” window (if it is missing, call it with the “F7” hotkey) select the three existing layers with clouds (they should be named “Layer 1”, “Layer 2” and “Layer 3”) by holding down “Ctrl” and by clicking on each of them. Right-click and in the window that appears, click “Merge Layers.” Drag the newly created layer onto Document 1 and place it below the skyscraper cutout layer.
Click Window > Animation. At the bottom of the window that appears, click the only active button – “Create a copy of the selected files.” Another frame will appear. At the bottom of the frame the time it will be on the screen is displayed. In each frame, change it to 0.1 seconds.
Switch to the first frame and then to Document 1. Select the clouds layer and, using the Move tool, align its bottom right edge with the bottom right edge of Document 1. Switch to the second frame and then back to Document 1. Select the layer with clouds and align its upper right edge with the upper right edge of document 1. These two frames will be the starting and ending frames of the animation being created - the movement of the clouds.
Click the Create Tweaks button at the bottom of the animation window. In the Add Frames field, enter 20 and click OK. Delete frames 21 and 22 using the “Delete selected frames” button, which has a trash can logo and is located at the bottom of the animation window. The animation is ready. You can check this by clicking on the “Play” button.
Sometimes you get tired of posting your real photos on social networks. You can create a cartoon userpic to brighten up your boredom. It will also give a completely new look to your profile.
How to make an avatar for a VKontakte group
On the social networking site VKontakte, in most different communities, the determining factor in popularity is the correct design. At the same time, the main part of the public design is an avatar, which represents the face of the community.
Creating an avatar for a VK group
The process of creating a master image in a community is a demanding job that requires mastery of various graphics programs. Due to this feature, large groups often hire design specialists to get rid of any manifestations of plagiarism.
You can use blanks found on the Internet, but it is recommended to do this only in the early stages.
In addition to the above, special attention should be paid to the fact that today in a VKontakte group there can be one of two types of images:
- Avatar;
- Cover.
At its core, the main difference between these types is the final location of the uploaded image in the public header. Moreover, the avatar must somehow be added to the community to create a thumbnail.
In this article, we will talk about the main nuances of creating both types of pictures using Photoshop as the main editor. You can use any other program equipped with the appropriate tools.
The last thing to note is that any image can be used in every community, be it a "Public Page" or a "Group".
Method 1: Create an avatar for the group
The basic community avatar is almost the same as the main photo on the user’s personal page. As a result, we recommend that you familiarize yourself with the process of uploading and cropping images of this type.
Group avatar size
Proper design of the VKontakte community is the basis for effective promotion. A beautiful avatar and cover can increase the conversion of users joining the community, as well as sales if the community is commercial.
If you want to choose a ready-made image, then you should know, find out about the size of the avatar for the group .
Of all the available points, it is necessary to highlight the following:
- The image must be of high quality. All elements should be clear, without blur.
- The image should not contain watermarks: logos of other companies or communities, stock services, etc.
- The image you choose must be meaningful and the right size. There is no need to select an image of a BMW car in a community dedicated to Mercedes and vice versa. An avatar is the face of your community. It allows users of the social network to understand the focus of the community, its message and themes.
Creating your own avatar
How to make an avatar for a VK group yourself in the correct size? There are many graphic editors for this. The most convenient and popular is Adobe Photoshop. The program allows you to create images of any size in high quality. All this is achieved thanks to a large selection of auxiliary editor tools.
To get started, you need to create a new project in Photoshop.
To create a large picture you need to set the following dimensions in the window that opens:
Width: 250px
Height: 450px
After that, click the “Create” button.
A work area appears in front of us, where the process of creating a vertical avatar takes place.
The following dimensions must be specified for the cover:
Width: 1590px
Height: 400px
As a result, we get a picture in a horizontal position.
As a background for the ava, download any suitable high-quality image and place it on the template. To do this, go to the menu “File” - “Open”.
To add text, you need to select the tool with the letter “T” icon in the left panel.
After that, select the appropriate font and its size.
You can place text in any area of the picture.
If you don't want to create new projects every time, save these templates in PSD format. To do this, go to the menu “File” - “Save As”
After that, you can always open these templates and create new images.
The guide shows the appropriate sizes for a community avatar. They fit perfectly with the usual, classic format, as well as the new VKontakte design with cover.
The classic option means a design of this type:
The new cover design looks like this:
Creating an avatar on mobile devices
If you want to create an ava for the VK community from iOS or Android devices, then you should pay attention to specialized online services.
As an example, consider the profi service. To work with the site, you need to log in through your VKontakte account. After this, you will have the opportunity to create a cover, avatar, menu and pictures for VK posts.
Go to the "Avatar" section.
You have the opportunity to add pictures, text and sprites in the area highlighted in blue.
This creates the classic design of the following format.
To create a cover, go to the appropriate section.
Graphic elements and text are added in the right column.
To save the final version you need to pay for a license. One day of license costs 50 rubles.
Using Templates
If you want to find options for ready-made avatars, then pay attention to ready-made templates. You can download layouts in PSD format on the following sites:
You-ps.ru – Large selection of templates for any topic. In addition to the sources, the site contains useful tutorials on using Photoshop. Downloading files from you-ps is free.
FreePSD community. There are many communities on the VKontakte social network where designers share their design templates. One of these public sites is “FreePSD”.
PS-Magic.ru. Another useful site with design sources in PSD format. Just like on You-ps.ru, here you can find not only avatars, but also lessons on editing and creating them in Photoshop.
Ordering templates from freelancers
If you haven’t found a suitable design option on the above sites, then contact professional designers for help. Finding a web designer is very easy. To do this, there are many freelance exchanges with thousands of performers.
Kwork. All services on the site are sold for 500 rubles. Hundreds of performers are ready to create a band design for you in the shortest possible time.
FL.ru. The most popular freelance exchange in the CIS. Register on the site as a customer and publish a task to create an avatar for your public page. After this, performers will begin to respond to the task you created. Choose the candidate you like and start working with him.
Weblancer. A similar exchange for finding freelancers. Place an order and expect responses from potential contractors to create a template.
Communities within a social network. Go to the community search in VK and enter the query “community design”.
You will see a large list of hundreds of groups for this request. All of them belong to agencies and freelancers who design communities. In most groups you can not only order the development of a template, but also find ready-made options available for free download.
Possible difficulties
When working with a VK group avatar, you may encounter the following problems:
- Low quality of saved image in Photoshop. To ensure that the final design does not lose its quality, save in Web format. To do this, go to the “File” – “Export” – “Save for Web” section.
- Problems with font selection. Use sans serif fonts. You can download them on the website fonts-online.ru. Remember that the readability of the text on your avatar or cover depends on the chosen font. The higher quality the font is chosen, the better the design of your public page looks.
Bottom line
An avatar for a VK group plays an important role, especially if the community is commercial. Ava can be made with your own hands in Photoshop, or you can order it online. A good avatar should be easy to remember and attract attention.
Rate the text:
[Total: 2 Average: 5/5]
Source: https://softolet.ru/vkontakte/vse-ob-avatarke-gruppy-vkontakte.html
Ava for Contact
In this article we will look at what an avatar is, why you need an ava for VKontakte, and how to make a nice ava to make your page stand out among others.
In social networks, immediately after registration, a new user is provided with a separate page with a photo of the user and information about him. This is a kind of living room or reception area. When you log into VKontakte, you will be taken directly to your page. Your guests and friends will also visit this page.
Let's see what the VKontakte page is.
Menu
In fact, you don’t even get a page, but several pages. The first, main page contains a summary of all the information about you and your collections - music, films, texts.
And the menu is precisely designed to manage and edit lists of your audio and video recordings, notify friends about your news, make appointments, join groups, make announcements and, of course, communicate with users like you VKontakte network.
Uploading a photo
The easiest. The space for the photo is marked with a frame with a question. Immediately below the future photo there are two lines:
- Edit page and
- Change photo.
Select the Edit photo option. Then everything is simple - on the page with the image upload dialog, you need to specify the name of the file with your image.
Photo or avatar
Of course, decency suggests uploading your personal photo, however, uploading drawings or creative photos is not prohibited.
What you shouldn't do is upload a photo of a friend or other recognizable person.
There are no restrictions on the proportions or sizes of the ava for contact. You can create an artistic collage with photographs, inscriptions, and frames. This will only add chic to your page.
By the way, the image of you (or an imitation of you) on the main page is called an avatar or ava. Friends will not ignore a successfully designed VKontakte ava and will definitely mark it with comments. This not only feels good, but also improves your online ranking.
Design of miniatures
The uploaded photo will appear not only on the main page, but also everywhere where you left your comments or messages. Only there will not be the whole photograph, but a reduced part of it.
You must take care about which part will accompany all your messages and comments. You will be shown a window containing your ava and two miniatures.
In the center of the ava, like a passport, there will be a highlighted square. What's inside this square will be on your miniatures.
If you are not satisfied with the automatically generated thumbnails, simply move the highlighted square to the desired area and click Save.
Moving a square is simple: move the mouse cursor to the square, press the left mouse button, and so on, with the button pressed, move the square.
What else is possible
You can change your avs at least every day, you can live completely without an ava, if you really want to. Click on the down arrow next to the Edit photo item (remember? – it’s right under the photo!) and select one of the available and self-explanatory functions.
Well, for those who have a video camera, another function becomes available - take a photo from the webcam. Everything is simple here - press the button, take a photo and show yourself to everyone on VKontakte!
A beautiful avatar in a few minutes
And finally, a short video tutorial on how to make your ava unique.
Tell friends Similar posts
anisim.org
How to make a long VKontakte avatar
As you know, an avatar is literally the face of your page on the Vk social network. That is why you should try to make sure that your most important photo is of high quality and beautiful.
Today we will tell you how to make a long VKontakte avatar. Because the avatars are square or not large enough, they don’t look very nice, you’ll agree.
To do this, you do not need to have any knowledge in the field of computer technology or programs. Just follow our instructions that we wrote for you.
Instructions
- The maximum size of an avatar, as is known, can be 200 x 500 pixels (px). To work with dimensions, and in general for comfortable image editing, you will need to download the Adobe Photoshop program from the Internet.
- Open the installed Photoshop program and create a new document there. “File” - “New”. A window will open in which you can enter the necessary parameters for the new document. We are interested in its size. Immediately set the height to 500 pixels and width to 200 pixels. They are designated by the English abbreviation “px”. As for the bit depth of the color mode, this option is not so important for us. You can leave the value “8”, which is the default.
- So, an empty field of the required size has opened. Now you can start “dancing with a tambourine” around your photo. You can either simply put the required fragment of the photo in this field, or fill the background with some color first. By the way, there is a special tool on the left panel of Photoshop for this. It is depicted as a bucket with paint spilling over the edge. Although, you can use a regular “brush”.
- How can I insert my photo directly into this field? Without closing this document, open your photo “File” - “Open”, select a photo from your computer and drag the image to the desired location using the mouse and a tool that looks like a regular “cursor”. Avatars for Odnoklassniki, by the way, are made in exactly the same way.
- And since you use a special program, you can even write something on your photo. To do this, there is also a special “Text” function sign in the main menu of Photoshop. You can write your nickname, pseudonym, or even a whole phrase. Just not a very long one.
- Don't forget to also look at what effects are available in Photoshop. You may like one or more, as it will make your avatar even more unique. However, do not forget that VKontakte also has its own filter with effects. Although it is simpler and more meager, you can, of course, limit yourself to just that.
- You can make a frame for your photo on a long avu. All you need to do is create another layer, then select the “Rectangular Marquee” tool and select the image, but not the whole image, but moving a little away from the edges. Press the key combination “Shift+Ctrl+I”, after which the selection will be inverted. You can fill it with any color, and we recommend setting the blending method to “Soft Light.”
- Most importantly, don’t forget to save your new super avatar! To do this, click “File” - “Save as...” - Select the .jpg format and save to your computer.
So you have made your first long avatar for VKontakte!
yavkontakte.ru
The best sites to create your own avatar from a photo
There are many services available on the Internet for creating avatars from photographs. Therefore, I decided to talk about several of the most interesting of them.
Face Your Manga
South Park Studio
Using the South Park Studio service, you can create your own character in the style of “South Park”, using thousands of available elements. “This is one of the best tools to create a “South Park Avatar” from a photo.
Pick a Face
Another great service with which you can make a userpic. It contains more than 550 projects and designs. You can create your own hero without starting from scratch.
WeeWorld
A well-known social site created for entertainment. With it, you can make new friends, send them messages, play games and create your own avatars. Using the avatar maker you can also create a cartoon character of your choice.
TheCartoonist
One of the most popular web services among users. With this tool you can transform any photo into a cartoon character. His goal is to help people who cannot pay for a drawing.
Cartoon Photo
Using Cartoon Photos, you can convert your photo into a 100x100 cartoon userpic in just one click. Do you want to change your facial expression and emotions in your photo? Or do you need to create an animated GIF from a photo? Then you should try this tool.
Meez
Awesome service for creating avatars. It can be used to create 3D animated avatars, which can then be directly exported to most social networks and blogs.
KusoCartoon
Helps you turn your photos into a cartoon character or avatar that can be used on Twitter, Facebook, Pinterest, Gmail, etc.
Portrait Illustration Avatar
Another great, free tool for creating avatars.
Picassohead
With this tool you can easily convert any photo from Picasso into an avatar or a cartoon character.
Cartoonize
Another free cartoon character generator that lets you create a cool cartoon avatar. Before choosing a userpic, you need to select an image and then add a cartoon effect. And everything is ready.