Today I’ll tell you how to make words bold on a website using HTML and CSS. This design is used when you need to highlight certain information on a page. Moreover, we are talking not only about headings, but also about simple words and phrases in the text. This is implemented quite simply.
Bold font with strong tag
This method is suitable if you want to highlight an important part of the text in bold. The HTML tag is a logical formatting tag and its essence is to “emphasize” the importance of the selected fragment.
There are other logical formatting tags in HTML. For example, a tag makes text italic and indicates emphasis on the highlighted phrase.
Other types of text selection are described in the article: Tags, text formatting in HTML.
Don't use the tag too often. A page oversaturated with tags may be “punished” by search engines. The same thing can happen if you highlight all search keywords on a page, or the same phrase over and over again.
An example of how to make a bold font HTML tag:
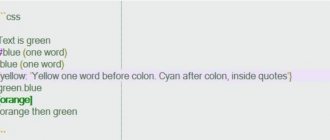
Plain text, highlighted important piece of text . Plain text.
How to change font color and background?
In addition to the appearance of the font in MS Word, you can also change its style (text effects and design), color and background on which the text will be located.
Changing the font style
To change the font style and its design, in the “Font” , which is located in the “Home” (formerly “Format” or “Page Layout” ), click on the small triangle located to the right of the translucent letter “A” ( “Text Effects and decor" ).
In the window that appears, select what you would like to change.
Important: Remember, if you want to change the appearance of existing text, first select it.
As you can see, this one tool already allows you to change the font color, add a shadow, outline, reflection, highlighting and other effects to it.
Changing the background behind the text
In the “Font” , next to the button discussed above, there is a “Text highlight color” , with which you can change the background on which the font is located.
Simply select a piece of text whose background you want to change, and then click on the triangle next to this button on the control panel and select the appropriate background.
Instead of the standard white background, the text will appear against the background color you chose.
Lesson: How to remove the background in Word
Changing the text color
The next button in the “Font” is “Font Color” - and, as the name implies, it allows you to change this very color.
Select a piece of text whose color you want to change, and then click on the triangle next to the “Font Color” . Choose a suitable color.
The color of the selected text will change.
How to set the font you like as the default?
If you often use the same font for typing, different from the standard one available directly when you launch MS Word, it would be a good idea to set it as the default one - this will save some time.
“Font” dialog box by clicking on the arrow located in the lower right corner of the group of the same name.
2. In the “Font” , select the one that you want to set as the standard one, available by default when the program starts.
In the same window, you can set the appropriate font size, its style (regular, bold or italic), color, and many other parameters.
3. Having completed the necessary settings, click on the “Default” located in the lower left part of the dialog box.
4. Choose how you want to save the font - for the current document or for all that you will work with in the future.
5. Click the “OK” to close the “Font” .
6. The default font, as well as any additional settings you may have made in this dialog box, will change. If you apply it to all subsequent documents, then every time you create/launch a new Word document, your font will be immediately installed.
How to change the font in a formula?
We have already written about how to add formulas in Microsoft Word and how to work with them; you can learn more about this from our article. Here we will talk about how to change the font in the formula.
Lesson: How to insert a formula in Word
If you just select a formula and try to change its font the same way you do with any other text, it won't work. In this case, you need to act a little differently.
1. Go to the “Designer” , which appears after clicking on the formula area.
2. Select the contents of the formula by pressing “Ctrl+A” inside the area in which it is located. You can also use the mouse for this.
“Service” group dialog box by clicking on the arrow located in the lower right part of this group.
4. A dialog box will open in front of you, where in the line “Default font for formula areas” you can change the font by selecting the one you like from the available list.
Note: Despite the fact that Word has a fairly large set of built-in fonts, not all of them can be used for formulas. Additionally, you may not be able to select any formula font other than the standard Cambria Math font.
That's all, now you know how to change the font in Word, and from this article you also learned how to configure other font parameters, including its size, color, etc. We wish you high productivity and success in mastering all the intricacies of Microsoft Word.
We are glad that we were able to help you solve the problem.
Ask your question in the comments, describing the essence of the problem in detail. Our specialists will try to answer as quickly as possible.
Did this article help you?
Not really
It happens that there is a certain part or one concept in the printed text that you need to pay attention to. That is, you need to make sure that some part catches the eye, and the reader can focus on it. For these purposes, different text styles are used.
Below is an example of how letters and words can be written.
Example
Example
Example
In order to change the style, Microsoft Word has special buttons.
— Bold (popularly called “bold”)
— Italic (oblique)
— Underlined
Bold text using b tag
Unlike a tag, a tag does not give the selected area additional logical meaning. The tag is a physical formatting tag and its purpose is to change the style of text.
That is, if for some reason you think that a fragment will look better written in bold, but the highlighted area itself is not more important than the text around it, use the tag.
Regular text text in bold font
. Plain text.
How to write in italics
To highlight messages in italics, use two underscores along the edges of the entry (__text__) or use the menu function, highlighting the phrase, then selecting Italics - italics.
Bold CSS Styles
Bold text can be made not only using special HTML tags. You can achieve bold output on any tag by setting the font-weight: bold; property to it. (does not work for all fonts).
Such highlighting will be of a stylistic nature, without adding logical weight to the selected text.
In addition, you can select either a specific tag or a group of elements at once by setting styles via a CSS class.
CSS property inside the style attribute:
Bold text.
CSS class:
.bold_text { font-weight: bold; } Text in bold. Text in normal font. Text in bold.
Method 2: Hotkeys
A much simpler method by which you can make bold or convert already written text into bold is to use a keyboard shortcut. It will be displayed if you hover the cursor over the “F” button, already familiar to us from the previous method, located in the “Font” tool group on the Microsoft Word ribbon.
"Ctrl+B" (b - bold)
Place the carriage in the place in the document where you plan to enter text in bold, or select the required fragment, then press the keys indicated above. By the way, this combination works in almost all programs where at least basic text formatting is possible.
Ways to format text
There are four main formatting methods:
1. By using keyboard shortcuts. To change and make characters bold, you can use the keyboard shortcut:
The feature of changing characters using keyboard shortcuts is quite new. So if it doesn't work, update the program.
2. Use of signs. Symbols are written at the end and beginning of a phrase. There are only three options available: bold, italic, and monospace.
3. Using a bot. In order to highlight text in bold or another style in Telegram, before the message you need to write @bold, and only then write the desired phrase. The bot will give you three options to choose from - developer font, bold and italic. The main disadvantage of this method is that the entire message is formatted, and not a separately selected phrase.
4. By using the site 4 txt.ru. The site allows you to remove existing changes and write a new message using additional formatting tools. All you need to do is select the desired effect, write a word or phrase in the field displayed on the left and get the result in the right field. Next, the received text is copied and pasted into the messenger message.
Line height
Line spacing is the distance between lines of text. To set it, use the line-height property. It sets the line height. Line height consists of font size and line spacing. If the line height is 50 pixels and the font size is 30 pixels, then the line spacing will be 20 pixels. If the line height is set less than the font size, the lines will intersect. The line-height property can take the following values:
line-height: normal - normal spacing (default)
line-height: the number by which the font size will be multiplied
line-height: height in the units available in CSS
line-height: percentage of font size
line-height: inherit value is taken from the parent element
For example, let's create a large paragraph of text consisting of several lines. Let's set its font size and line height:
Style:
| 7 8 9 10 11 | #text { font-size: 20px; line-height: 30px; } |
HTML code:
| 34 35 36 37 38 39 | Multi-line text Multi-line text Multi-line text Multi-line text Multi-line text Multi-line text Multi-line text Multi-line text Multi-line text Multi-line text Multi-line text Multi-line text |
Try different line heights. See how the text will look.
Features of Telegram
Telegram messenger has a number of features. It is customized for each user individually. In it you can change the font, find a bot, watch a video, listen to music, chat, etc.
Sometimes a person has been using the messenger for years and does not know all the functionality of the program. A feature of Telegram fonts can be considered their “poverty”: the writing styles do not shine with variety, but for everyday messages the existing basic ones are sufficient.