After registering on the Zoom platform, the user has access to many opportunities. The most popular is creating your own video conferences. But there are many others, including changing the profile, along with choosing an avatar. This is also a very useful feature, because having a thumbnail will make it easier for other participants in the conversation to understand who they are talking to. In this article we will figure out how to put an avatar in Zoom .
How to install a VKontakte avatar on a computer?
To begin, the user needs to go to their profile page and hover the mouse over the area with the avatar, after which buttons with additional functions will appear. Here you need to select “Update Photo”.
Note!
If the user has not previously set an avatar, in this area you will need to click on the “Insert photo” button.
Next, a new window will appear in which you need to click on “Select file” to go to the explorer, where you can find a suitable picture to upload as the main profile photo.
Note!
On VKontakte, you can set images in formats such as JPG, PNG, or GIF as an avatar.
After selecting a suitable picture, you will need to select the area that will be displayed as an avatar. This area can be narrowed, expanded and flipped by moving the edges. To set the selected area as an avatar, you need to click on “Save and Continue”.
Next, the system will also ask you to set a miniature of your avatar, which will be displayed in a circle next to the user’s name on the site. Here, too, you will need to mark the correct area, which can be changed by moving the corners. To confirm your actions and completely install a new avatar, you just need to click on “Save changes”.
What to do if the ava does not change?
Sometimes a strange “magic” happens to the account image: all the instructions on how to put a photo from a YouTube channel are followed, and the picture in one place is old, in another – new.
Avatar magic
It also happens that nothing has changed at all. But in all cases, we don’t panic – we wait. The platform needs time to process information!
Possible actions while waiting:
- Refresh the page in the browser, close the tab and then open it again.
- Just in case, check the image for compliance with the requirements:
- Photo does not violate copyright
- Format – GIF, JPG, PNG, BMP
- No nudity
- Size (preferably) 800 x 800 pixels.
How to set a VKontakte avatar in the application?
Users of the official mobile application first need to go to their page, and then click on the button with the camera icon in the area with the avatar. Next, a menu of additional functions will appear, in which you can click on “Upload from device” to select an image from your mobile device. In addition, here you can also select the second option to immediately take a photo with the camera of your device and set it as an avatar.
After selecting the desired picture from the device, you will also need to select the area that will be set as an avatar. To confirm your actions here, click on the checkmark button.
Avatar selection
This feature is available both in the application for mobile devices and on PCs. The only condition is that you have an account, which can be created according to our instructions.
Let's look at each of the two methods separately.
You can also put a GIF on your avatar in Zoom (gif file), but it will be static and not animated. That is, the picture will not change in any case.
Method No. 1: Mobile application
On Android and iOS, the user thumbnail is configured as follows:
- Open the mobile application on your smartphone or tablet.
- Log in to your account if you haven't already.
- Now, using the bottom panel, go to the Settings .
- Tap on the top column where your name and email are indicated.
- Next, click on the item “Profile photo” .
- Select an option "Select photo".
- Give the app access to your device's storage if needed.
- Upload a suitable image from the gallery.
- Crop it as you wish and tap the button "OK".
Method No. 2: Computers and laptops
In this case, changing your avatar in Zoom when using a PC program will take a few simple steps:
- Open it on your computer or laptop.
- Log in if you are not already logged in.
- Click on the thumbnail in the upper right corner of the screen, next to the “Search” .
- In the menu that opens, select "My profile".
- The site will open in your Internet browser, where you must log in to your account. Enter your email and password in the appropriate fields, and then click "Sign in".
- On the new page, click on the button "Change".
- Now click on the item “Upload” .
- Using Explorer, add a suitable image.
- Cut it into the appropriate shape.
- And finally click "Save".
The computer program itself does not currently provide such an option. That is, for now you can only edit your profile thumbnail through the official website. If you want to change it again, follow this link and proceed from step 6 of the instructions above.
How to set a VKontakte avatar in the mobile version?
On the m.vk.com website, the user must first click on the icon with his avatar to go to the next page, where he can set a new profile photo.
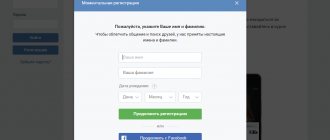
On the page that opens, you need to click on the “Upload profile photo” button, after which you can select a suitable picture from the device’s memory.
Next, the user will need to mark an area in the picture to install a new avatar thumbnail, after which they should click on the “Save” button so that this picture will now be displayed as a new avatar.
On iPhone
Would you like to put a photo on WhatsApp? The right decision - users from the contact list will see your face or a funny image, because personalizing your account will make you stand out from the crowd!
If you use an iPhone, you will find the following instructions useful to help you install photos in WhatsApp on your phone:
- Open WhatsApp messenger;
- Click on the gear icon in the lower right corner;
- The “Settings” section will open;
- At the top of the screen you will see a camera icon;
- Click on it and the “Edit Profile” window will load;
- Click on the circle with the avatar;
- A small menu will appear - you can click on the “Take photo” line to open the camera and take a photo;
- Or click on the “Select photo” line, you will be transferred to the gallery;
- Move the picture, select zoom and click on the “Select” icon to put the photo on your phone.
Ready! You were able to put a photo in WhatsApp on your iPhone - now your profile is decorated with the desired image. Let's move on to the next part of the review?
We put a new avatar in Odnoklassniki via a computer
An avatar is the face of your page. And to be completely honest, this is your face. In any case, this was originally intended by the developers of social networks. However, not all service users consider it necessary to post a real photo, choosing pictures from the Internet. In general, according to the Odnoklassniki rules, this is unacceptable, and in theory, site administrators can simply block an account for using someone else’s photos. However, punishments are usually avoided.
As a new ava, you can put a photo from photo albums on the site or from the archive on the device. Let's consider the first situation - you have previously uploaded photos to a social network album, and now you want to set one of them as the main one. This is done as follows: 1.Open your profile in OK.ru;
2.Hover the mouse cursor over the current avatar and click “Change photo”;
3. Select photos from photo albums on your page;
4.Mark the boundaries of the future avatar and click “Install”.
All is ready! Your new photo will now appear everywhere.
There is an alternative way to install a file from an album on the website as the main photo: 1. Go to the album, open the photo with which we want to replace the current image;
2.Click on “Make main”;
3.Select the area that will be displayed on the page and click on “Install”.
Perhaps you will even like this method more, because... it allows you to save some time.
Now let's consider a slightly different situation. Let’s say the photograph that you want to make the main one on the page has not yet been uploaded to the social network, but “lies” in the archive of your computer. In this case, you will have to use a different scheme of actions: 1. Open the profile, hover the mouse cursor over the ava, click “Change photo”;
2.Click on the item “Select photo from computer”;
3.Select a photo file from your PC and click “Install”.
This is how you can change your main photo in Odnoklassniki in just a few simple steps. It’s a pity that you can’t swap previously selected photos – you can only delete them.
Ask RU
How to upload an avatar to Sprashivay.ru? To upload an avatar, the photo must be in one of the following formats: JPEG, GIF and PNG. If suddenly you don’t see the photo loading, then you may need to change your browser. If you cannot do this operation even through Explorer, try simply dragging the photo onto the adding (editing photo) form. Next you need to make the photo smaller, because on this site there are restrictions on the size and weight of the avatar. Another limitation is the frequency of avatar changes (over time). So, you can upload one photo within 30 minutes.
How to make a beautiful art avatar for Instagram in a mug
We show you how to quickly style your avatar for Instagram yourself.
Step 1 . We stylize the photo.
We use any photo editor with filters. For your smartphone you can download Picsart, Pixlab, PicsKit, PicShot and others. We will do it on a computer; the free online editor Photomania.net will do.
Select a suitable filter, for example, Tintbrush from the Painting section (stylization for painting with paints).
You can fill it completely with a filter or highlight the desired fragments with a brush. The intensity of the effect can be adjusted. In this example, the intensity is at maximum.
Save the photo to your computer.
We get this photo.
Step 2 . Add a circle to Canva.
Let's go to the Canva editor, we need a square. Since the original photo has a size of 600x900 px, you can make the square a little larger - 700x700 px, the size is set in the “Custom sizes” section.
For now we just have a white square, we need to add a mask with a circle. Go to “Elements”, go down to the “Frames” section and select the circle.
The circle turns out to be small, you can enlarge it a little, for example, to a size of 580x580 px with a square width of 700x700 px. Align to the center.
Now we need to place our photo in the circle. Go to “Downloads” and upload our stylized photo from your computer.
Now drag the photo into the circle.
You can add an additional frame around the circle, again go to “Elements”, and select not the mask, but the circle shape.
The frame should be slightly larger than the main photo, to make it easier to adjust the size, you can make the circle transparent.
Add color to the frame and remove transparency.
The colored circle needs to be moved to the background behind the photo, right-click on the circle and select “Send to background” or “Move back”.
This creates a frame like this. Save the photo and click “Download”.
You can make not a single-color frame, but a gradient one; you can also add not only a circle, but also objects of other shapes. Go to “Elements” and scroll down to the “Gradients” section or write the word gradient in the search.
There are many objects of different shapes here. All colors are customizable, you can change the size and orientation of the shapes. We got several avatar options.
Step 3. Put it in your profile - we show it in the next section (How to put a photo or picture on your profile picture on Instagram).
How to take a photo in a mug with a 3D effect
The essence of such an avatar is that part of your photo should extend slightly beyond the circle and then you get the effect of a 3D avatar.
There are several ways to take such a photo, we show ours. First you need to select a photo. We advise you to find or specifically take a photo on a plain background - such a background will be easier to remove.
Then you need a program or application that removes the background. You can use Photoshop or any other software, we'll take Teorex PhotoScissors. Add a photo there. Use a green brush to highlight what needs to be left, and use a red brush to highlight what needs to be removed. The program is convenient because you don’t need to select the entire object - just mark the colors.
Click "Cut".
We finalize the details and save the photo with transparency in PNG format. It is not necessary to bring the photo to perfection, since the avatar on Instagram is still small and small mistakes will not be noticeable.
Let's go to Canva, make a white square again, as in the previous example, and add a circle frame mask there.
Insert the original photo with the background into the mask.
You can add a small frame (Elements - Gradients).
Now load a photo of a person without a background on top of all layers. The task is to make part of the photo extend beyond the circle; sometimes you need to slightly enlarge the photo with transparency.
This creates an interesting effect.
In contact with
Everyone probably knows how to upload an avatar in VKontakte. After all, more than a million people are registered on this social network. This is done quite simply. Under the main photo there is an inscription to upload a photo. By selecting it, you will be taken to the menu of your computer, where you can select the required number of photos. After uploading the photo, you can crop, rotate, and even tag friends in it. As we can see, uploading an avatar is quite easy, and absolutely everyone can do it. Share your photos with your friends, rate them, vote, and there is no doubt that being on social networks, and just on websites, will bring you great pleasure!