Without exception, all owners of groups in OK strive to make them interesting and different from others. To achieve this goal, the portal provides a huge number of different functions. Among them, we can note the solution to the question of how to create a theme in Odnoklassniki, which is quite simple to install.
Before describing in more detail the features of installing such a picture, it should be noted that such a pleasure is available only to those communities that have accumulated at least 10 thousand subscribers. And once again, it should be noted that only registered groups can stand out in this way; this technique is not available for pages.
How to create a discussion?
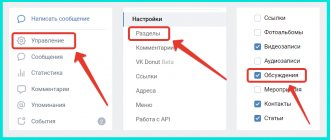
So, first you need to enable this section. To do this, you need to go to “community management”.
In “community management”, go to the group sections and find “materials” there. To enable discussions, you must select the “enabled” or “restricted” tab. If you want any subscriber to be able to add discussions in the group, you must select the “enabled” option. But it is better not to use such a function, as it can lead to a lot of spam. To add discussions only to group administrators, select “restricted” and click on the “save” tab.
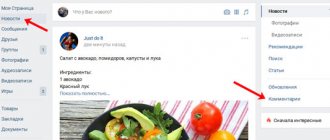
After saving changes to the materials settings, a discussion section will appear in your community. If you have a group, then this section is located in the center above the news feed. If you have a public page, then discussions will be on the right side under the “community members” section. To add this material, click on the word “discussions” in bold.
How to set a default group theme?
If the uniqueness of the community page is not the main goal, if there is no need to somehow stand out among analogues, or if individuality is achieved in other ways, it is quite acceptable to install one of the proposed pictures. We are talking about standard image options that the portal itself offers.
The installation process here is quite simple. You need to find a link that will lead to the opportunity to decorate the main page. In the diagram presented to your attention, you need to activate the section with the proposed pictures. After clicking it, the system will display many different options, among which the best option is selected in the group for discussion, which will reflect the information direction of the group.
Adding discussions to a group
In the discussion section, you can view and edit topics that have already been created. To add a new discussion, click on the “create topic” tab.
Next, you need to fill in all the information about your topic. In the "title" line, enter the title of the discussion. This is the name that will be visible to group visitors. In the “text” section, write what this discussion is for. Write here what you want to convey to your audience, or create a topic that your subscribers will be interested in discussing. In addition, you can add photos, audio recordings, videos, surveys, or some documents to this topic. If you do not check the “on behalf of the community” checkbox, this discussion will be created on behalf of the group administrator. If you want to hide your account, then on the contrary, do not forget to check this box. After you enter all the data, click on the “create topic” tab.
Now the discussion has been created, and it will immediately appear in your group. Members of your group can comment and chat in this section.
In order to change the name or delete a discussion in a VKontakte group, you need to go to this discussion and click on the “edit” tab, which is located in the upper right corner.
In the “edit topic” menu, you will have access to the “delete topic” tab, as well as the ability to change the title of the discussion. About is also available here, thanks to which no one will be able to write anything in the discussion, as well as about, thanks to which it will be in first place in the list of discussions, regardless of the date of its creation. After editing, click on the “save” tab.
So, today we have to figure out how to create a discussion in the VKontakte group. This is a very important question, which, as a rule, arises only for novice moderators. More advanced users are usually aware of this process. Don't be afraid that it will take a lot of your time or effort. On the contrary, everything here is extremely simple.
What it is?
But before adding a discussion in the VKontakte group, it is important to understand what we are talking about. What is this virtual object that is so interesting to many?
Everything is very simple here. A discussion is a specially designated page for a conversation on a particular topic. Here users can express their opinions, give advice, recommendations and wishes, share experiences, and so on. In general, provide information regarding the title of the discussion.
In addition, this object is often used as a post where you can ask questions. This happens especially often in public spaces dedicated to work or play. Now it’s worth talking to you about how to create a discussion in the VKontakte group. This is not as difficult as it might seem at first glance.
How to pin a post on a VK wall
Possibility of pinning in microblog, benefits:
- Save information for yourself
- Focus the attention of guests on the VKontakte page.
Below are 2 working ways to attach a post.
1) Publish the news, move your mouse over the 3 dots on the right, click the bottom menu item.
2) Click the date of the post or the text of the post, text and not photos or videos.
The post will open in a new window, under it, point to More, click the pin button.
Now the post is pinned first on the wall.
The next news will be below it, move up another publication and the previous one will be unpinned automatically.
Video tutorial:
Settings
The first place to start is by setting up your public page accordingly. Without it, you will not be able to bring your idea to life. But what are we talking about?
The thing is that “Discussions” are initially disabled for creation. That is, if you just made a group, then you will have to enable this function. How to do it? Just go to “My Groups”, and then click on “Manage Communities”. This line is located in the upper right corner of the page that opens. After clicking, a window with several actions will appear in front of you.
You will have to look carefully at the Information section. Now, if you are interested in how to create a discussion in the VKontakte group, you will have to find the corresponding line in this place. Select the "Open" option and then save the settings. In principle, the matter remains small.
How to create a topic in Odnoklassniki yourself?
When carrying out a process that is important for the user, how to create a topic in Odnoklassniki, experts recommend following certain rules. Here are a few of the most basic ones:
- The height of the image must be no more than 140 pixels. Failure to comply with this rule will result in the image being hidden under the information page;
- It is advisable to think very carefully and select the image in style so that it flows into the general background without contrast. Otherwise, a seam will appear on the page, which is not attractive.
The beginning of placing a picture is associated with the search for the necessary material, that is, the most suitable picture. You can get a theme on the Internet, but in order to find and create a unique image, it is better to use not a search engine directly, but special stocks or photo repositories.
Get to the point
When you have made sure that everything is in order with the group settings, you will have to proceed with immediate action. Sometimes they use programs for VKontakte. It’s just not recommended to do this. We'll figure out why a little later. In the meantime, let's try to answer how to create a discussion in the VKontakte group.
Go to the main page of your public. There, at the top of the screen, the line “add discussion” will appear. Click on it and look at the result. You will be “thrown” to a new page. There you need to write the title of the discussion (its name), as well as the first comment. In all this, the post will be written on your behalf. If you want to write on behalf of the community, then check this box. The corresponding window is located at the very end of the working panel, under the comment line.
All that remains is to save all the changes. Evaluate for results. Now you can create new discussions this way. Their number, as a rule, is not limited. But there is another very important point - the removal of outdated or unpopular discussions, as well as the issue of using programs for VKontakte. And now we will dwell on these topics.
VKontakte: Reviews for Shop-Script
Attract new customers!
Use reviews about your store on the social network VKontakte to attract new customers!
Improve your store's position in search engines!
Fill the pages of your store with unique content through reviews on the VKontakte social network!
Increase the attractiveness of your products!
Increase the attractiveness of your store's products through reviews of other customers about your store on the VKontakte social network!
The “VKontakte: Reviews” plugin allows you to display messages from discussions on the VKontakte social network on any page of the “Shop” application. If your store has its own community in VK, then this could be, for example, reviews about the work of your store. If all or some of the products in your store have their own discussion threads on VKontakte, then they can also be displayed on the store pages. The plugin allows you to display any number of topic messages in chronological, anti-chronological or random order. Only the text part of the messages is displayed. In the plugin settings, you can specify a list of uids of VKontakte users whose messages will not be displayed on the page (for example, a group administrator).
The plugin has the ability to use your own template to display information from a topic. If you are using a standard plugin template, you can change the CSS styles.
For the plugin to work, you need to create a VK application with the Website type and specify the service access key for this application in the plugin settings. If you already have such an application on VKontakte, then it is not necessary to create a new one; you can use the service key from an existing application. Step-by-step instructions for creating a VKontakte application with the Website type are presented in this article.
To display messages from a VKontakte discussion, insert the code into the required place in the page template: {shopVktopicsPlugin::getVkTopic(idGroup, idTopic, count, asc, cache_min)}
, Where:
- idGroup
— identifier of the group to which the discussion belongs - idTopic
- discussion identifier - count
- the number of messages displayed on the page (a positive number or 0 - all messages) - asc
— selection order. Can take 3 values: ASC - in chronological order from the very first - DESC - in anti-chronological order (starting with the most recent)
- RANDOM - random messages
— (optional parameter) Cache time for topic messages in minutes. If not specified, the value from the plugin settings is used.
For example, the address (URL) of the discussion looks like this: https://vk.com/topic-2158488_20577978
Here
2158488
is the VKontakte community identifier, and
20577978
is the discussion identifier.
Then, to display 5 random messages from this discussion on the page, you need to add the code to the page template: {shopVktopicsPlugin::getVkTopic(2158488, 20577978, 5, RANDOM, 15)}
To display the first three messages:
{shopVktopicsPlugin::getVkTopic(2158488, 20577978 , 3, ASC, 30)}
To display the latest message:
{shopVktopicsPlugin::getVkTopic(2158488, 20577978, 1, DESC, 5)}
The VKontakte: Reviews plugin uses the VKontakte API in its work. Data from a social network can be obtained using AJAX, which allows the user to leave the loading speed of the storefront page almost unchanged, but the downloaded data will not be indexed by search engines, or by standard HTML. In the latter case, the received data will be indexed by search engines, but the page loading speed may be slightly reduced if the VKontakte API server takes a long time to respond. The loading method is selected in the plugin settings (see screenshot).
The functionality of this plugin is also contained in the VKontakte plugin: Integration
If you have purchased a license for the VKontakte: Reviews plugin, you can receive a discount on the VKontakte: Integration plugin in an amount equal to the amount paid for the license for the VKontakte: Reviews plugin, but not more than 40% of the cost of the VKontakte: Integration plugin. To receive a discount, you must contact support indicating the order number for which you purchased the license for the VKontakte plugin: Reviews and the domain to which this license is linked
About managing discussions
Sometimes there is a need for quick removal by discussions. And then the question arises of how to do this. If you want to “cover” all the created topics at once, then it is better to implement the idea through the same community settings. You just need to select the “Close” option in the “Discussions” section and save. Now you know how to delete a discussion in a VKontakte group in a radical way. But loyal and reliable.
However, quite often you only need to delete one topic. Or several. To do this, go to the section of all published discussions, and then look for the “delete” button there. Click on the one that is located near your post. And all problems are solved.
Only many users very often look for different programs for VKontakte. As already mentioned, it is better not to resort to their help. After all, they often hide the most common virus that hacks user accounts. And then it will be very difficult to regain your community and profile. Thus, it is better to practice standard methods of solving the problem several times and hone your skills, rather than then suffer and be tormented by the issue of regaining access to your own profile.
To increase the activity of your audience (see), you must create topics and discussions. In them, users will communicate with each other and have the opportunity to ask you questions that interest them.
Now I will teach you how to create a discussion.
Go to the desired community. Now open the menu and select .
Now go to the “Sections” tab, and in the “Discussions” block, select “Open”.
To save changes, click on the “Save” button.
How to create a discussion in a VKontakte group
Return to the community home page. A new section has appeared here - discussions. Click the mouse cursor on the title to enter editing mode.
On the next page, click on the “Create topic” button.
We will move on to a form where you need to fill out the title and text. You can also add the necessary content - graphics, audio and video recordings. When you have everything prepared, check the box “On behalf of the community”, and click on the “Create topic” button.
Our discussion will be created. Now users will be able to view it and take part in the conversation.
You should monitor their activity and, if necessary, enter into dialogue.
Add
To add a new discussion in your VKontakte group from a computer or laptop, log into your account and open the community’s main page. Under the main information and the block with photos there is a button “Add discussion...” – click on it.
If you do not have such a field, then go to “Community Management” and go to the menu on the right to the “Sections” tab. Make sure that discussions are not “turned off”. Instead, select either “Open” (all group members can create) or “Restricted” (only editors and community administrators can create them).
If you want it to be added not on your behalf, but “on behalf of the community,” check the appropriate box. Click "Create Topic".
A new discussion will be added to the community.
If you want to edit text in a group, then open the entire list of discussions and hover over the desired one. A pencil and a cross will appear at the top right. Click on the pencil to change the text.
This is what the list looks like on the main page of the group. As you can see, I have 4 of them, but only 3 are visible. You can also sort them by update date and creation date.
If you want a specific topic to always be displayed at the top of the list, regardless of the dates, you can pin the discussion to the main page of the VKontakte group.
To do this, open the entire list and find what you need. Then click on it.
A window like this will appear. In it, check the “Pin this topic” box and click “Save”.
Here you can change the title and add a survey to it.
Now the pinned discussion will always appear at the top of the entire list on the main page.
If you have a group, then the discussion block is located above the news, if you have a public page, then it is located on the right.
If you are interested in moving this block so that this block is on the right side under the group avatar and its members, then do the following. Above the list, click on the “edit” button.
In the next window, uncheck the “Discussion block above group news” field and click “Save.”
You can also choose the number of topics to be displayed on the page and the sorting type.
They now appear in a group on the right side.
If you need to return everything back and the question arises of how to make discussions at the top so that they are displayed before the news feed, then, as written above, click on the “edit” button. and check the “Discussion block above group news” box.
How to create your own theme?
After the desired picture has been found, as soon as it has been given the required dimensions in a special editor, you can put the topic in the OK group. This process is carried out according to a special scheme:
- In the community you need to find the link “Decorate the group page.
- Click the line Load the selected theme for the community.
- You need to study all the clues presented to your attention.
- Once the download is complete, the topic is automatically sent to the portal moderators for review. On average, this process takes up to three days.
Once the check is completely completed, the user receives a special notification regarding the decision made. If a positive decision is received, the user himself can post it on the group page.
How to remove
You can create discussions on various topics, and if you see that users do not participate in some, then you can safely remove them from the list.
To do this, open the list and click on the one you want to remove from the list.
In the next window, click on the “Delete topic” button. A window will appear asking you to confirm deleting the selected discussion.
If you don't want to remove the discussion from the list, but you no longer want subscribers to leave their comments there, then you can “Close topic”. In this case, it will be impossible to add a comment, but you will be able to read all the discussion posts.
In the list of group discussions, a pin will appear next to the one that is pinned, and if it is closed, a padlock will be displayed.