Subscribing to groups on VK is carried out in just a few clicks, so the average user often has a huge list of communities that they want to get rid of. This is quite easy to do, but when the list of groups exceeds 100, it becomes more and more difficult to accomplish.
In such cases, it is recommended to use a special script or third-party software. We’ll talk about all this in more detail today in our article, namely, we’ll look at how you can unsubscribe from a group or community in VK on your phone and computer.
Manual unsubscribe
This method involves visiting a group and leaving it as standard. Let's look at how this can be done through a mobile application and a computer version.
Via computer
We leave the community via PC:
- Open your VKontakte page in the browser and go to the “ Communities ” section - from there we go to the desired group. In it, click on the “ You are a participant ” button.
- In the menu that appears, select “ Leave group ”.
- Thus, the “ You are a member ” button will be changed to “ Join the group ” - this means that you have unsubscribed from the group.
Via phone
Unsubscribe from the group through the official VKontakte application:
- Open the application on your smartphone and go to the community from which you need to leave. In it, click on the “ You are a participant ” button located under the “ Message ” button.
- In the window that appears, select “ Leave Community ”.
- Now the “ Join ” button will be displayed in this group - this means that you are no longer subscribed to the community.
This way we can unsubscribe from one group. To unsubscribe from everyone, you need to do such actions for each community, and this is not at all rational. It is better to use a special application or script. We will discuss how this can be done in the following sections.
How to delete a group in Odnoklassniki in the mobile version?
In the mobile version of the m.ok.ru site, you cannot give your administrative rights to another participant, but here you can easily delete your own community with all the materials available here. To do this, you just need to go to the community itself and click the “More” button to open the corresponding menu. In this menu you just need to select “Delete group”.
Next, you will also need to confirm the deletion of the community by clicking on the appropriate button in the next warning window.
How to unsubscribe from all groups at once
Via the app
In order to unsubscribe from all groups with one click, you need to download the Sobot application to your computer. It is distributed with a paid license starting from 126 rubles per month. Let's see how you can use it:
- Open the official page https://vkbot.ru/ and click on the “ Download ” button in the upper right corner.
- Next, click again on the “ Download ” button located in the center of the page.
- The program has been downloaded to your computer, now you need to pay for it. To do this, we return to the site and in the “ Buy ” section, select the appropriate tariff plan and pay for it.
- Activation of the key occurs in the program itself - install it, and enter the received code on the main page.
- Next, you will need to log in to your personal profile. After that, you will need to open it in the application and use the option “ Leave groups, meetings, publics ”.
In this way, you can drink from all groups on VK in one click. You can also do this for free using a special code.
How to leave a Viber group using your phone
The easiest way is to remove yourself from the Viber group using your smartphone. However, the approaches for Android and iOS may differ.
For Android
Experienced users identify two options for leaving the public on Viber. They involve removal from the group or its temporary disabling.
Solution #1
Using the Chats section:
- Log in to the Viber application and go to the Chats section.
- Find the name of the community you want to leave.
- Long press on the title and wait for the menu to appear.
- Click on the Delete chat button.
When pressed for a long time, a request appears, which is necessary to confirm the correctness of the selected position. Users are asked to unsubscribe from the Viber group or turn off notifications received on their phone. In the latter case, you must select the Silent option. Next, to turn on the alert, you can go to the Chat Information section (three dots on the right) and activate the sound.
If you have turned off audio notifications for participant actions, the request will include a Turn off for 30 days section. When you select this item, you can temporarily leave the group and later return to it (if necessary). To do this, you need to long press on the title and wait for the menu. There will be two options - enable or delete. In the first case, the user returns to the group, and in the second, he is completely removed from it. If the delete option is selected, the chat title no longer appears.
Solution #2
Using the chat screen:
- Enter the correspondence of the group in Viber from which you need to leave.
- Click on the three dots at the top right.
- Select the Information section.
- Find the Sign Out and Delete section in the list below.
- Click on the mentioned link.
As in the previous case, the user has several options at his disposal, including turning off notifications or deleting.
What to do if you want to completely delete a group in Viber? To do this you need to be an administrator, otherwise nothing will work.
iOS
Now let’s look at the question of how to remove yourself from a Viber group if you have an iPhone at hand. As is the case with Android, several taps on the screen are required to achieve the goal. In this case, participants have two options at their disposal.
Solution #1
Using the Chats section:
- Log in to Viber from your iPhone.
- Click the Chats link if another link is open.
- Find the name of the conversation you are interested in that you want to leave.
- To move to the desired option, move the title to the left.
- Click Delete (red button with a cross).
Next, the system offers several ways to leave the Viber group. You can not delete it completely, but select the Silent link. In this case, the participant remains in the chat, but does not receive audio messages about adding new messages. When you select this mode, you can disable the Viber group for 30 days. To do this, move the public title to the left, select delete, and then Disable for 30 days.
From now on, Viber does not send information about messages in the public. If you wish, you can return to communication at any time. To do this, click on the group and select Enable. Next, activate the sound alert by moving the slider to the right.
If you decide to permanently leave the Viber group on iPhone, click on the Leave and delete link. These actions are enough to leave the community and remove it from the list of available chats.
Solution #2
The second method is to solve the problem through the Correspondence Screen. Algorithm of actions:
- Enter the chat and click on the title.
- Click on the conversation title at the top of the display.
- Scroll to the bottom of the list of options and click Sign Out and Delete.
- Select one of the items from the menu that appears at the bottom of the iPhone display.
Next, decide which of the options considered suits you best. The algorithm of actions here is the same.
Delete a community without deleting members if you are an administrator
The principle of leaving the community for an administrator is no different from leaving an ordinary participant. You simply leave the group and anyone can take the administrator’s place. After leaving the administrator group, the “ Become an administrator ” button appears above the list of participants on the main page of the community. You can also appoint an admin yourself before leaving, and hand over the reins of the public to his caring hands.
Important: the program developers provide protection for the confidentiality of personal data, so copies of correspondence are not stored on the server. After completely deleting a chat or community (in the case of all members being deleted by admins), it is no longer possible to restore it. Before deactivating the chat, think three times - this action cannot be undone.
By creating backup copies, you can restore some of the information in chats (text messages and media files that are available on the device) when you “move” to a new device.
Removing all members from a WhatsApp group
If a group administrator leaves the group he created without deleting all of its members one by one, a new administrator will be automatically “assigned” to the group. The previous administrator will lose all of his rights in the group and will not be able to delete the group.
Of course, the now former administrator will be able to delete the group from his phone, but it will be a local deletion, only on his phone. The group itself will remain on the phones of other group members. This means that the group will not be deleted in this way. Therefore, the first step of a group administrator before deleting a group is to delete all its members one by one.
We'll show you how to remove group members using the example of deleting one single member. The remaining group members are removed in the same way. It should be noted that you will actually have to remove group members one by one. It will not be possible to delete everyone at once “en masse” or in some large “subgroups” - we delete participants one by one.
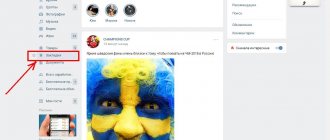
To delete a group member, in the “Chats” tab (1 in Fig. 1) we find the group (2 in Fig. 1). We go into it by tapping on its name.
Rice. 1. Find the group in the “Chats” tab in WhatsApp.
The group window will open (Fig. 2).
Rice. 2. “Talk” group window.
In a group, tap on its name. In our example, you should click on the word “Talk”. The group settings window will open, which you need to scroll down until the group members appear in it (Fig. 3).
Rice. 3. WhatsApp group administrator and its participants (using the example of one participant).
After clicking on the name of a group member, a list of possible actions with him appears. Among the proposed actions, you need to select “Delete” (Fig. 4).
Rice. 4. Menu of options for actions with group members on WhatsApp - the “Delete” action is highlighted.
After tapping on the words “Delete”, a window will appear to clarify whether you really need to delete a group member, or whether the action was chosen accidentally, by mistake (Fig. 5).
Rice. 5. Confirmation of deletion of a group member in WhatsApp.
By clicking on “OK” (Fig. 5), the group administrator confirms the removal of the group member, and the corresponding notification is sent to his phone almost immediately. After which the group member is removed from the list of participants on the administrator’s phone.
How to leave a WhatsApp group if you are not an admin
Any group member on his phone can independently leave the group to cease being a member. To do this, he does not need the consent or confirmation of the administrator. You can leave the group as described below for Android.
After independently leaving the group or after receiving a notification from the group administrator about exclusion from the group, the now former group member can independently delete the group from his phone, remove it from the chat list, more details BELOW.
Disabling the community
You don't have to leave the group. You can disable a community for 30 days. It will move to the bottom of the conversation list. During this period, you will not receive notifications of new messages from this chat. But the chat will continue to live. There, as before, activity will not cease. You can see new messages only by opening the correspondence of this chat. This may be a way out when activity in the chat is disturbing, but you don’t want to delete it at all
Each chat has a silent mode function. It is not necessary to turn off the sound in your smartphone and in the application completely. In the settings of a specific chat, switch the “ Silent mode ” toggle switch to the active position and messages from this group will arrive without sound.
Delete your group
There are situations when you need to delete a group that you created yourself. The removal process begins with preparation. Let's go to Facebook. In the left slidebar we find a line with the corresponding name.
In the window that opens, select the community that you want to delete.
The page opens. Under the cover there is a “...More” button. Click on it.
In the pop-up menu, click on the line “Edit settings...”.
The settings page opens. Scroll down to the privacy section.
Select “Change privacy settings.”
Put a tick on “Secret”.
Click on “Confirm”.
We confirm our choice again by clicking on the button of the same name.
Exclusion of participants
While in the group that you want to delete, in the menu under its name, click on the “Members” line.
In order for the community to disappear forever, we need to remove everyone who is in it. Unfortunately, this cannot be done with one click of a button. You will have to manually exclude each participant. To do this, click on “…” next to the participant’s name.
In the pop-up menu, click on the line “Exclude from…”.
A window appears in which you need to click on “Confirm”.
We repeat the same procedure with each participant.
Let's go out on our own
When all participants have been excluded, in order to delete the community, all that remains is to exclude the creator, that is, yourself. But it is possible that you have invested a lot of effort and time into creating and promoting the group, and it is a pity to get rid of it. Then you can stop at this stage. Since in confidentiality we have already checked the “secret” box, now only members will be able to find your community and see its news, and at the moment - only you. And you can always change the privacy type and invite participants again.
If you still decide to continue deleting, click on the three dots next to your name.
In the pop-up list of actions, select “Leave group”.
In the window that appears, select “Leave and delete” and click on it.
You have successfully deleted your group.
Be careful. If you leave a group before you exclude other members from it, it will not be deleted. After a certain time, the administrator position will be offered to active users.
It is also possible that you are simply tired of being in the community and posting new posts. Then it is better to instruct one of the participants to assume the responsibilities of an administrator. There will certainly be people interested.