When using several social networks at the same time, it may be necessary to transfer photos from one personal page to another, because for some reason the original file has not been saved. This can also happen to users who want to transfer a photo from VKontakte to Odnoklassniki. There are two methods, implemented through the full version of the site and the mobile application. You need to select the appropriate one and use it to upload the photo.
Transfer a small number of photos manually
When you need to transfer several photos, the easiest way to do this is by copying:
- We go to our page in Contact, find the necessary photos.
- Right-click on each image and in the menu that appears, click on “Save image as...”.
- Then select the folder where the photos will be placed. Let's save them.
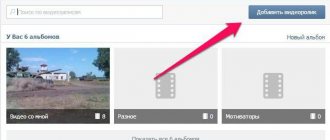
- Open a page on Odnoklassniki. Go to the “Photo” tab.
- Select an album from existing ones or create a new one. We are looking for the “Add Photo” button, it is located above all the pictures.
- By clicking on it, you can see all the drives and folders that are on the computer.
- Now you just need to find the folder with saved images (1), select one or more photos with the cursor (2) and click on “Open” (3).
After a few seconds, the photos will appear in the album.
Attention: if you have photos on your computer, you do not need to copy them from VK.
How to save other people's photos in OK
In addition to publishing personal photos, you have the right to save any pictures from the Internet or from a social network. To do this, open the image you like and click “Save Photo”. A window will open with a list of your photo albums. Select the one you want to copy the image to.
You can also download the file to your device. To do this, click on the inscription “Save to computer”.
Transfer a large number of photos manually
But what should you do if you want to transfer a large number of images, or even an entire album, from VK? The safest and easiest operation is performed using Yandex disk.
- First, you need to register a mailbox on Yandex or log into an existing one.
- At the top of the page you will see four tabs. We are interested in "Disk". We click on it.
- There is a list on the left, select “Photo” in it. Several more sub-items will open for you. From them you need to select the line called “Photo from social networks”.
- A list of all available social networks will appear in front of you, select VK from them.
- In the window that appears, you must enter your username and password for your page. The system will ask for permission to access personal and general information; you need to provide it by clicking on “Allow”.
- After this, copying all photos to Yandex disk will begin automatically.
Now you should send the photo to Odnoklassniki
- We mark on the Yandex disk all the photos that need to be transferred (you can mark one or more folders) (1).
- A menu will appear on the right. Select the “Upload to social networks” button there (2)
- In the list that appears we find Odnoklassniki.
- Then follows the identification procedure that is already familiar to us (enter your login and password, allow access to the data).
- Click on the “download” button. After some time, the images will appear on Odnoklassniki.
Attention: saving photos to Yandex disk and further posting them on social networks is absolutely free, any request to transfer money for services rendered is fraud!
From phone
To add pictures from a smartphone, you can use both the official OK application and the mobile version of the site. Uploading through the mobile version of a social network is something between this process in the application and the full version of the website. For those who have already added images from a PC or at least read the instructions, everything will definitely work out.
But let's take a closer look at the application. The add buttons can be found in places already familiar to us:
- on your personal page,
- in the news feed,
- in the photo section.
Here, for example, is what this treasured button looks like in the news feed.
If you have never used an application to add media files to Odnoklassniki before, then you will first have to allow access to your phone memory.
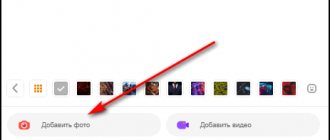
Once permissions are given, you can add any photos from your smartphone or tablet gallery. Just mark all the necessary files on your device and tap “Download”. If you wish, you can first select a photo album into which the files will be uploaded.
A little more tools can be found in the photo section. You can get there from the main menu. At the top of the screen there is a small carousel that shows the latest pictures from the mobile album. You can mark several items on it for loading.
In the lower right corner there is a button with a “+” sign. After clicking on it, you will again be taken to the phone gallery and can select files. But in order to select the place where you want to place the images, you will need to go to the “Albums” tab.
Transfer photos automatically
There are various services that transfer photo albums from one social network to another, for example itamitut.ru and filecloud.me. Each has certain pros and cons, but the principle of operation is similar to Yandex disk, which is currently considered the safest. It is difficult and time-consuming only during the first transfer; later it will be much easier. When saving photos next time, you will not need to re-authorize, just click on “Save new photos”. Uploading to Odnoklassniki is also carried out without re-entering data. The process will take a maximum of a couple of minutes.
When using various services to synchronize data between social networks, do not forget about security and do not leave your passwords on unverified sites. Then you will be protected from unpleasant surprises in the form of account hacking and unauthorized debiting of funds.
Next page
Related Posts
How to post photos on Odnoklassniki feed
How to create a group on Odnoklassniki
How to log into topface via Odnoklassniki
If there are not enough photos
If you only need to transfer one, two or three images, then you should not look for complicated ways. There is a very simple way to do this: download photos from Contact to your computer.
Then you need to go to Odnoklassniki and upload the same images to your page from the folder to which they were moved.
By the way, this way you can “steal” a photo from someone else’s page. However, you should not do this without the permission of the profile owner. This method is quite simple and convenient, but it is ineffective if you need to move a lot of photos at once. The user will have to spend a lot of time. Therefore, in such situations, the following, more complex method is used.
Transferring images using Yandex disk
It’s only difficult the first time: subsequent procedures will take no more than a minute. First, you need to create an email account on Yandex, if you don’t already have one. So, your mailbox is registered, you need to log into it. Find the DISK section and click on it with the mouse.
There is a column on the left - in it we select the item PHOTOS FROM SOCIAL NETWORKS. Let's go there.
We select the social network from which we intend to transfer. In our case, this is VKontakte, so we press the desired button.
The system will ask you for permission to proceed.
Once you click the Allow button, the photo transfer will begin. Note: for the next move, the user will need to click the “Save new photos” button.
Next, you need to go to the “Social Networks” section - it is located at the very bottom of the page.
Open the VKontakte folder and mark with icons entire folders or individual pictures that require transfer.
Click the “Upload to Social Networks” button. Here you should select the desired site (in our case Odnoklassniki) and click “Download”.
After some time, you will see a message below that the pictures have been successfully moved. The reverse process, that is, from Odnoklassniki to Contact, is carried out in exactly the same way. As you can see, the method is simple, free and absolutely safe. When you master it thoroughly, teach your friends how to use the system.
You sit on VK and regularly cover your life there, but is it inconvenient for some of your older relatives to watch your reports there? Do you have a small store on VK, and do you want to expand its audience by opening a profile on Odnoklassniki? One way or another, you are faced with a task: how to transfer a photo from Contact to Odnoklassniki. Solving it is not difficult.
How to add a photo on VKontakte: to your avatar, feed, album, group
Hello everyone, dear readers of the AFlife.ru blog! Social networks are designed for communication, viewing videos and photos. You can add images from your smartphone or through a browser, edit them directly in the application, set viewing settings and much more. How to add a photo on VKontakte, we will discuss the available methods in our article.
How to put a photo on your profile
Let's start with the very first stage after registering on the VKontakte social network. After creating a profile, you need to set an avatar. How to do it:
- Go to the main account page.
- Hover your cursor over the place where your avatar should be. You'll see a link to "Upload a new photo" or "Update photo" if you already have one installed.
- If you have the ability to take a photo directly from your device, you can choose a snapshot. If you want to download existing footage, select the file from your hard drive by clicking on the blue button.
- Save your avatar.
- Next, you need to mark the display area that visitors to your page will see.
- Save your changes.
In order for the avatar to be displayed correctly, you need to set the image to at least 200*500 pixels. You can put a picture of 200*200 pixels, but in no case smaller. You cannot upload overstretched images where one side is several times larger than the other.
If necessary, you can change the photo at any time. Remember, an avatar is the first thing other users will see when they visit a page or type your name into a search.
Adding a photo to the wall
If you want to post an image on the wall, you need to open your page. Find the white box that says “What’s new with you?” Inside it there is a special camera icon designed for uploading pictures and photos. Next, you will have three options:
- Add a previously downloaded photo from the album;
- Take a quick shot;
- Upload an image from your device's memory.
The selected frames will appear inside this white box. If desired, you can add other elements to them - video from Youtube or another site, inscription, music, or edit online.
It is possible to disable comments, visibility (for example, make it only for friends), delay publication, or leave the settings as they are.
If everything is in order, click “Publish”, the photo will instantly appear on your wall and in the feed of your subscribers.
If you log in from a phone, the social network interface may be slightly different, but in general it is clear here too. Instead of the “Add Photo” button, you need to click on the + icon or a stylized image of a camera.
You can immediately apply filters, masks, or shoot short videos on snapshots. Here you can also post an image in the “History” format; it will be available for viewing within 24 hours.
How to upload a photo to an album
VKontakte has the ability to store pictures in separate folders, which you can come up with a name for. New frames are added from a computer, phone or from another place on a social network (for example, from a favorite group). How to add a photo to a folder:
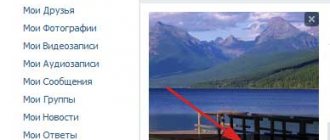
- In the menu on the left, go to the “Photos” section.
- If you want to create a new album, first click the corresponding button and configure the settings. You need to enter its name, description if necessary, and set access for other users. After saving, it will immediately appear in your list of albums.
- Specify the upload folder or simply click the "Add Photos" button. In the second case, the frame will be published on the wall of your page, but at this stage it is still possible to place it in a specific folder.
- Once the image has loaded, open it. Edit the description, tag a person or place, make corrections. By the way, many other actions with photos are available here.
If you liked a picture in a community, group, or friend’s feed, you can add it to your album. To do this, open the photo and click the “Save to yourself” button. It will be located in the folder of saved VKontakte images.
Adding photos to a group
In the same way, you can add pictures to social network groups if you want to share them with other subscribers. First of all, make sure that the community you choose has this opportunity. It may be limited, in which case the material for publication is first sent for preliminary approval with the group administrator. If not, the photo will immediately appear in your feed.
How to upload a picture or photo in the community:
- Join the group. Find the white box in your feed that says “Suggest news.”
- Here, click on the same icon as when adding a picture to your wall (camera icon).
- Also mark images from existing VK folders, take a snapshot or upload from your gadget.
- Click the “Attach Photo” button, it will indicate the number of selected frames.
- Edit the image and add other elements to the post (music, document, poll, etc.).