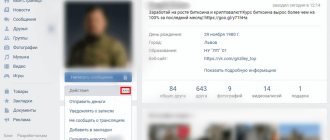
From the main profile page
There are two options for events. Now I’ll tell you everything and show you, be careful.
First option:
- First, let's go to our favorite social network - classmates.
- Once we are on our page, we begin to look for the “Photos” block.
- And there, in the upper right corner there will be “Add photo”, click on it.
- Then a window like the one below will appear.
This is Windows Explorer. All we need to do here is select the files we need, which are located on the PC. And you're done.
Second option:
You can also add a photo from the main profile page using the “Create notes” block. At first glance, it may seem that if you add a photo, it appears only in the notes, but no.
I hasten to surprise you that this function is the same as above mentioned. Perhaps this is a mistake, or maybe it was deliberately designed this way, so to speak, they showed creativity. Let's use it while it works.
Useful tips for downloading pictures from PC
1. If there are a lot of pictures in the folder, in order not to make a mistake with the choice, click on the “picture” icon (Change view) in the right part of the top panel of the system window and use the slider to set the display mode to “Huge icons” or “Large...”.
2. If you need to select several pictures in a directory so as not to perform the download operation multiple times, do the following:
- while holding down the “Ctrl” key, click the left button to mark the images that you want to send to the recipient;
- click “Submit” (they will all be uploaded to the server at once).
3. To upload a group of photos that are located next to each other:
Hold down the Shift key and click the mouse to select the first photo of the group and the last one;
wait for the selected group of pictures to be uploaded to the mail service.
Enjoy using your e-mail! If you want to learn how to send letters by mail, read this article.
In life, there may be a need to send x-rays to a doctor or share your vacation impressions with friends. I would like to send photos, audio or video clips to my friends. Let's figure out how to send a photo via the Internet .
A huge advantage of the Internet is that delivery of mail with an electronic attachment via the Internet will occur almost instantly, but by regular mail the recipient can wait for a letter or parcel from several days to several weeks.
Send photo by email (e-mail).
1. You must have your email, i.e. your email inbox doesn’t matter where – on Yandex, Google, Rambler, Mail... You also need to know the recipient’s email address.
2. Go to your email, click on “ Write a letter ”.
3. In the “ To ” field, insert the recipient’s email address, for example – ...@gmail.com.
4. In the “ Subject ” field, enter the subject of the message, for example, “My photo”.
5. In the “ Plain text ” field, write your letter text.
6. Click on “ Attach file ”. Select files to send... window will appear with a table of files on your computer, in which you can select the file in which your photo is stored.
7. Double-click on the selected photo with the left mouse button. A download window will appear.
8. Wait for the download to finish, this will take a few seconds, then the window will close and an icon in the form of a paperclip and a link to the downloaded file will appear. Also, how many downloaded files are attached to this email.
9. If you need to send more photos, then click on “ Attach another file ” and repeat the steps for each photo.
10. If you change your mind about sending, you just need to click on the red cross next to the attached file and it will be detached from the letter.
11. Click on “ Submit ”. The message “ Message sent successfully ” will appear. All! Your email with attachments has been sent to the recipient! The recipient can immediately open both your letter and your photos.
12. To be more sure that the letter was sent in full with all attached files, you can click on “ View message ”. Then, by clicking on “ View all pictures ”, make sure that nothing is forgotten.
13. If you need to send many photos, it is better to first create one file from them, archive it and send this archived file.
14. If the photo is not attached to the letter due to its large size, you can reduce its size using a graphic editor.
Send photos via file sharing service.
Photos and other files, audio clips, and videos can also be sent through file hosting services.
To do this you need:
- Find a site on the Internet that provides temporary storage of files.
- Upload your photo to such a site and receive a link to it.
- Send this link to the recipient.
- The recipient will follow the link to the file hosting service and download your photo for themselves.
- It is necessary to take into account that uploaded files are stored on file hosting services for a limited time.
Send photos via social networks.
You can also send a photo to a friend through social networks.
To do this, you need to post a photo on your social network page, and a friend or friends will then download it.
And if you don’t want others to see your photo besides your friend, then you need to send it to a specific friend in a personal message, attaching this photo to him.
Life and technological progress do not stand still. There are probably other ways to send a photo to a friend via the Internet.
Hello, dear readers of the KtoNaNovenkogo.ru blog. Each of you, communicating on forums, on social networks, creating your own official pages there (for example, creating a page on Facebook or your own page in VKontakte), sooner or later wonders how you can upload a picture to the Internet yourself and get a link to it , so that you can also share your masterpieces with friends.
Looking ahead a little, I’ll say that you just need to upload the file to a file hosting service , of which there are quite a few on the Internet. In today's publication we will look at the most popular file hosting services and learn how to upload a picture to the Internet and get a link to it for further publication on social networks or on forums.
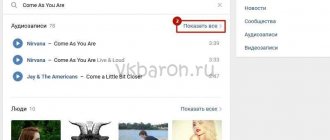
Through the Photo section
The simplest and most familiar method for many, try it, perhaps it will become your favorite. We do the same work. Go to our page and click “Photo Section”. It looks like this as shown below.
I remembered the song, there are three roads, three paths, but which one should I take?
What I mean is that we now have three options:
- We create a new album and upload the photo to it.
- We place the pictures in our already created album.
- Or simply click “Upload photo”.
I propose to consider each option in more detail in order to better understand what is at stake.
Creating a new album
- First, we are required to click “Create Album”.
- Then a window will appear in front of us where we need to enter the name of the album and click “Create”.
Important! I suggest you pay attention to your privacy settings. We may limit who can view our album. If the need arises, you can completely hide it from everyone and only you will see it.
- So, we have done the above steps, now we have this picture in front of us.
- Before us is the window of the album we created. Click on “Upload photos”.
- As a result, the same window called Windows Explorer will open in front of us.
- Here we select the files we need and then click “Open”.
By the way, you can simplify the situation by adding photos. We take and select the number of them we need and “Open”. At the same time, we do all this from the PC folder directly into the browser window from the Odnoklassniki website.
After all, our pictures will be loaded and you can see them on your page. A notification will also appear indicating the completion of our work.
Picasa
There is also such a wonderful free program from Google as Picasa, which allows you to work with various files. For example, using it you can not only upload a picture and receive a link , send a photo by email or share it on social networks, but also add it directly to the well-known video hosting YouTube.
Picasa supports various file types , such as bmp, gif, png, tiga, tif, tiff, psd, raw, avi, mpg and many others, which can be either allowed or disabled by checking the boxes in the settings.
configure Picas to a private Google+ album, so you can open a photo from any device and share it with whomever and whenever you want. In the settings, you can choose from which sources the auto-upload will be made (camera, memory card, from the desktop, from the “my photos” folder, from the “my video” folder, or from everything combined).
And in the free program from Google you can create folders, edit them, view slide shows of selected images, create presentation films and collages. And all this is in addition to the available free editor, which is very rich in all sorts of filters and effects applied to the images available in the file hosting service.
Adding to an existing album
Adding our photos to an existing album is as easy as a piece of cake. To do this, go to “My Albums”. In each of them there will be three vertical dots on the right, click on them and there we will be offered two options for events.
- Upload a photo.
- Edit.
We select the first option, and we are immediately transferred to the explorer. Here we already know what to do, or more specifically, select the files we need and click “Open”.
In this way, you can add an image to a new album, as well as to an old one.
Add pictures using the “Upload photo” button
Guys, it is not necessary to immediately put our photographs in a new or old album. There is another interesting way. You can throw it directly into the photo section. For this we need the “Upload photo” button.
You can also use the mouse to move classmates to the window from Explorer. Don’t worry, everything will automatically be in the “My Photos” section.
So we figured out how to add a photo to Odnoklassniki from a computer to your page.
Method 1: online services
I LOVE IMG
Service address: iloveimg.com/ru/photo-editor
1. Click on the “Select Image” button and upload the main image.
2. Click “Open” and upload the photo you want to overlay.
3. By pulling the sliders, you can change the scale and move the picture.
To save the result, click on the “Save” button.
PhotoDraw
Service address: photodraw.ru/online
1. Click on the “Upload from your device” button and select a photo.
2. Click "Upload" and add the following image.
3. Place the drawing in the desired place and change its size by moving the edges.
This way you can overlay several photos on top of each other.
4. Click on the “Save” button to download the result.
IMGonline
Service address: imgonline.com.ua/impose-picture-on-another-picture.php
1. In the first tab, upload two pictures using the “Browse” button.
2. In the second tab, select overlay options.
If you need to make the picture transparent, set the appropriate value in %. If you just want to overdub, set to 0.
3. Adjust the size of the pictures.
4. Adjust the position of the second image relative to the first.
5. In the last tab you can configure the quality and format of the output image.
6. Click on the “OK” button to start the overlay process.
To save the result, click on the “Download processed image” item.
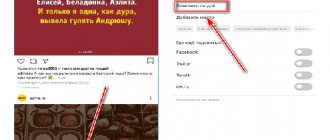
From the news feed
The very first thing we see after registering with OK is, of course, the news feed. What am I talking about all this and the fact that you can add images straight from the feed.
To do this, there is a “Photo” button just in the note-taking block that I told you about above. Our actions will be the same: click this button, then select the necessary files on your PC.
How to add a photo to Odnoklassniki from a phone or tablet?
You can add images from your phone through a specially trained OK application and through the mobile version. I don't really like the second method, so I suggest stopping and looking at the first method.
Moreover, the algorithm will be more similar to the computer version. Here we will find buttons already known to us, such as:
- In the photo section.
- On my personal page.
- In the news feed.
I will show all examples from my girlfriend’s page and from my iPhone. The process is similar with Android.
For example, in the feed everything is very transparent. In the “What’s new” column there is a section “Photos, click on it, and your photo albums will open, select the files and click “Upload”.
You can also go to your page and click “Photo.
Then all photos, as well as albums, will appear. Find the camera icon at the top and click on it. And then it’s like clockwork.
If we add our photos through the photo section, then this is basically the same as what we analyzed on our personal page. Let’s go to “Photos”, and you already know the rest.
Now you know how to add a photo to Odnoklassniki from your phone from the gallery.
How to attach pictures to a letter?
The processes for downloading individual images and an archive with images are no different from each other. Also, to send a photo by email, regardless of the service used, you need to perform an almost identical set of actions.
Mail.ru
1. Open the “Mail” section, click “Write a letter”.
2. Fill out the form to send a letter (read more about this procedure here).
3. After you prepare the text of the message:
To load images from a PC disk:
- click “Attach file”;
- Select the picture by clicking the mouse and click “Open”.
To download content from storage:
- Click the “cloud” icon next to the button;
- in the additional panel, select files/archive;
- click "Attach".
Yandex.ru
- Under the field for entering the text of the letter, click “Attach files”.
- In the Windows window, go to the folder with the prepared photos or archive, select the objects with a mouse click.
- Click "Open".
To upload files from Yandex.Disk, click the “flying saucer” icon. Then in the “My Disk” panel, select the images (select them by clicking) and click “Attach”.
Gmail
1. In your service account, click the “Write” button.
2. Formalize the message (specify the recipient's address, title, print and edit the text).
3. To upload a photo from a PC, click the “paperclip” button in the bottom panel.
If you need to send pictures from Google.Disk, click the adjacent button (service logo). Mark the required files with a mouse click and click “Add”.
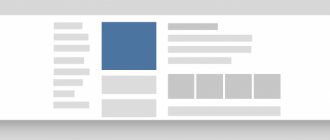
Saving other people's images to yourself in OK
From PC
You can not only publish your data, but also save photos that we liked.
- We take it, open the necessary image and at the bottom right there will be a list of various functions.
- You can choose either “Save to Album” or “Save to Computer.”
- You can also hover over the image and right-click. And select “Save as...”.
- Explorer will open, and there you decide where exactly to save.
From phone
- Open the photo and find three horizontal dots on top, click on them.
- Or press your finger on the photo.
- A mini menu will appear there, select “Save Photo”.
- And our photo is automatically saved in the phone.
Pixic - image and image hosting
Uploading a file to the Pixic file hosting service, which lives here, is as easy as shelling pears. We go to this hosting of pictures and images, click “Browse. " and select the file that we want to upload to the Internet. Expanding the window with image and preview settings, we make the necessary adjustments. Then click on “Download”.
Uploading an image to Pixic is not difficult, but this program, unfortunately, has a number of limitations:
- Supported formats: gif, jpeg, png
- Limit of files for simultaneous upload: 10
- Limit for downloading from the Internet: 30 MB
- Limit on uploaded file size: 5 MB
- Maximum product of sides: 25 MP
Those who are not bothered by such restrictions are welcome.
Upload photo to Yapix
Yapx is also free and very easy to upload a photo and get a hosting link. You can upload an image either without registration or with it - by entering the requested data or using your registration on social networks such as Facebook, Odnoklassniki, VKontakte, mail ru:
Now by logging into your profile you can:
- Add an image
- Create a story in pictures
- View all your uploaded images
- View your best images in the public gallery
- View those images from the public gallery (other people's, not just yours) that you liked and marked them as liked - added to the list of favorites
Upload a picture to pixs
also upload a picture and get a link to it using the free graphic data exchange service pixs.
In order to be able to create albums, add any images to them, and have access to editing, you must register. Registration will take no more than a few seconds. Click on “My Pictures” (in the upper right corner), where you will be asked to either log in with your details or register - enter your email address and create a password.
Well, then as in the file hosting services described above:
- Click on “Download”
- Select an image from your computer or from the Internet (enter the file URL)
- Come up with a name for our image (if desired)
- We reduce our image to the desired size (if you do not check the box, it will be loaded at the same size as it is)
- Well, if you really want to, then we allow the publication of our image in the gallery