Home » VKontakte » How to add a product to a VKontakte group: making selections
0
softmarker 08/10/2019 403
Doing business on VKontakte is becoming easier every year. In particular, this is due to the fact that groups are constantly increasing their functionality.
Developers add some new tool every year. And one of these tools in recent years has been the “Products” section. He contributed to the fact that now any online store (and not only) can conduct its activities on social media. VKontakte network without using separate sites.
In today's material we will take a detailed look at the topic of VKontakte products: how to add, how to delete, what restrictions there are, and so on. When you know how to add a product to a VKontakte group, your business becomes easier because other people feel more comfortable buying products from a network they trust. It turns out that trust in the VKontakte network is transferred to your products, so creating an online store on the VKontakte social network is quite a promising business.
New VK features
“Products” on VKontakte appeared relatively recently. They are a separate section on the main page of the community and are presented in the form of a photo with a name and price.
Clicking on any of them will open a card. Here you can see a more detailed description, a button to contact the seller, you can also add to favorites, like, share, write a comment, etc.
Let's say you have an online store on VKontakte where you sell perfumes. Today, new perfumes have gone on sale that are not as famous as other proven brands. And selling them is therefore more difficult. What to do in such a situation? Try to advertise them in your posts? Organize special promotions and sales to attract attention? Perhaps this will help. But there is another more effective way. Display this product in the “Products” section. Thus, everyone who visits the public page will be able to find these perfumes. Attention increased. And, as you know, the more people see, the more people will buy.
Thanks to this function, you will be able to display your products in the most visible place, and people will not be able to ignore it.
This is very convenient compared to what it was before. And, as you know, previously all products were designed in the form of photo albums. Not only was it not always easy to find these albums, but you also had to enlarge the photo of each item you liked to see its cost. Now you can see a complete list of items with prices.
You can also present your services here. Similar to a product, you can add one or more services, add a detailed description, price and everything else. And they will be displayed on the main page of the public.
Advantages of an online store in VK
The developers of the social network VK are constantly transforming and developing the social network. More and more necessary and useful functions are appearing. One of them is the possibility of organizing an online store. This allows you not only to display and advertise your products, but also to sell them online. This option allows consumers to add selected items to the cart and pay for them through the VK payment system.
Attention! This function is available only for citizens of the Russian Federation and payment is possible only in rubles.
In order to create an online store in a group, you will need to do the following:
- Go to the “Products” section.
- Check the box next to “App Store”
Next to it will be the inscription “set up”. After clicking, a form for setting up an online store will open. You will need to indicate the recipient of the funds, select a design option and forms to be filled out by the customer.
You will first need to register in the VK payment system - VK pay. This function is available only to citizens of the Russian Federation, since identification in the system takes place using the passport of a citizen of the Russian Federation. The registration process is quite simple - just follow the instructions provided.
The online store needs to be configured
How to include products on VKontakte
Before you create a showcase for your VKontakte community, you need to include the section that is responsible for this. Below are step-by-step instructions:
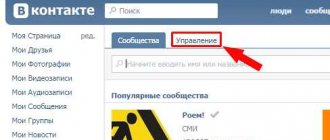
- Go to the public page;
- Next, click on the button with an ellipsis and select “Community Management”;
- On the right, select “Partitions”;
- Find the “Products” line and turn it on.
- After you select the “Enabled” item, some parameters will appear below (see screenshot). Customize them for yourself.
- Next, select “Products” in the “Main block” line. After recent innovations, some community sections are by default in the right column and in order for them to be displayed above the news feed, you have to use the “Main block”.
- Save your changes.
After completing the steps, a new section will appear on the main page.
Mass actions with goods
The basic version of the plugin allows you to send products to a group one at a time. In the extended version, mass actions with products (export, update, delete) and selections (export, delete) are possible.
Export of goods
Product Updates
The plugin establishes a one-to-one relationship between objects on the site and in a group. This means that each object on the site is linked to a corresponding object in the VK group. As a result, if the site uses the same image for two different products, then when updating the products an error will occur and it will not be updated. Because the same photo on the site cannot be linked to two VK objects. To avoid this situation, by default, when updating products, all product information is updated, except for images. Additionally, it also reduces the product update time.
If you also need to update images, you should enable the Update images option. In this case, the plugin will try to update product images in VK. However, errors are possible for the reason described above. If an error occurs, the product will not be updated and there will be a corresponding entry about this in the plugin Log.
The Send photo again option (only valid if the previous option is also enabled) allows you to avoid the error described above. When this option is enabled, when updating products, the plugin will download product photos again (as if they had not been downloaded previously). This is reminiscent of the situation with the export of goods, when even if the same photo is used for several products, they are all sent to VK correctly, although the connection of images on the site and in the VK group is established only for the last added product.
It is recommended to enable this option in exceptional cases.
Removing products
How to add a VK product
Unfortunately, the developers do not provide the ability to upload several items at once, so you will have to do this again and again, adding 1 item at a time.
Make sure that the showcase is turned on (instructions above) and then proceed to the instructions described below:
- Click the "Add" button.
- In the window that opens, you need to select a category, enter a name, description, add a photo (several are possible) and indicate the cost.
- Then click “Create”.
Done, your product has been added to VKontakte!
To add the following items, you need to go to the page with a complete list of products, click the “Add” button and do all the steps again.
What are Product Options?
The Product Options block allows you to create two tabs where information is inserted in the same way as in a standard text editor. You can use illustrations or videos, describe here how to use the product or warnings for the consumer - complete freedom of action. The title (Custom Tab 1 Title column) will be displayed as the title of this tab. For example:
How to add a selection of products on VKontakte
There is also the ability to create collections (categories). This is somewhat similar to photo albums, where instead of adding all the photos in one pile, you are asked to create an album.
This is especially true for those communities where there is a large number of products and it needs to be grouped into categories.
So, to create a collection, follow the instructions:
- Go to the page with all items.
- Next, in the upper right corner, click the “Create collection” button.
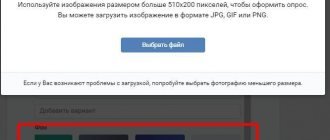
- In the window that appears, enter the name of the collection and upload the cover (the size of the uploaded image must be at least 1280 x 720 pixels).
- Click the "Create" button.
After these steps, a new section will appear - collections. Also, when creating a new product, you will have the opportunity to select a selection. VK product selections are an excellent tool that will allow you to sell more products.
And a little trick!
In addition, we still have 2 more functions that have not been considered: “Go” and “Duplicate”. The first one is needed in order to open the finished product page on your website. The second will allow you to make a copy of the product. As we have already said, it is convenient to create new products by duplicating existing ones, especially if they are of the same type. This saves a lot of time needed to update the assortment. In addition to working with the list, you can also create a duplicate on the product editing page. Just click on the “Copy to new draft” link (it will appear when the product is published).
But be careful! Make sure you are editing a copy and not a previously created original! Otherwise, all the work will go down the drain.
How to add, edit or delete a product in WordPress WooCommerce.
Instructions and features. 5 (100%) 2 vote[s]
VK product management
Fortunately for us, the functionality is not limited to just adding one.
Firstly, the developers have added the ability to change the location of positions by dragging them with the mouse. This was done for those situations where there is a certain product whose sale is a priority. For example, to make an item appear on the group's home page, drag it to one of the first three places in the general list (since only the first 3 are shown).
Secondly, you can edit any card. For example, there is a need to change the name, description or price. To do this, in the card itself, click the “More” button, select the “Edit” item, change everything necessary and save.
Thirdly, the ability to freeze a position has been added. For example, a certain item is out of stock (sold out). When editing a card, you can check the box next to the line “Product unavailable” and all users will know that it is not available. And as soon as it appears, uncheck it.
Fourthly, in order to conveniently track comments, there is a wonderful “Review Comments” button, by clicking on which you can see everything that people write (questions, reviews, etc.).
How to delete a product
Some users often have a question: how to delete this or that position? Well, let's look at this point in more detail.
To remove it you need:
- Go to the card.
- Under the photo, click the “More” button and select “Delete”.
- Confirm deletion.
Ready! The position has been deleted. Everything is quite simple and clear.
Are there any restrictions on VK products?
There are not many restrictions when working with the “Products” block. But they exist, and now we will talk about them.
- You can only add 1 position at once. This is not entirely convenient when you have, say, 100 items. But for now we have what we have. We hope that the developers will think about this issue and please us with new features in the near future.
- No more than three positions can be posted on the main page of the public at the same time. Unfortunately, we are also powerless here and cannot increase this number.
I would also like to note that the maximum number of products is unlimited. At least we have not been able to reach any limit and have not heard of it. Therefore, add for your health!
“Store 2.0”: setting up the latest version
If you connect “Store 2.0”, you will have a separate tab in the community menu:
Go to it to set all the necessary settings. The internal content is essentially the same as in the Store application, but the usability has become more convenient. There are now 5 tabs, they are located not on the top, but on the right.
Orders
The same simplified CRM system with statuses, comments and tags. In this version, the table can be customized to suit your needs by enabling or removing various fields.
Goods
Here we can quickly edit product cards, selections, and also set product properties. We have already discussed what it is and why it is needed.
Settings
Here are the basic options: region and city of work, currency, contact information, terms of delivery and payment, recipients of notifications about new orders.
Delivery
Unique functionality that is not available in the Store application. The connection process is quite simple, you need to indicate the cities where delivery is carried out and the available options: pickup, Boxberry, SDEK, post office.
You can provide free delivery for customers (pay for it at your own expense), and also set a deadline for order completion.
Help
An interactive section that, when you go to it, automatically redirects you to the list of frequently asked questions about the work of “Store 2.0”.
Payment settings cannot be added yet, I have already said this, but this should change soon. Otherwise the functionality is almost the same.
Bottom line
We examined the “Products” block in detail. This is a very interesting and useful tool that makes it easier to do business on the VKontakte social network. The main thing is not to forget that marketing plans and advertising moves are still yours.
We tried to provide as complete information as possible and hope that it was useful for you.
Rate the text:
[Total: 2 Average: 5/5]
Author of the publication
offline 7 years
softmarker
Comments: 95Publications: 268Registration: 05/15/2014
Creating a business community
If your store's community has already been created on VKontakte, then skip this step.
1. Log in to VKontakte and create a community:
2. Select the “Business” community type:
3. Fill in your store details and create a community: