How to remove VKontakte notifications
Let's look at the instructions on how to remove VKontakte notifications
, through the official website vk.com, directly through your personal profile:
- Having gone to your VK page, you need to go to the “My Settings” section and select the “Alerts” section. This section contains a lot of settings for your profile. You will see a complete list of notifications, which includes setting up notifications for your smartphone and email. It is not possible to turn off messages forever; you can only set up sound notifications.
- Settings that are available on the site: show instant notifications, enable sound alerts, show message text, they can be disabled using the slider.
- Below there will be settings for feedback, events, etc. They are also adjusted using the knob on the right.
- It is possible to configure notifications via SMS. If you require notifications, then click the checkbox and the “save” button, you will see other settings, namely whether to receive SMS or not, and at what time to send notifications.
- You can also link the email to which notifications will be sent.
- The notifications you set will be sent to your email. Messages, events, friend requests, tags in photos, invitations to communities, birthdays, gifts, events and much more from the list.
Source: https://pr-vip.ru/blog/kak-otklyuchit-uvedomleniya-vkontakte
Formulation of the problem
It is very difficult to imagine the modern world without VKontakte. Obviously, this social network has an application for iOS devices. Any application has problems, and VKontakte was no exception. Either the process of listening to music becomes difficult, or notifications about messages and publications stop appearing on the screen. The question of why notifications from the VKontakte application stop coming is worrying more and more modern people who use Apple products. There are a number of reasons why this situation may occur, and in each case there is a specific solution.
The question of why notifications do not arrive on the iPhone “VKontakte” is asked by many users. Most often, the alerts do not disappear at all. If the application is running, message notifications are still displayed on the screen. Complete silence occurs only when you minimize the application from processes. It was after this that many people stopped receiving notifications on their iPhones on VKontakte. The reason for this phenomenon will be explained below.
How to turn off notifications on VKontakte
There is an alert for almost every event within a social network.
This allows you to stay up to date and track the reactions of other users to published material, a comment left, or a broadcast.
If there is a large audience, such notifications can become quite annoying, cluttering up really important messages. In this article we will figure out how to disable notifications in VK.
Disabling notifications via email and within VK
The corresponding section of the profile settings is responsible for receiving notifications by e-mail and through the VKontakte page. To change these parameters you need to:
- Click on the round avatar and select “Settings”.
- Go to the “Alerts” section (located under the security and privacy settings).
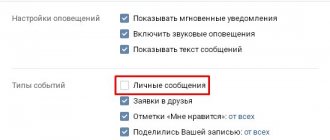
- Adjust settings: The first block called “Alerts on the site” configures the type of notifications that arrive directly to the VK profile. Here you can turn on or off instant notifications, sound and text display.
- Next comes a whole series of different events taking place on the social network. Opposite each, you can choose one of three options for receiving alerts: “all”, “only important”, “disabled”.
- The last block displays the e-mail that receives a summary of events that have occurred and sets the frequency of their receipt. To disable notifications received by email, select the “Never” option. Instant or once per day alerts are also available.
By switching all switches to “Off” or “Never” mode, you will be able to completely get rid of VKontakte notifications.
Turn off notifications on your phone
Previously, the social network had the ability to receive notifications in the form of SMS to a mobile number. This option has now been removed. The thing is that now you can install the official VKontakte application on smartphones and receive alerts through it. This is more convenient and allows you to immediately familiarize yourself with the event for which you received a notification.
To turn off notifications coming through the application you need to:
- Tap on the three horizontal stripes.
- A menu will open where you need to click on the gear icon.
- Select "Notifications".
- Click on the big “Configure notifications” button.
- Disable the feature by moving the slider to the left.
Ready. Now your phone will not receive notifications about events within the social network.
Reference. You can also disable the option through your smartphone settings. You should visit the “Notifications” section, find the application and make the appropriate settings. In this case, you can either completely turn off all signals or deactivate individual elements - sound, vibration, LED indicator, mark on the icon.
Disabling notifications in VK is quite simple. To do this, you must follow the instructions presented in the article. Email notifications are disabled through the interface of the full version of the site, and mobile notifications are disabled through the general settings of the phone or the application itself.
Source: https://zatupila.ru/kak-otklucit-uvedomlenia-v-vk.html
I'm not receiving notifications from the contact on my iPhone:
If push notifications on iOS devices do not show notifications, then the problem is most likely that you have disabled this feature in the settings.
Follow the instructions in the pictures and set up notifications as you see fit.
This is the first option if notifications are disabled in the settings of the phone itself.
And this is the second option:
You probably realized that in this case, all notifications are set in the settings of the VKontakte application. For the iPad everything is the same, but these screenshots were taken on an iPhone.
How to turn off notifications in VK
This article will discuss in detail the question of how to disable notifications in VK on your phone, email and browser.
The VKontakte developers have created a very multifunctional and flexible system for notifying users about all kinds of events. The range of notification options is huge.
You can customize everything: from messages and likes to changing the balance in your advertising account. After reading the article, you will learn how to turn on and off any notifications in VK in a couple of clicks.
Turn off notifications on your phone
The social network VKontakte appeared long before smartphones and stable mobile Internet became something commonplace.
Therefore, some time ago, VK had a service of notifying about events in the profile via SMS to a mobile phone number.
Now, the vast majority of users use smartphone applications. Accordingly, messages arrive only when you have Internet access.
To turn off notifications on your smartphone, follow these steps:
- Go to the official VKontakte application.
- Tap on the button in the form of three horizontal stripes at the bottom of the screen.
- Go to settings via the gear icon.
- Go to the notification settings menu.
- Here are all the options with which you can disable and enable alerts. Choose which notifications you don't want and opt out of them.
Reference! You can temporarily turn off all notifications by tapping Do Not Disturb and choosing a mute period of 1, 8, or 24 hours.
If you wish, you can remove only notifications about new messages that arrive too often. A separate option is available to disable notifications from group chats, in which several hundred messages can arrive in an hour.
Settings for feedback (likes, comments, mentions), events (applications, invitations to communities) and the “Other” section can be adjusted in accordance with your activity on the social network.
If you often publish new photos and posts, it’s better to remove likes so as not to be distracted by the sound of your phone every time someone likes your post.
But if you don’t receive comments and requests often, then you can leave these notifications to immediately find out about such an event.
We recommend: How to change the language on VKontakte
Turn off notifications on your computer
Many people use social networks to collaborate or study. For example, they exchange their work, notes and ideas. For this reason, the VK tab is often open during the work process. To remove annoying messages or their sound, follow these steps:
- Go to your profile settings through the column of the same name in the menu.
- Go to notification options. This page contains a huge list of all kinds of settings. Using the “Site Alerts” block, you can disable the sound of notifications and display them as pop-up messages.
- Use the toggle switch to turn off notifications.
- Using other blocks on the same page, you can prohibit sending notifications about any event. For example, turn off notifications about likes or invitations to communities.
How to unsubscribe from emails
The VK security service automatically connects the mailing of letters about any events in the profile to the user’s email mailbox, if you specify it during registration. There are 2 ways to refuse this service.
- Open the letter that came from VK to your email. Scroll to the very bottom. Look for the small print that says “unsubscribe” and follow the instructions. They will open on a new website after clicking on the inscription.
- In the VKontakte notification settings, scroll to the very end of the page.
- In the “Email Alerts” block, in the “Notification frequency” column, select “Never notify.”
The developers of the social network make great efforts to ensure that users’ stay on the site is as comfortable as possible. You can make your profile even more comfortable for yourself by fine-tuning your alerts using the instructions provided.
Source: https://vkbaron.ru/akkaunt/kak-otklucit-uvedomlenia-v-vk.html
What do we have to do?
The developers are currently working on the bugs. You can try to return notifications to normal mode on your own. So far there are several tips from users of Apple devices, and these methods in most cases help resolve the issue. First, you need to make sure that the latest, most current versions of both VK and software are installed on your gadget.
- The first way is to check if notifications are turned on at all. And you shouldn’t be indignant, because most often this is precisely the problem. The user accidentally refuses to receive notifications without reading the information in the pop-up window, or the failure occurs automatically. In any case, the first thing you need to do is check the settings. Open the notification item in them and look for VK in the list of installed applications.
- If the corresponding option is active, go to the application itself and try the second method - check the VK settings. The reason that notifications on VKontakte stopped coming to the iPhone may lie in the application itself. In the push notification line we include everything that is necessary. To be sure, you can reboot the gadget.
- If this does not return everything to its place, we use the third method. You need to log out (exit) from the VKontakte application and log in again. After this, it is better to reboot the device.
- The fourth method is to delete the VKontakte application from your iPhone or iPad, and then after some time install it again in the AppStore.
If all these steps have been completed, and notifications on the iPhone “VKontakte” have stopped coming again, the problem is still in the server. You can notify the application developers about existing problems through the support service or in reviews on the AppStore and wait for Vkontakte to be corrected.
Good afternoon friends. In the previous post we learned how to do it correctly. In this lesson, before you start actively using the social network, we will spend a little more time on the technical aspects. In this article you will learn how to correctly set the VKontakte page settings.
So, what do these very VKontakte settings mean? Here we will learn how, if necessary, you can change your page credentials: password, email, phone number, etc. We'll talk about how to make security and privacy settings, how to set up alerts and create a user blacklist. It is recommended to perform all these steps immediately after and before you start actively using VKontakte.
Another interesting “trick” is changing the address of the VKontakte page. By default, the address is: domain/user id. “VK” allows you to replace it with a name consisting of Latin letters, numbers and “_” signs. To do this, you need to click “Change” and in the window replace the id with the word that you like best. I changed my ID to the words “sergey_vkazi”. Don’t forget to click the blue “Occupy Address” button. This action must be confirmed - you will receive a code in an SMS message, which you will need to enter in the field. After this, the address of my page took on the following form: https://vk.com/sergey_vkazi
Oh, by the way, don’t forget about tooltips. They are a great help if you don't know something or have forgotten something. You just need to hover the cursor over one or another item, and then a hint appears.
Security of the VKontakte page
The next section is the security of your VK page. Let's talk a little about how to improve the protection of your page.
Here you can set up login confirmation. Then, every time you enter the page you will have to enter the code received via SMS. Not entirely convenient, but very reliable protection against hacking and all sorts of dirty tricks. If you click the “Connect” button, the following window will open.
Here you need to read the terms and conditions carefully. If you enable this service, the password recovery service by phone number will become unavailable. Therefore, it is recommended to link the page to a current email address and indicate the correct data. If you have not yet linked your page to an email address, do so in the “General” section. There you will have to enter your password again and then confirm the action by clicking on the link in the letter that will be sent to the linked email address.
So, we want to improve the protection of the VK page. After linking it to your email mailbox, click the “Start setting up” button (see screenshot above), click the “Get code” button in the window that opens, and enter it in the input field. Afterwards we will receive a message from the administration that additional protection has been successfully connected and we will see the following window:
That’s it, click the “Finish setup” button. In the next window, click “Show list” of backup codes, and copy the backup codes somewhere. They are needed to enter if you do not have a mobile phone with you. Never show or share backup codes with anyone!
If you suddenly decide to cancel login confirmation, then you should click the “Disable login confirmation” button, enter the password in the window that opens and confirm the action.
To conclude our conversation about settings in this section, let’s talk about the “Security” window. Here you can see the latest activity (for example, I can see that the last activity was “ just now (Russia, Chrome Browser)
“. If you click on “Show activity history,” you can see from which browser, from which country and when it was done. If you suddenly see a suspicious browser or that the login was made, for example, from America, you should immediately sound the alarm. Most likely, you were just hacked.
Setting up privacy on VKontakte
Here we can configure the privacy of “VKontakte”. In simple terms, this section indicates who can see the basic information of your page, the list of groups and who can be seen in the list of friends and subscriptions, etc. There are four subsections in total: “My page”, “Posts on the page”, “Contact me” and “Other”. In general, everything is quite simple. Opposite each item there is a drop-down list where you can choose who, for example, will see this or that information on your page. If you select “Everyone except...” and “Some friends” in the drop-down list, you will have to select “favorite” friends from the list that you allow (or do not allow) to view your data.
At the very beginning, you can leave everything as is. When you get a little comfortable with VK, make best friends and, perhaps, ill-wishers, you will be able to adjust your privacy settings at any time - allow or deny something to someone.
At the end of the page privacy settings, I would like to say about the “See how other users see your page” function. It is at the very bottom of the section. If you enable this feature, you will be able to look at your page through the eyes of any user you select from your friends list (if the user is not on your friends list, then in the list field you should enter a link to that person’s page)
Setting up VKontakte alerts
We continue to consider the settings of the VKontakte page. The next section is VKontakte notifications. There are only four subsections, the first of which is “Alerts on the site.” Here (and in the following subsections) by default, all notifications are enabled (“All” is selected). There is nothing complicated about setting up alerts. You can look at them yourself, and if anything happens, turn off unnecessary notifications. Many, as a rule, have all notifications turned on so that the user can be aware of any actions and changes.
The last two subsections are about setting up alerts via SMS and email. If you want all notifications to be sent to you via SMS, you just need to check the “receive SMS alerts” box and click the “Save” button. If you want to receive notifications by email, select “Always notify” in the drop-down list.
Well, friends, we have looked at the basic settings of your VKontakte page. We will look at the remaining four sections – ““, Setting up applications,” “Mobile services” and “Payments and transfers” in more detail in the following articles, when we study the corresponding sections. In the meantime, that's all for today. We have set up our profile and filled out basic information about ourselves. In the following articles we will learn how to perform basic actions - adding friends, etc.
See you soon on the pages of my blog.